
Open-Source Internship opportunity by OpenGenus for programmers. Apply now.
Reading time: 30 minutes | Coding time: 10 minutes
Lets learn an application of OpenCV to realise how powerful it is. We will develop an application which will show a live sketch of your webcam feed. In this project we'll be using NumPy and OpenCV.
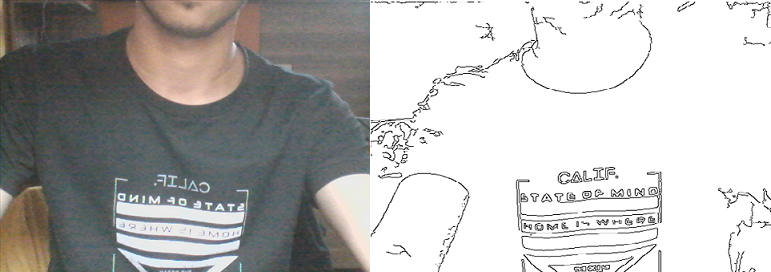
Following is the input (on left) from the webcam feed and the output (on right):
NumPy is the fundamental package for scientific computing with Python. It contains among other things:
- A powerful N-dimensional array object
- Sophisticated (broadcasting) functions
- Tools for integrating C/C++ and Fortran code
- Useful linear algebra, Fourier transform, and random number capabilities Besides its obvious scientific uses.
OpenCV (Open Source Computer Vision Library) is an open source computer vision and machine learning software library. It has over 2500 optimized algorithms which includes a comprehensive set of both classic and state-of-the-art computer vision and machine learning algorithms.
Let us get started
To get started, we need to install OpenCV and Numpy (assuming that you have Python installed). Follow the following steps:
pip install opencv-python --user
pip install numpy --user
Following it, we define OpenCV and Numpy in our code as follows:
import cv2
import numpy as np
Let us get started implementing our application in steps:
- Reading frame from the webcam
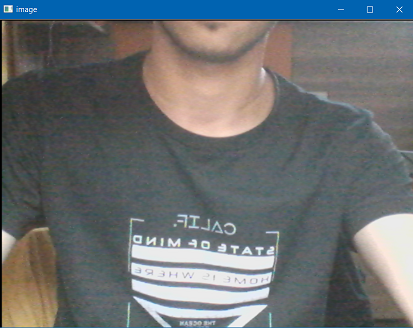
As we want to build a live app, we need to use the webcam and extract image frames from the video. This is done as follows:
cap=cv2.VideoCapture(0)
ret,frame=cap.read()
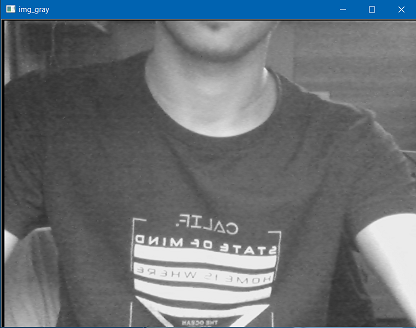
- Grayscaling Image
We shall cover the image to grayscale:
img_gray=cv2.cvtColor(image,cv2.COLOR_BGR2GRAY)
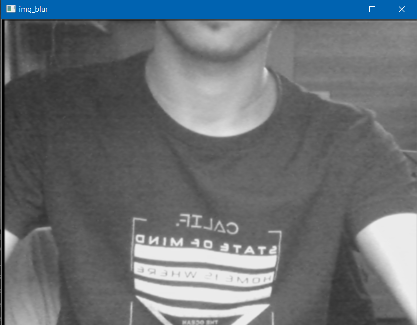
- Blurring Image
Following it, we will blur the image using Gaussian Blur which is provided by OpenCV.
img_blur=cv2.GaussianBlur(img_gray,(3,3),0)
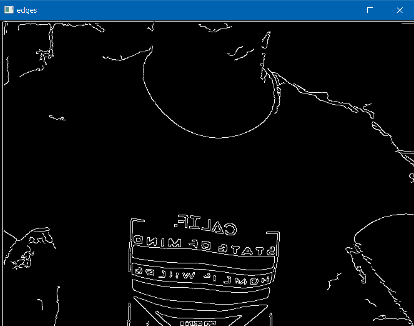
- Detecting Edges
We shall detect edges in the image using another function in OpenCV.
edges=cv2.Canny(img_blur,10,80)
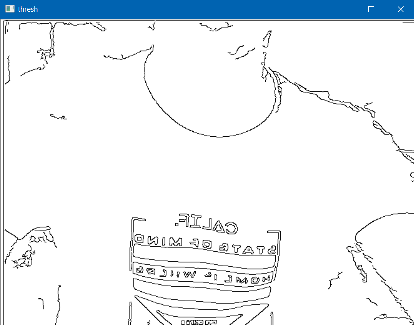
- Applying Threshold Inverse
We will invert the threshold as a finishing touch.
ret,mask=cv2.threshold(edges,50,255,cv2.THRESH_BINARY_INV)
Explanation
- Edge Detection & Image Gradients :
Edge Detection is a very important area in Computer Vision.Edges can be defined as sudden changes (discontinuities) in an image and they can encode just as much information as pixels.
Types of Edge Detection:
- Sobel – to emphasize vertical or horizontal edges
- Laplacian – Gets all orientations
- Canny – Optimal due to low error rate, well defined edges and accurate detection.
Canny is by far the best way to detect edges in an image .Here are the steps this algorithm follows :
- Applies gaussian blur
- Finds intensities and gradients in the image
- Removes pixels that are not edges
- Applies threshold (if a pixel is within lower and upper threshold then its an edge)
- Thresholding :
Thresholding is act of converting an image to a binary form. Thresholding is act of converting an image to a binary form.
cv2.threshold(image, Threshold Value, Max Value, Threshold Type)
Here , Threshold Value if the value of intensity after which the pixel will become white .Below the threshold all pixels will be black .
But, if the threshold type is Threshold Inverse then the scenario will be opposite.
Threshold Types:
- cv2.THRESH_BINARY - Most common
- cv2.THRESH_BINARY_INV
- cv2.THRESH_TRUNC
- cv2.THRESH_TOZERO
- cv2.THRESH_TOZERO_INV
Adaptive thresholding is also widely used and is by far the best way to apply threshold on images. It doesn't require us to input a threshold value and does the job by itself .This technique further has many threshold types . The best and the cleverest one is OTSU.
- Blurring :
Blurring is an operation where we average the pixels within a region (kernel).
img_blur=cv2.GaussianBlur(img_gray,(3,3),0)
Here (3,3) is the kernel size ie. the matrix of pixels over which blurring is performed .More is the number in the brackets more will be the blurring effect. In this project we are using Gaussian blur - it saves the edges to an extent and blurs the rest of the image.
Blurring Types:
- cv2.blur - Averages values over a specified window
- cv2.GaussianBlur – Similar, but uses a Gaussian window (more emphasis or weighting on points around the center)
- cv2.medianBlur – Uses median of all elements in the window
- cv2.bilateralFilter – Blur while keeping edges sharp (slower). It also takes a Gaussian filter in space, but one more Gaussian filter which is a function of pixel difference. The pixel difference function makes sure only those pixels with similar intensity to central pixel is considered for blurring. So it preserves the edges since pixels at edges will have large intensity variation.
Complete Code
Following is the complete code:
import cv2
import numpy as np

def sketch(image):
    #converting_image_to_grayscale
    img_gray=cv2.cvtColor(image,cv2.COLOR_BGR2GRAY)
    #blurring_image_to_remove_noise
    img_blur=cv2.GaussianBlur(img_gray,(3,3),0)
    #extracting_edges
    edges=cv2.Canny(img_blur,10,80)
    #applying_threshold_inverse
    ret,mask=cv2.threshold(edges,50,255,cv2.THRESH_BINARY_INV)
    return mask

# capturing_video_from_webcam
cap=cv2.VideoCapture(0)
# constant_image_capture_from_video
while True:
    ret,frame=cap.read()
    cv2.imshow('Live_Sketch',sketch(frame))
    # Key13==ENTER_KEY
    if cv2.waitKey(1)==13:
        break
# releasing_webcam
cap.release()
# destroying_window
cv2.destroyAllWindows()
Save it in a file named "app.py" and run it as:
python app.py
Output