
Get this book -> Problems on Array: For Interviews and Competitive Programming
Reading time: 30 minutes | Coding time: 10 minutes
In this, we have gone through the basic ideas, commands and work flow of Gerrit so that you can get comfortable using Gerrit at your first attempt. There are specific differences between Gerrit and other systems like GitLab and GitHub so you need to go through our guide so that you do not make any silly mistakes.
To carify, Gerrit is a code management system just like GitLab and GitHub.
We covered the following parts:
- Key ideas in Gerrit
- Basic System setting
- Add, commit and push changes
- Review a pull request
- Resolve a merge conflict
Key ideas in Gerrit
Key ideas in Gerrit are distinct from other systems like GitHub and GitLab and hence, deserves attention so that you can work on it smoothly.
- Each commit is a different pull request
- The commit message forms the details associated with pull request
Each pull request/ commit has either of the 4 possible states namely:
- WIP: Work in progress
- Ready: Opened for code review
- Private: a private change
- Submit: Merged into the project
There are two scores associated with a pull request review:
- Code-Review: (-2 or -1 or 0 or 1 or 2)
- Verified: (-1 or 0 or 1)
The meaning for the different scores of Code-Review are as follows:
- -2: This pull request should not be merged
- -1: Some changes in the pull request will be preferred
- 0: No opinion
- 1: Looks good but someone else must approve
- 2: Looks good and can be merged
The meaning for the different scores of Code-Review are as follows:
- -1: The code does not work as expected
- 0: I did not verify the code by running it
- 1: The code runs as expected
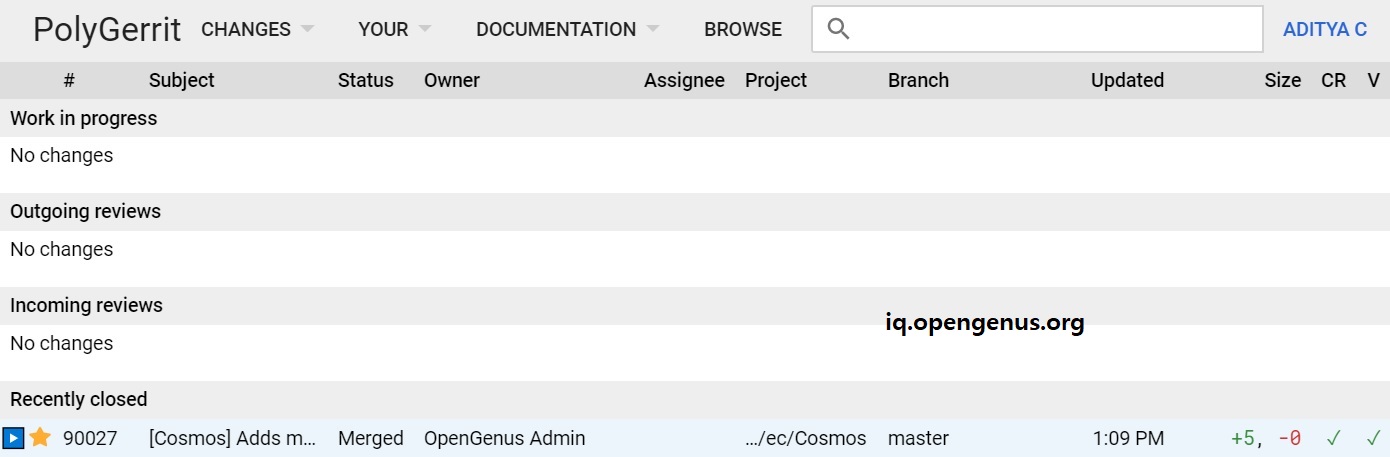
This is how the Gerrit homepage looks like:
Basic System settings
Before you go into adding code features to your project on Gerrit, you may need to make some basic changes to your system and your local git.
Make sure that the git config setting are as expected using the command:
git config --list
If something needs to be changed, you can do it using one of the following commands:
git config --global user.name "OpenGenus Admin"
git config --global user.email team@opengenus.org
git config --global core.editor vim
git config --global url."ssh://gerritgitmaster/".pushInsteadOf "ssh://gerritgit/"
Following this, you may wish to setup SSH key for your system if you do not want to enter your username and password for everytime you push or pull your project.
- Generate and copy your SSH key using the following command:
ssh-keygen
cat ~/.ssh/id_rsa.pub
- Add the SSH key to your Gerrit profile
Go to the homepage of Gerrit, click on your name (on the top right side), click on settings, a new page will open.
Click on "SSH key" tab, click on "New SSH key" and paste the key you have copied locally and save it.
You can add details of mirror and master server in the SSH config file at "~/.ssh/config". Sample content will be:
Host *
    ServerAliveInterval 120
    ServerAliveCountMax 300
Host gerrit*
    User opengenus_admin
    port 48921
Host gerritgit
    Hostname jpgerrit.opengenus.org
Host gerritgitmaster
    Hostname gerrit.opengenus.org
You can test your SSH setting using the following command:
ssh gerritgitmaster
Clone your project
You can find your project by going to the browse option in the header and search for your project. Once your project appears, click on it and it will take you to the project home page.
The first command you will see the clone command which is like this in our case:
git clone ssh://gerritgit/opengenus/ec/cosmos
You will get your local workspace. From here, you can directly start making changes or
Add and Commit your changes
Add and committing changes is same as in Git. You can, simply, "git add" the files that you need to track and then, "git commit" it when ready.
Commands:
git add .
// OR
git add <specific_file>

git commit
// OR
git commit --amend
For each commit, you need to add the change ID which can be done as follows:
gitdir=$(git rev-parse --git-dir);
scp -p -P 92734 aditya@gerrit.opengenus.org:hooks/commit-msg ${gitdir}/hooks/
Make sure to use your own port and hook URL.
Open a pull request on Gerrit
The difference in Gerrit is that git push command will open a new pull request for every commit on Gerrit. There is no concept of fork on Gerrit so no manual UI step is needed. So, be carefully to keep all changes for a single pull request on a single commit.
Command:
git push origin HEAD:refs/for/master
This will open a work in progress pull request. To open it for review, you need to add reviewers in the UI and submit it. Upon this, reviewers can review it by giving code review score and comments. You can click on the "Submit" button to merge your pull request.
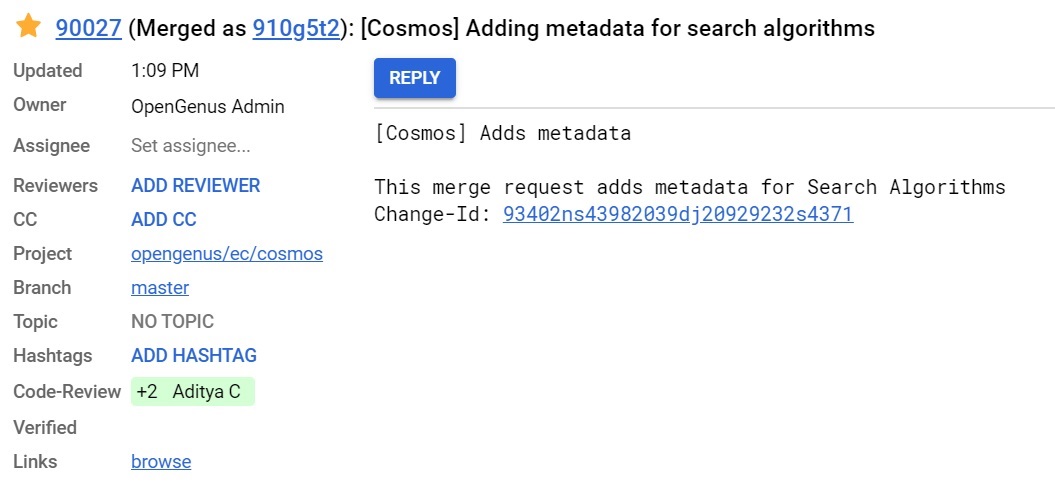
This is how a pull request looks like on Gerrit:
We can open a pull request directly for review from the command line as well. For that, the command will be:
git push origin HEAD:refs/for/master%ready
Similarly, we can add reviewers, give code review score, comment and other activity through the command line directly. This can be easier if done from the User Interface (UI) for now.
Review a pull request on Gerrit
To review a pull request on Gerrit, you can go to the project page and go through the files that has been changed.
On clicking on a line number, a dialog box will open and you can add your comment there. Once you have added all comments, you need to submit it by clicking on the "Reply" button on the top of the project page.
This will open another dialog box where you can add some note, add your code review score and submit it. Other reviewers and the developer who opened the pull request will receive an email notification.
Enjoy reviewing pull requests on Gerrit.
Resolve merge conflict on Gerrit
You can find that there is a merge request when you will try to rebase your pull request. You can rebase using the "rebase" button on the pull request page.
"Rebase" means to bring the other changes that has been merged into your version to ensure everything works fine together.
A merge conflict can be resolved on following the following steps:
- Update your local repository using "git fetch"
- Run a manual rebase using "git rebase"
- Resolve the conflicts using "git mergetool" or "git rebase --continue"
- Make code changes in the conflict part (list of files will be shown on command line)
- Commit the resolved code using "git commit --amend"
- Push a new patchset to Gerrit using "git push"
Commands:
git fetch
git rebase
git rebase --continue
git commit --amend
git push
With this, you will be able to resolve merge conflicts which can happen if there are multiple developers working on the same project.
With this, you have the basic knowledge of working on your project on Gerrit.