Open-Source Internship opportunity by OpenGenus for programmers. Apply now.
Reading time: 15 minutes
In this article, we will explore the git diff command and go at a deeper layer than git status. Git diff command show changes between the working tree and the index or a tree, changes between the index and a tree, changes between two trees, changes between two blob objects, or changes between two files on disk.
git diff 
The git status command is nice if you just want to see which files reside in which states, but what if you want to go the other direction and see more information than just what git status shows? Well, Git has a command for that too.
If the git status command is too vague, and you want to see the actual changes being made in these files and not just know which files have been changed, you can use the git diff command.
You can use git diff to answer two questions:
- what changes have I staged that are ready to be committed?
- what changes have I made, but not staged?
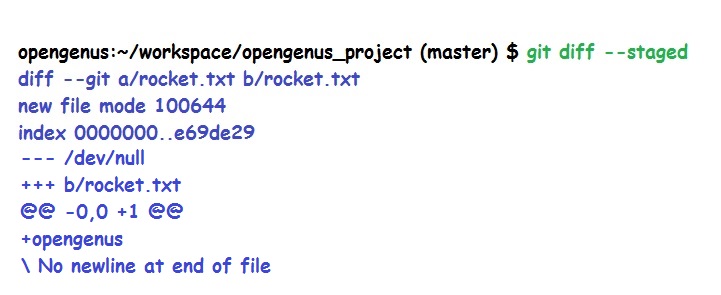
If we want to see the changes we've staged that will go into our next commit, we can use git diff --staged.
git diff --stagedThis command compares our staged changes to our last commit snapshot. When we run git diff --staged, we're going to see an interesting detailed response. So let's go over how to read this output.

The first thing we see are the compared file versions. Git diff is comparing file a with file b. Now in almost every case, file a and file b will be the same file, but just in different snapshot versions. This is shown with diff --git, and then file a followed by file b.
The next line is the file metadata. Now this is technical information of our files. The first two numbers are the hashes or IDs of the two file versions that are being compared. As we were briefly introduced to SHA1 hashes, git identifies a file object at a specific version by using the SHA1 hashes.
The last number is most likely going to be 100644. Now this is just an internal file mode identifier that represents a normal file. Now, there are other number identifiers which we will not explore now.
Next we see the change markers for file a and b. File version a is assigned with the minus symbol, and file version b is assigned with the plus symbol. Next there is the diff chunk, which is made up of two parts, the chunk header and the chunk changes. At the top of this chunk, is the chunk header, and the header is enclosed with two @ symbols on each side and will tell you which lines were changed in the file versions. File a is represented with a minus sign, and file b is represented with a plus sign. In this example, the +1 is saying that the plus sign, being file b, begins at line 1 and then has one line modified.
After the chunk header, we have the chunk changes that contain the actual line changes. Now this often includes a few lines of unchanged lines before or after the changes to help provide context of where these changes are being made in the files.
These changes will either have a minus or a plus sign in front of the change to show you what version that change is occurring in. However, for files with only one or two lines of content, these extra lines may not show up.
