
Get this book -> Problems on Array: For Interviews and Competitive Programming
Offline handwritten character recognition system is a model that is used to convert handwritten characters into digital text such that they can be used for further purposes such as storing important details or credentials, understanding text from ancient or really old papers etc.
What is Hindi OCR?
Hindi OCR is basically a model which is used to recognize handwritten Hindi (Devanagari) characters. Now when it comes to how good an OCR model is, the models developed for Indian languages have not shown quite good accuracy due to the complexity of the Indian languages. The text or characters of Hindi (and other Indian languages) are quite difficult to segment and evaluate due to their curvy and complex structures.
In this article, we will study about a model that is Neural network based and is trained on a dataset such that it is able to recognize Grayscale handwritten Hindi characters.
Idea behind project/Purpose
The main idea behind the project is that when it comes to developing OCR model for native languages, the accuracies achieved are quite less and hence this is the field which still needs development. Further the extension of this model (the one implemented here) can be recognition of entire words, sentences or even whole paragraphs.
Dataset
The dataset used in this model is taken from UCI machine learning repository. It contains around 92,000 handwritten Hindi character images. The dataset includes 46 classes of characters that includes Hindi alphabets and digits.
The dataset is divided into training set (85%) and test set (15%). The images are in .png format and of resolution 32x32.
For details about the dataset, checkout the following link:
https://archive.ics.uci.edu/ml/datasets/Devanagari+Handwritten+Character+Dataset
About Model
Overview
The model we are about to implement is based on Convolutional Neural network and we will be implementing a four layered structure. Consider the below summary image:
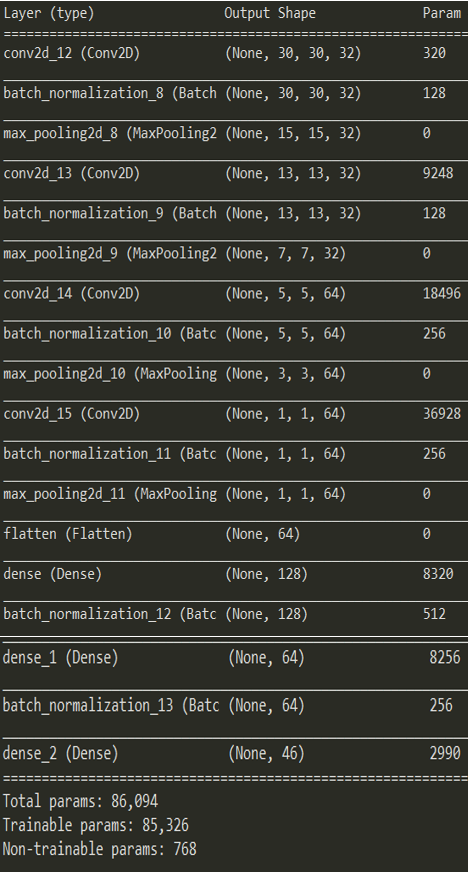
Now from the above image we can see that for each layer, first we have the convolutional layer and each layers is followed by batch normalization and max pooling. The reason for applying batch normalization is because it helps to increase the stability of a neural network and helps our model to work with better speed and provide more efficient results.
After four of these layers (i.e. conv + batch_norm + max_pooling) we have the flatten operation. Finally we will implement three fully connected layers that will help our model detect the correct character.
Required Libraries
The model is implemented in Python programming language. It uses libraries such as numpy for numerical computations, and most importantly keras (tensorflow backend).
import os
import h5py
import numpy as np
from keras.preprocessing.image import ImageDataGenerator
from keras import optimizers
from tensorflow.keras.models import Sequential
from tensorflow.keras.layers import Convolution2D,MaxPooling2D,Activation, Dropout, Flatten, Dense, BatchNormalization
Data Processing
The model is based on Convolutional Neural networks. First the image is preprocessed. In preprocessing, if the image is not of the required size as per the need for the CNN, then it is resized to the required format. Data augmentation is also applied before training the network. Data augmentation is basically a technique or strategy which is used to increase the diversity of the data. So, what we are trying to do is increase the dataset size so that the neural network can have better and more data to train on and hence will achieve more test accuracy.
Then we load the dataset and create the training and test set using the code below:
The following code is required:
trainDataGen = ImageDataGenerator(
		rotation_range = 5,
		width_shift_range = 0.1,
		height_shift_range = 0.1,
		rescale = 1.0/255,
		shear_range = 0.2,
		zoom_range = 0.2,
		horizontal_flip = False,
		fill_mode = 'nearest')

test_datagen = ImageDataGenerator(rescale=1./255)
trainGenerator = trainDataGen.flow_from_directory(
			"DevanagariHandwrittenCharacterDataset/Train",
			target_size = (32,32),
			batch_size = 32,
			color_mode = "grayscale",
			class_mode = "categorical")
validation_generator = test_datagen.flow_from_directory(
			"DevanagariHandwrittenCharacterDataset/Test",
			target_size=(32,32),
			batch_size=32,
			color_mode = "grayscale",
			class_mode= 'categorical')
Convolutional Neural Network
Next comes the most important part i.e. the CNN layers. Now, there are some important steps involved in CNN. The main aim of CNN is to extract the essential features from the images which can be used for recognizing the given image. The steps involved in CNN are convolution operation which basically uses kernel for feature extraction. Pooling (here max pooling) which helps in preserving the essential features and finally flattening in which the pooled feature maps obtained from CNN are converted into a vector which is given to further network (here Fully connected layers).
Here I have implemented a four layered CNN model.
model = Sequential()

#Layer1----------------------------------------------------------
model.add(Convolution2D(filters = 32,
			kernel_size = (3,3),
			strides = 1,
			activation = "relu",
			input_shape = (32,32,1)))

model.add(BatchNormalization())
model.add(MaxPooling2D(pool_size=(2, 2),
			strides=(2, 2),
			padding="same"))

#Layer2-------------------------------------------------------------
model.add(Convolution2D(filters = 32,
			kernel_size = (3,3),
			strides = 1,
			activation = "relu",
			input_shape = (32,32,1)))
model.add(BatchNormalization())
model.add(MaxPooling2D(pool_size=(2, 2),
			strides=(2, 2),
			padding="same"))


#Layers 3-----------------------------------------------------------
model.add(Convolution2D(filters = 64,
			kernel_size = (3,3),
			strides = 1,
			activation = "relu"))
model.add(BatchNormalization())
model.add(MaxPooling2D(pool_size=(2, 2),
			strides=(2, 2),
			padding="same"))


#Layer 4--------------------------------------------------
model.add(Convolution2D(filters = 64,
			kernel_size = (3,3),
			strides= 1,
			activation = "relu"))
model.add(BatchNormalization())
model.add(MaxPooling2D(pool_size=(2, 2),
			strides=(2, 2),
			padding="same"))
model.add(Flatten())
Fully Connected layers
After the feature extraction part is done by the CNN layers, we will give the flattened output to the Fully connected layers. Here I have implemented three fully connected layers. For the first two layers, Relu is used as the activation function with configuration of each can be seen in the code below. The third and final layer uses SoftMax activation function as the final output is a vector of size 46 (one for each class of character) containing the probability of each character and the output is provide using this vector.
#Fully Connected Layer 1----------------
model.add(Dense(128,
		activation = "relu",
		kernel_initializer = "uniform"))
model.add(BatchNormalization())

#Fully Connected Layer 2----------------
model.add(Dense(64,
		activation = "relu",
		kernel_initializer = "uniform"))
model.add(BatchNormalization())

#Fully Connected Layer 3----------------
model.add(Dense(46,
		activation = "softmax",
		kernel_initializer = "uniform"))

#Compile Model---------------------------
model.compile(optimizer = "adam",
		loss = "categorical_crossentropy",
		metrics = ["accuracy"])

#Fit model on the loaded dataset---------
res=model.fit_generator(
		trainGenerator,
		epochs = 25,
		steps_per_epoch = 2444,
		validation_data = validation_generator,
		validation_steps = 432
		)
For training the model, the optimizer used is the famous “adam” optimizer and the loss function involved is “categorical crossentropy”.
Testing
For testing single images, check out the following github link:
https://github.com/darklord0303/Hindi-OCR
Sample Input/Output
Input image:
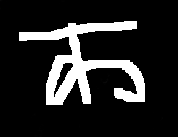
Output:

Conclusion
The implemented model provides an accuracy of 98.94% in 25 epochs. There are similar models such as Densenet which provies less accuracy than this and models like AlexNet that provides accuracy around 98%.
Note: This model is only able to recognize single characters. The image should be first converted into grayscale format first.
For complete details of the model implementation, check out the below github link:
https://github.com/darklord0303/Hindi-OCR
Read more:
- Optical Character Recognition (OCR) by Apoorva Kandpal (OpenGenus)
- Batch Normalization by Apoorva Kandpal (OpenGenus)
- Convolutional Neural Networks (CNN) by Piyush Mishra and Junaid N Z (OpenGenus)
- Building a Convolution Neural Network (CNN) for handwritten digit recognition by Piyush Mishra (OpenGenus)