
Open-Source Internship opportunity by OpenGenus for programmers. Apply now.
Reading time: 30 minutes | Coding time: 15 minutes
In this post, we will look at Region-based Convolutional Neural Networks (R-CNN) and how it used for object detection. We'll see why the R-CNN came into the picture when CNNs were already into existence. We will implement a demo in PyTorch as well.
What is Object Detection ?
As per Wikipedia- Object detection is a computer technology, which is related to computer vision and image processing that deals with detecting instances of semantic objects of a certain class (like humans, buildings, cars or animals, etc.) in digital images and videos.
It is very easy for humans to detect and to identify the objects present in an image. Now, with the availability of huge amounts of data and high computing resources, it is relatively very easy yo train computers to detect and classify different objects present in an image with high accuracy. The problem of identifying the location of an object(given the class) in an image is called localization.
During the deep learning era, a variety of state of the art approaches came into existence which were able to solve object detection problem with high accuracy. Some of these are- CNN, R-CNN, variants of R-CNN (fast, faster and mask), SSD, YOLO.
Object Detection using CNN
Now we will see, how CNNs can be used to detect and classify objects in an image. CNNs are feed-forward artificial neural networks where connections between the nodes do not form a cycle. The basic architecture of CNN comprises of different layers like:
- CONVOLUTIONAL LAYER
- POOLING LAYER
- OUTPUT LAYER (Fully Connected Layer)
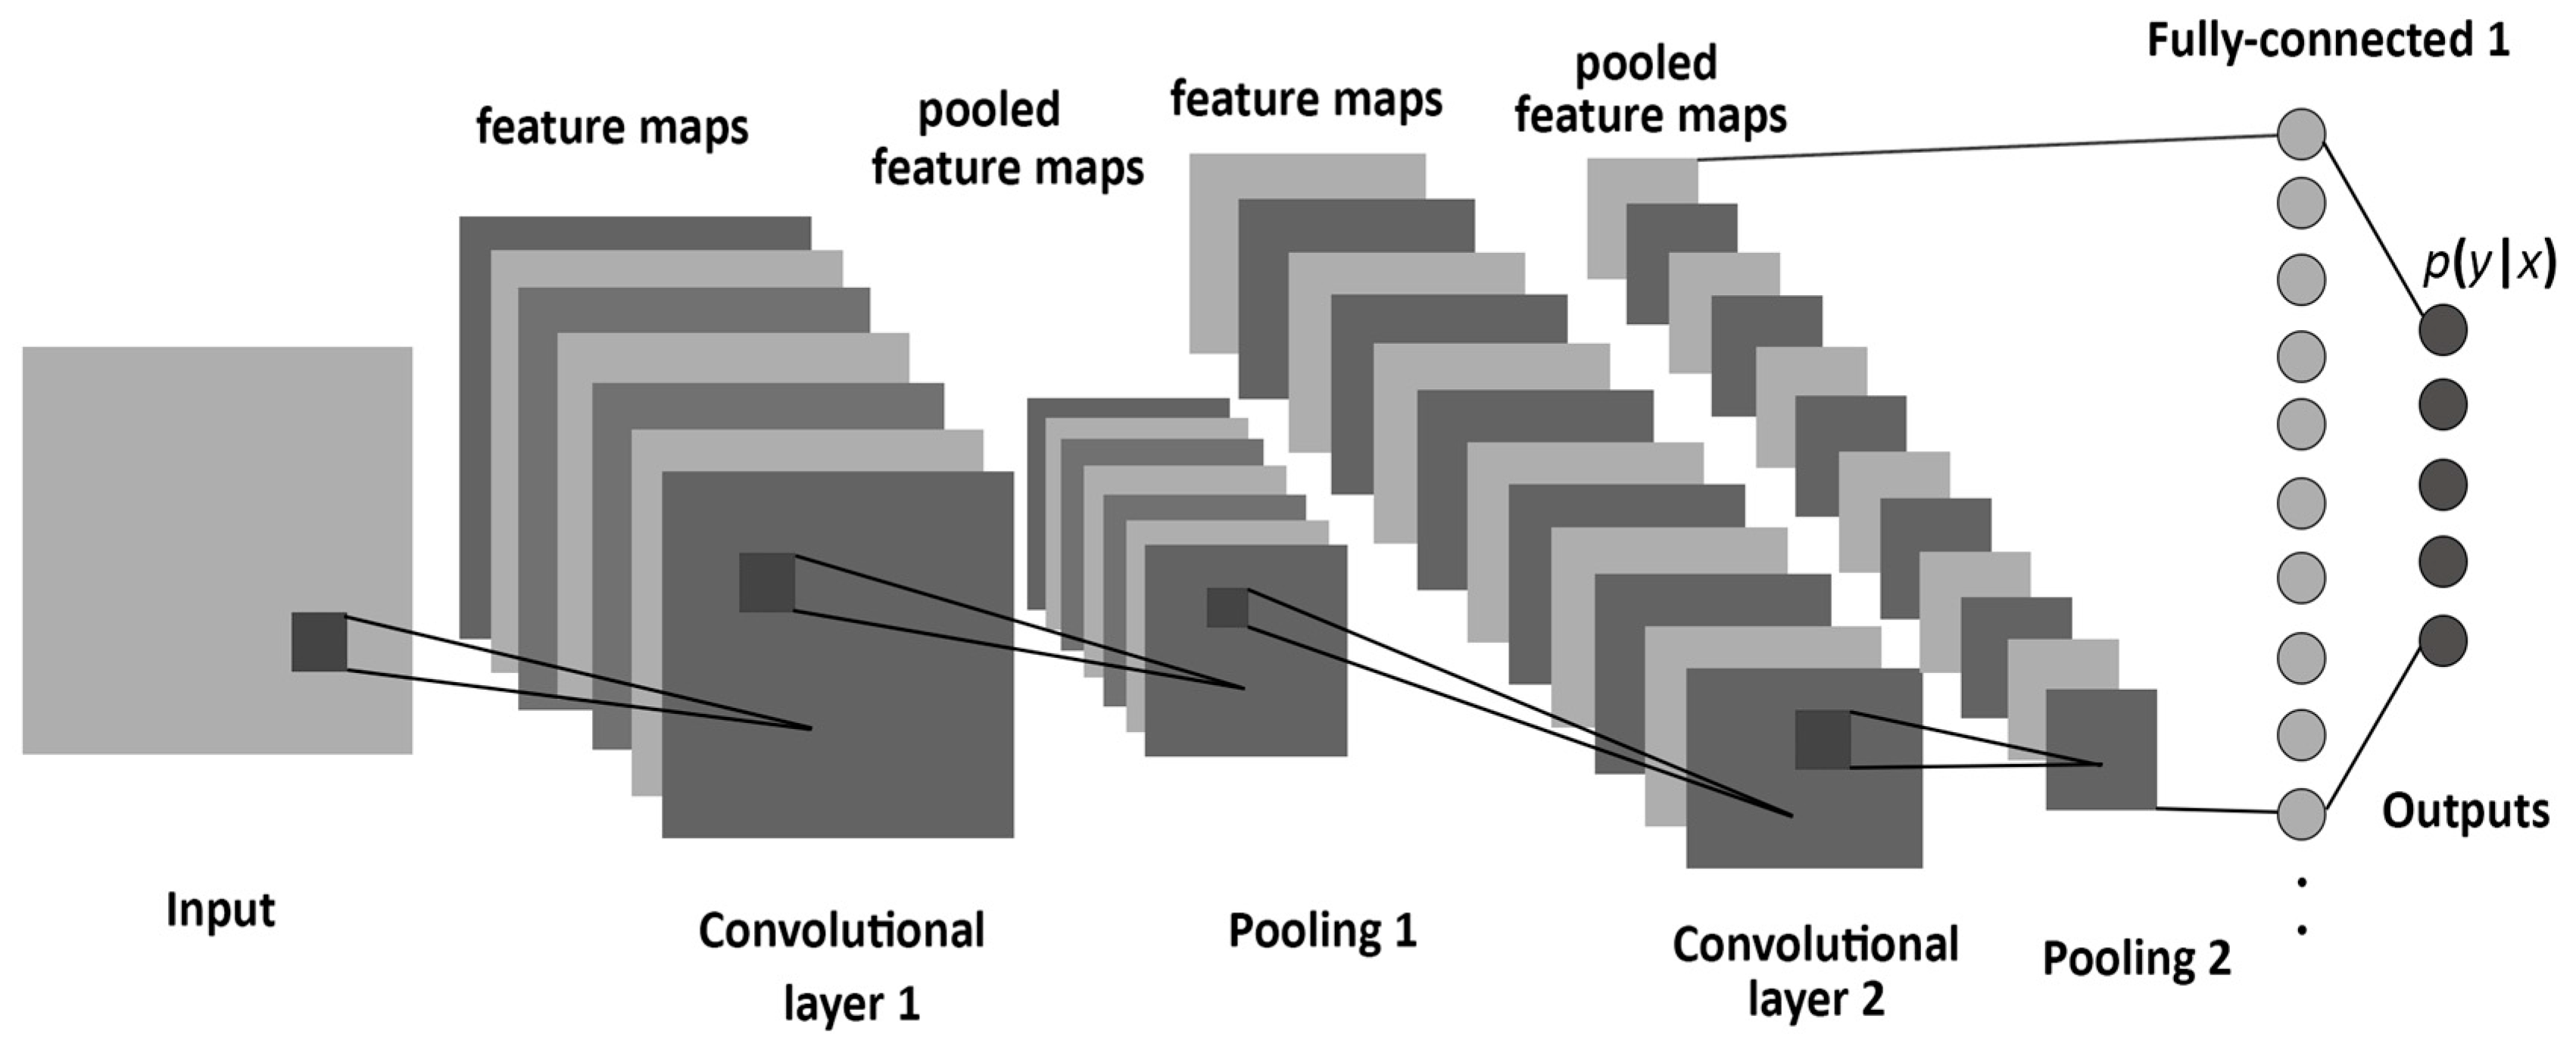
The convolutional and pooling layers act as a feature extractor and the fully connected layer performs the non-linear transformations of the extracted features and acts as the classifier.
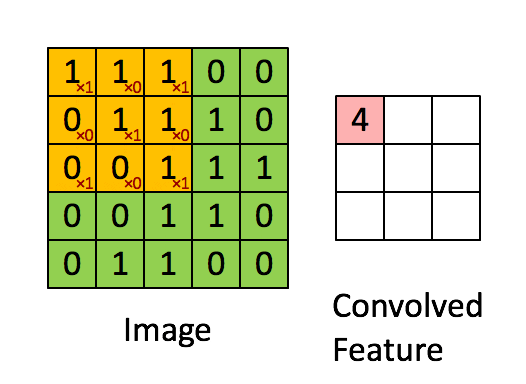
In the convolutional layer, convolution operation takes place which is nothing but a weighted sum between two functions.
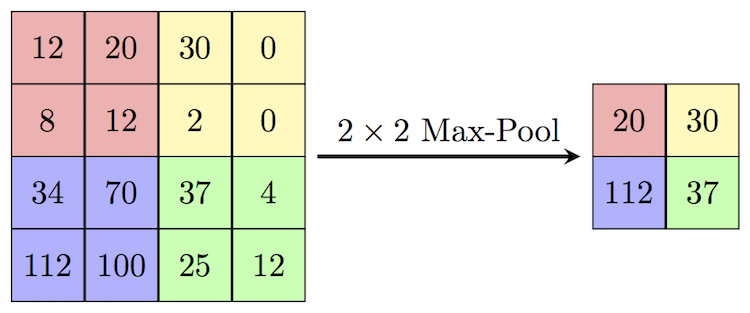
After the convolutional layer, the pooling layer is used to reduce the number of trainable parameters. The most common form of pooling is the Max-Pooling layer.
After using multiple convolution and pooling layers, the output is required in the form of a class. The convolution and pooling layers are used to only extract features and reduce the number of parameters from the original image. But, in order to obtain the final output, a fully connected layer is applied to generate an output equal to the number of classes we need.
Now, let's look at the steps involved in detecting and classifying objects in an image-
- Step1- Input an image.
- Step2- Divide image into different regions.
- Step3- Consider each region as a separate image & pass these regions to CNN which will classify them into different classes.
- Step4 - Combine the regions to obtain the original image with objects detected in it.
Limitations of CNN for object detection
- Objects present in an image may have different aspect ratios and spatial locations like in some cases object is very big and occupy the whole or in some case, it might be very small and occupies a very small region of the image. The shape of the objects is also variable in nature.
- Due to the above reasons, a large number of regions are required to detect and classify the objects accurately which will result in massive computation time.
- Thus, to reduce the number of regions, R-CNN is used which selects the regions using a proposal method.
Detecting objects using R-CNN
To overcome the problems faced in CNN, R-CNN was adopted. Girshick et al. proposed a method where Selective Search is used to extract just 2000 regions from the image which are known as region proposals. While in CNN we have to deal with the classification of a large number of regions but now in R-CNN we only need to work with 2000 regions.
These 2000 region proposals are generated using the selective search algorithm. The 4 regions which form an object can be regarded as - varying scales, colors, textures, and enclosure. The selective search tries to identify such patterns in the image and using this it proposes different regions. Selective search comprises of various steps-
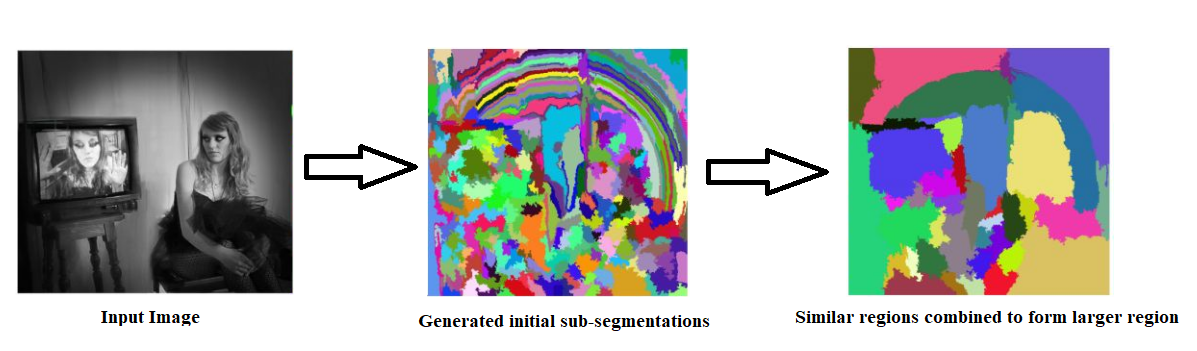
- Step1- Input an image and generate initial sub-segmentations to obtain multiple regions from the image.
- Step2- Combine similar regions to form a larger region that is based on the colour similarity, texture similarity, size similarity, and shape compatibility.
- Step3- The regions now produce the final object locations (Region of Interest).
Selective Search
Selective Search is a region proposal algorithm with a high recall and is used in object detection. The algorithm inspires from the hierarchical computing and grouping of similar regions based on the colour, texture, size & shape compatibility.
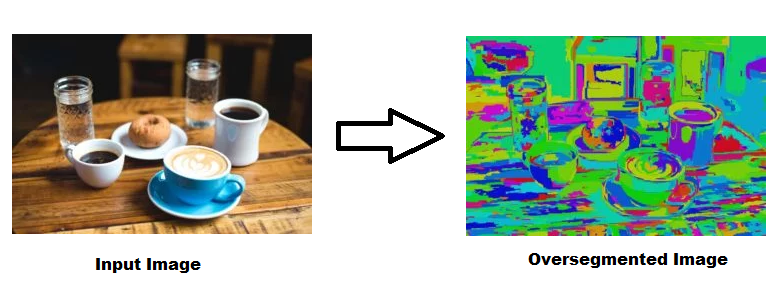
It begins by over-segmenting the image based on the intensity of the pixels using a graph-based segmentation method by Felzenszwalb and Huttenlocher. It uses oversegments from Felzenszwalb and Huttenlocher’s method as an initial seed. After passing an input image, the oversegmented image is shown-
Selective Search algorithm takes the oversegments as initial inputs and then perform the following procedure-
- Step1- Adding all bounding boxes corresponding to the segmented parts to the list of regional proposals.
- Step2- Grouping of adjacent segments based on the similarity.
- Step3- Go to step 1.
Note- Selective search uses 4 similarity measures, that are related to color, texture, size and shape compatibility.
During each iteration, larger segments are formed & added to the list of region proposals. Thus, a bottom-up approach is incorporated to create region proposals from smaller segments to larger segments and this is referred to as computing “hierarchical” segmentations using Felzenszwalb and Huttenlocher’s oversegments.
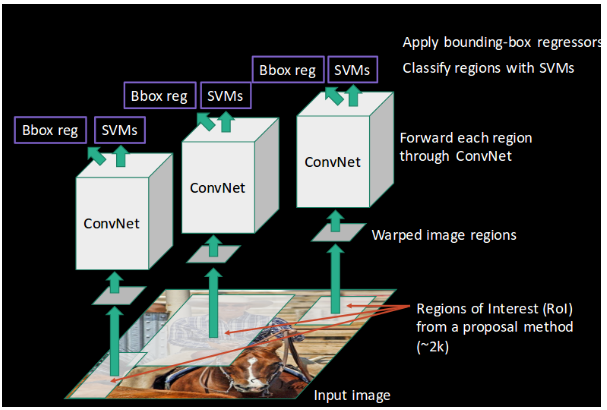
Now, to detect objects using R-CNN a series of steps takes place-
- A pre-trained CNN is taken, which is retrained on the last layer of the network based on the number of classes which are needed to be detected.
- Now, the ROI (Region of Interest) for every image is taken & then these regions are reshaped to match as per the size of CNN.
- Now regions are obtained, so a Linear Support Vector Machine (SVM) classifier is trained to classify the objects and background, i.e., for each class, one binary SVM is trained.
- In the last step, a linear regression model is trained to output tighter coordinates for the box once the object has been classified in the image.
The above steps can be illustrated pictorially.
Limitations of R-CNN for object detection
- Even though the number of regions has been reduced to 2000 per image, it takes an enormous amount of time to classify these regions.
- Not possible to implement for real-time applications, since it takes around 47 seconds to predict for a new test image.
- The selective search algorithm is a fixed algorithm, thus no learning takes place in that stage which in turn leads to generating bad candidate region proposals.
Implementation in PyTorch
First, we will import all the necessary packages required.
from PIL import Image
import matplotlib.pyplot as plt
import torch
import torchvision.transforms as T
import torchvision
import torch
import numpy as np
import cv2
In this step, we are using the weights of a pre-trained Faster-RCNN model. The model.eval() line is to use the model for inference.
model = torchvision.models.detection.fasterrcnn_resnet50_fpn(pretrained=True)
model.eval()
These all are the classes/categories of objects for the pre-trained model is specified using PyTorch official documentation.
#  There are some N/A's, For complete list check https://tech.amikelive.com/node-718/what-object-categories-labels-are-in-coco-dataset/
COCO_INSTANCE_CATEGORY_NAMES = [
    '__background__', 'person', 'bicycle', 'car', 'motorcycle', 'airplane', 'bus',
    'train', 'truck', 'boat', 'traffic light', 'fire hydrant', 'N/A', 'stop sign',
    'parking meter', 'bench', 'bird', 'cat', 'dog', 'horse', 'sheep', 'cow',
    'elephant', 'bear', 'zebra', 'giraffe', 'N/A', 'backpack', 'umbrella',
    'N/A','N/A','handbag', 'tie', 'suitcase', 'frisbee', 'skis', 'snowboard',
    'sports ball','kite', 'baseball bat', 'baseball glove', 'skateboard',
    'surfboard', 'tennis racket','bottle', 'N/A', 'wine glass', 'cup', 'fork',
    'knife', 'spoon', 'bowl','banana', 'apple', 'sandwich', 'orange',
    'broccoli', 'carrot', 'hot dog', 'pizza','donut', 'cake', 'chair', 'couch',
    'potted plant', 'bed', 'N/A', 'dining table','N/A', 'N/A', 'toilet', 'N/A',
    'tv', 'laptop', 'mouse', 'remote', 'keyboard', 'cell phone','microwave', 'oven',
    'toaster', 'sink', 'refrigerator', 'N/A', 'book',
    'clock', 'vase', 'scissors', 'teddy bear', 'hair drier', 'toothbrush'
]
This function is to get the prediction for a given image.
It accepts two parameters- image path and a threshold value.
If the score obtained is greater than a certain threshold than a box is drawn on the image for that particular entity.
def get_prediction(img_path, threshold):
  """
    parameters:
      - img_path - path of the input image
      - threshold - threshold value for prediction score
    method:
      - Image obtained from image path
      - Image converted to image tensor using PyTorch's Transforms
      - Image passed through model to get predictions
      - class, box coordinates are obtained, but only prediction score > threshold
        are chosen.

  """
  img = Image.open(img_path)
  transform = T.Compose([T.ToTensor()])
  img = transform(img)
  pred = model([img])
  pred_class = [COCO_INSTANCE_CATEGORY_NAMES[i] for i in list(pred[0]['labels'].numpy())]
  pred_boxes = [[(i[0], i[1]), (i[2], i[3])] for i in list(pred[0]['boxes'].detach().numpy())]
  pred_score = list(pred[0]['scores'].detach().numpy())
  pred_t = [pred_score.index(x) for x in pred_score if x>threshold][-1]
  pred_boxes = pred_boxes[:pred_t+1]
  pred_class = pred_class[:pred_t+1]
  return pred_boxes, pred_class
The function is for getting the predictions using the pre-trained model.
The parameters are image path, threshold value, thickness of the box to be drawn, text size and thickness of text.
# Getting prediction using pretrained Faster-RCNN ResNet-50 model
def object_detection_api(img_path, threshold=0.5, rect_th=3, text_size=3, text_th=3):
  """
  object_detection_api
    parameters:
      - img_path - path of the input image
      - threshold - threshold value for prediction score
      - rect_th - thickness of bounding box
      - text_size - size of the class label text
      - text_th - thickness of the text
    method:
      - prediction is obtained from get_prediction method
      - for each prediction, bounding box is drawn and text is written
        with opencv
      - the final image is displayed
  """
  boxes, pred_cls = get_prediction(img_path, threshold)
  img = cv2.imread(img_path)
  img = cv2.cvtColor(img, cv2.COLOR_BGR2RGB)
  for i in range(len(boxes)):
    cv2.rectangle(img, boxes[i][0], boxes[i][1],color=(0, 255, 0), thickness=rect_th)
    cv2.putText(img,pred_cls[i], boxes[i][0], cv2.FONT_HERSHEY_SIMPLEX, text_size, (0,255,0),thickness=text_th)
  plt.figure(figsize=(20,30))
  plt.imshow(img)
  plt.xticks([])
  plt.yticks([])
  plt.show()
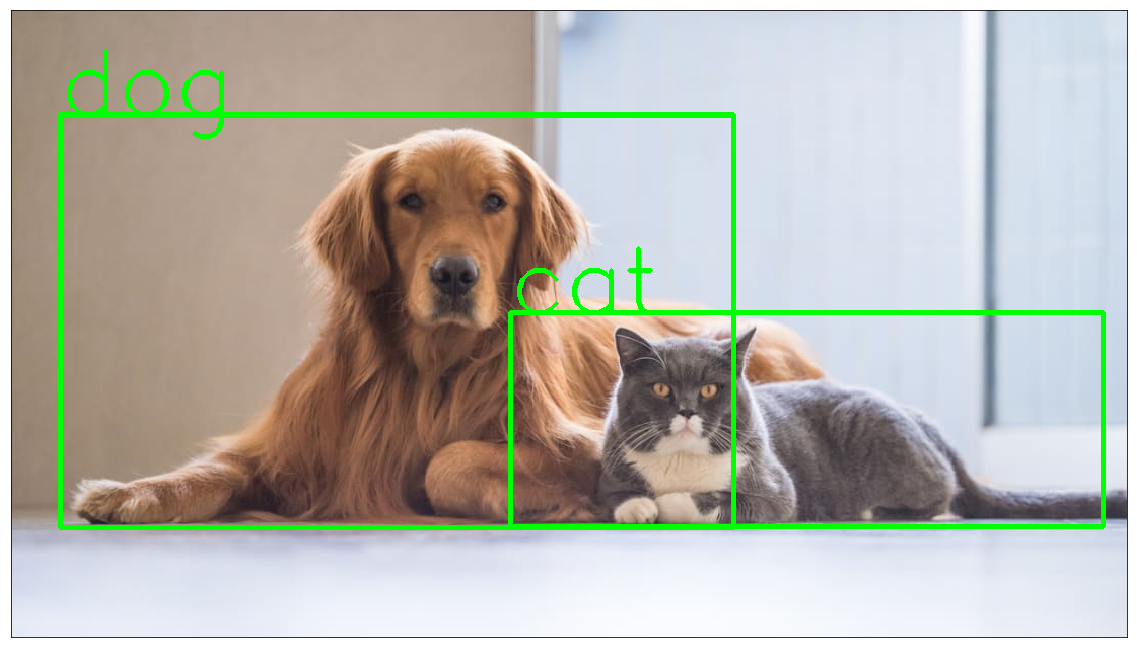
Now, we download an image for the inference purpose. After saving the image, we pass it to the object_detection_api function to get the required image with objects detected on it.
# downloading image for inference
!wget https://images2.minutemediacdn.com/image/upload/c_crop,h_706,w_1256,x_0,y_64/f_auto,q_auto,w_1100/v1554995050/shape/mentalfloss/516438-istock-637689912.jpg -O test.jpg
object_detection_api('./test.jpg', threshold=0.8)
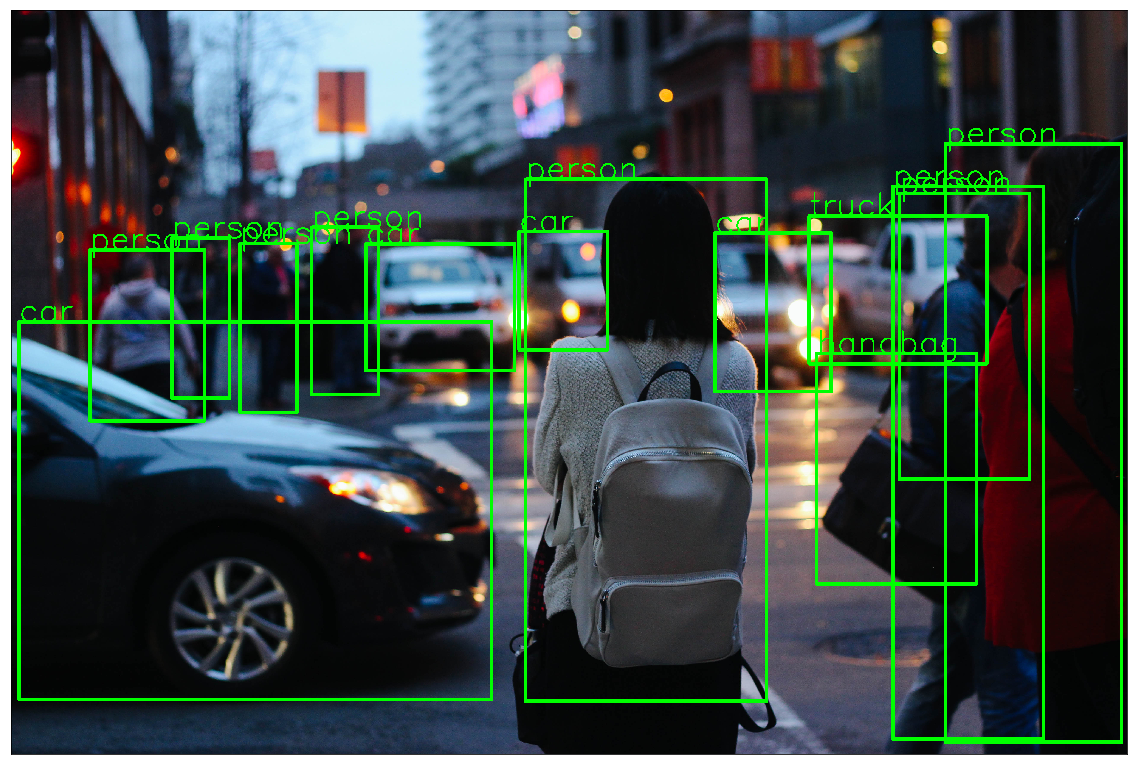
!wget https://images.unsplash.com/photo-1458169495136-854e4c39548a -O traffic_scene2.jpg
object_detection_api('./traffic_scene2.jpg', rect_th=15, text_th=7, text_size=5, threshold=0.8)
Conclusion
The R-CNN was adopted for object detection due to a large number of regions in CNN. However, it still takes much time in R-CNN to predict for a new test image. Thus, it leads to variations of R-CNN like Fast R-CNN, Faster R-CNN, Mask R-CNN, which are more efficient compared to previous versions. Finally, we saw a PyTorch implementation for object detection.