
Open-Source Internship opportunity by OpenGenus for programmers. Apply now.
Image preprocessing has been an integral part of computer vision and and can help boost the performance of the machine learning models significantly. Applying different types of filters to our image is what it means to perform image processing. Filters can help reduce the amount of noise in the image and help enhance their features.
In this article we will be focussing on sharpening filters.
- Sharpening filters makes transition between features more recognizable and obvious as compared to smooth and blurry pictures.
- What happens when an image is passed through a sharpening filter?
- The brighter pixels are made more brighter(boosted) as compared to its neighbours.
Sharpening or blurring an image can be reduced to some matrix arithematic operations applied to the image.
Applying a filter to our image means we perform convolution operation of our image with a nxn kernel. A kernel is a nxn dimension square matrix.
Convolution and Kernel
Each image can be represented as an matrix with its features being represented as numerical values and thus for extracting or enhancing different features , we perform convolution with different types of matrices known as kernels.
Convolution is the process of adding each element of the image to its local neighbors, weighted by the kernel. This is related to a form of mathematical convolution. The matrix operation being performed—convolution—is not traditional matrix multiplication, despite being similarly denoted by "*".
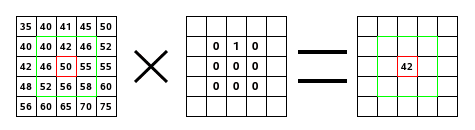
Now the kernel is what that decides the type of operation we are performing namely sharpening , blurring , edge detection , gaussian blurr etc.
Example of a sharpening kernel is shown below :
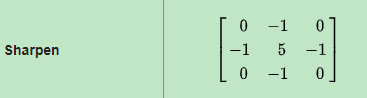
Sharpening
-
Sharpening as name suggests is used to sharpen and highlight the edges and make the transitioning of features and details more significant. However sharpening doesn't take into account whether it is highlighting the original features of the image or the noise associated with it. It enhances both.
-
Blurring vs Sharpening
Blurring : Blurring/smooth is done in spatial domain via taking average of the pixels of its neighbours , thereby producing a blurring effect. It is a process of integration.
Sharpening : Sharpening is used to find the difference by the
neighborhood and enhancing them even more. It is a process of differentiation.
Different types of Sharpening Filters
1) Unsharp Making and High Boost Filtering
We can sharpen an image or perform edge enhancement using a smoothing filter.
- Blur the image. Blurring means supressing most of high frequency components.
- Output (Mask) = Original Image - Blurred image. This output now contains now contains most of the high frequency components that were blocked by the blurring filter.
- Adding the mask to original image will enhance the high frequency components.
Since we are using blurred image for creating our custom mask , this process is known as UNSHARP MASKING.
Thus Unsharp Mask m(x , y) can be represented as :

- f(x,y) = original image.
- fb(x,y) = blurred image.
Add this mask back to the original image resulting in enhanceed high frequency components.

k specifies what weightage shoould be given to the mask being added.
- k = 1 represents Unsharp Masking.
- k > 1 represents High Boost Filtering because we are boosting high frequency components by assigning more weights to the mask(edge features) of the image.
If the image contains noise, this method will not produce satisfactory results, like most of the other sharpening filters.
Instead of subtracting the blurred image from the original, we can directly use a negative Laplacian filter to obtain the mask.
2) Laplacian Filters
A Laplacian Filter is a second order derivative mask. It tries to take out the INWARD edges and the OUTWORD edges. This second order derivative changes helps to find out whether the changes we are observing are due to pixel change of continous regions or from an edge.
A general Laplacian kernel contains a positive values at the center and negative values in cross pattern.
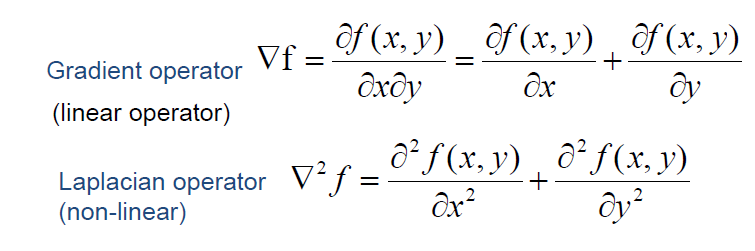
Now to go into the derivation of this kernel matrix we need to be familiar with partial derivatives and Laplacian operators.
Let us consider our image as function of two variables , f(x , y).
We will be dealing with partial derivatices along the two spatial axes.
Discrete form of Laplacian
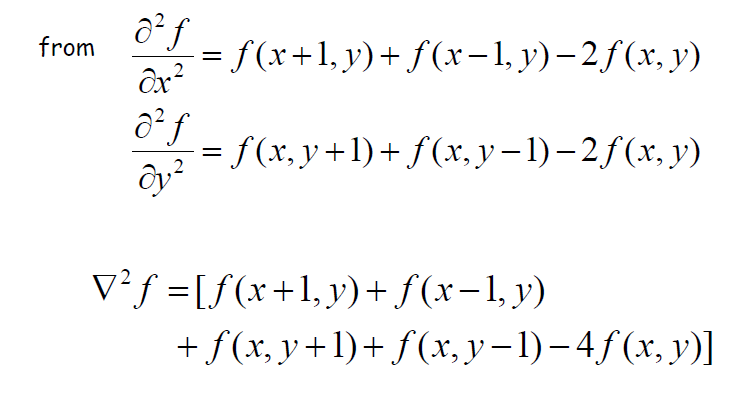
Resultant resultant Laplacian Matrix

Effects of Laplacian Operators
- It highlights and enhances the gray discontinuities.
- It deemphasizes contininous region (region without edges) i.e with slowly varying derivatives.
For the purpose of our code we are gonna use some approximate Laplacian Filters.
Let us perform sharpening using different methods
Using OpenCV
OpenCV is a python based library designed to solve computer vision based problems.
Let us have a look at the code below and then understand what's happening.
#Importing libraries)
import cv2
import numpy as np
from google.colab.patches import cv2_imshow

#Read input image
img = cv2.imread('img2.jpg')
img = cv2.resize(img , (400 , 400))

#Display the input image)
cv2_imshow(img)

#Let's make a kernel which we will slide over our image(convolution))
kernel = np.array([[-1 , -1 , -1] , [-1 , 9 , -1] ,[-1 , -1 , -1]])

#Now we will perform convolution using open cv for shapening ur image)
sharp_img = cv2.filter2D(img , -1 , kernel = kernel)
cv2_imshow(sharp_img)
-
First we are importing the libraries required to perform sharpening on our image.
OpenCV -> For operations on image
Numpy -> For performing fast matrix operations -
cv2.imread -> To read the input image in the form of numpy array from our disk.
cv2.resize -> To resize our image to fit in(400, 400) dimension.

-
kernel -> kernel is 3X3 matrix which we define as per our need to slide over the image for convolution operation.
-
cv2.filter2D -> Opencv provides us with a function called filter2D to convolve a kernel with an image.
It takes as input 3 features :- img -> input image
- ddepth -> representing depth of output image
- kernel-> convolution kernel

This is how we can perform sharpening using OpenCV.
We can play around with the kernel to produce different levels of sharpened images by changing the magnitudes of kernel matrix.
Using PIL
Pillow is Python Imaging Library(PIL) which provides support for opening , manipulating and saving images.
We will show how to use PIL for providing a sharpening effect to our images.
#Importing libraries
from PIL import Image
from PIL import ImageFilter

#Open image using Image class
img = Image.open('img3.png')

#Applying sharpening filter to our image
sharp1 = img.filter(ImageFilter.SHARPEN)

sharp2 = sharp1.filter(ImageFilter.SHARPEN)
-
Import libraries
Image -> From PIL module we import Image class
ImageFilter -> ImageFilter class is imported for various filters it provides. -
Image.open() -> It reads the image file and can read over 30 different formats.
Original Image

- ImageFilter provides different pre-defined filters like sharpen, blur etc which can be used with the filter() method.
- We sharpen our image twice and store the resulting image in variables sharp1 and sharp2.
Image after 1st sharp operation
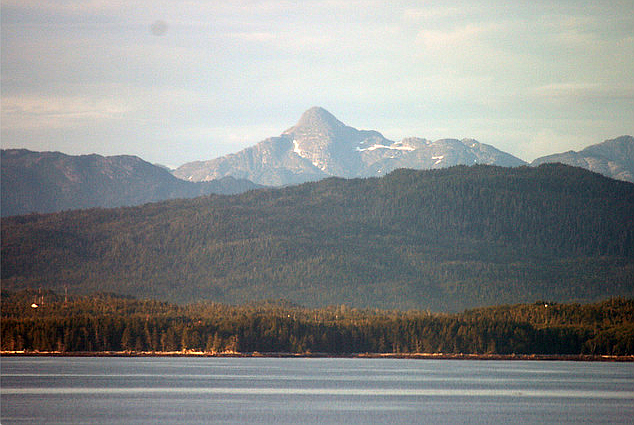
Image after 2nd sharp operation
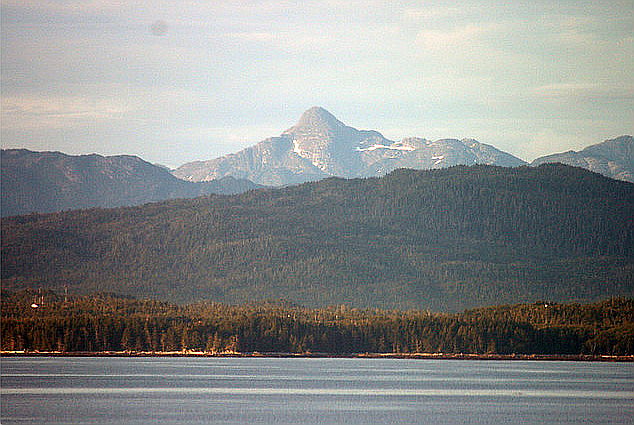
We can see the sharpening effects taking place and the features becoming more brighter and differentiable.
For complete code and notebook used refer this link
Suggestion
- Just go through the documentation of the libraries used for imageprocessing and read what more parameters and features are availaible.
- Play around with the image using differnt kernels and parameters of the function to gain more insights of how these functions work.
Question
- Try to produce the blur effect on an image. Only change needed will to be to change the type of kernel to be used.
- Find out about what more different kinds of filters are available for image preprocessing !!.
Hope you enjoyed reading this article at OpenGenus!!