Layouts in Java

- An interface is the layer between a user and an application.It helps the user to interact with the application.The application can contain the Graphical User Interface(GUI) that consists of images, texts and graphics.
- Once you have created the UI components of an application, it is important to arrange them properly to enhance the look and feel of the application.
- To arrange the components in the container, you can use the various layout classes. These layouts use relative positioning to place the components on the container that means the components automatically adjusts their position according to the frame size.
- The setLayout() method is used to set the layout of the containers.
Java provides various layouts like:-
- FlowLayout
- BorderLayout
- GridLayout
- BoxLayout
Using FlowLayout
FlowLayout places components in an order one after the other in a row.By default, the components are aligned in the center and are placed from left to right and top to bottom.However, the orientation of the components can be changed by using the setComponentOrientation() method.This method can accept the following values:
- ComponentOrientation.LEFT_TO_RIGHT
- ComponentOrientation.RIGHT_TO_LEFT
The FlowLayout class provides the various constructors that can be used to create an instance.Some of the constructors are:
- FlowLayout(): Creates an instance with the centered alignment and with the default horizontal and vertical space of 5 pixels between the components.
- FlowLayout(int align):Creates an instance with the specified alignment,such as LEFT,RIGHT and CENTER and the default horizontal and vertical space of 5 pixels between the components.
- FlowLayout(int align, int hgap, int vgap):Creates an instance with the specified alignment and the specified horizontal and vertical space between the components.
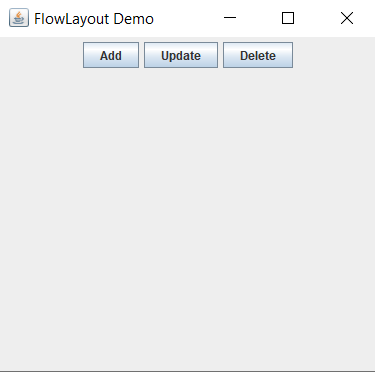
For example,you want to add three buttons, add update and delete in a row in a sequence of one after the other. For this you can use the following code:
import java.awt.FlowLayout;
import javax.swing.JButton;
import javax.swing.JFrame;

public class FlowLayoutDemo extends JFrame
{
    JButton add, update, delete;

    public FlowLayoutDemo()
    {
        add= new JButton("Add");
        update= new JButton("Update");
        delete= new JButton("Delete");

        setVisible(true);
        setSize(300,300);
        setTitle("FlowLayout Demo");

        setLayout(new FlowLayout());
        add(add);
        add(update);
        add(delete);
    }
    public static void main(String[] args)
    {
        FlowLayoutDemo obj= new FlowLayoutDemo();
    }
}
After executing the preceeding code, the output is displayed as shown in the following figure.
Using BorderLayout
BorderLayout divides the container into five parts:NORTH,SOUTH,EAST,WEST and CENTER. Each part can contain only a single component. It organize and alter the components to place them in the five parts.It is the default layout of the frame container.By default, the components are added in the CENTER region.
However you can specify the part for the border layout using the following fields:
- BorderLayout.NORTH
- BorderLayout.SOUTH
- BorderLayout.EAST
- BorderLayout.WEST
- BorderLayout.CENTER
The BorderLayout class provides the various constructors that can be used to create an instance.Some of these constructors are:
- BorderLayout(): Creates an instance with no space between the components.
- BorderLayout(int hgap,int vgap): Creates an instance with the specified horizontal and vertical spaces between the components.
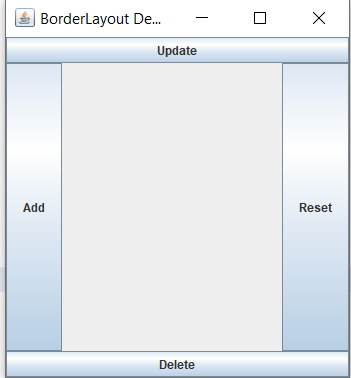
For example,you want to add four buttons,add,update,delete and reset in four different parts.For this, you can use the following code:
import java.awt.BorderLayout;
import javax.swing.JButton;
import javax.swing.JFrame;

public class BorderLayoutDemo extends JFrame
{
    JButton reset,add,update,delete;

    public BorderLayoutDemo()
    {
        reset= new JButton("Reset");
        add= new JButton("Add");
        update= new JButton("Update");
        delete= new JButton("Delete");

        setVisible(true);
        setSize(300,300);
        setTitle("BorderLayout Demo");

        setLayout(new BorderLayout());
        add(reset, BorderLayout.EAST);
        add(add, BorderLayout.WEST);
        add(update, BorderLayout.NORTH);
        add(delete, BorderLayout.SOUTH);
    }
    public static void main(String[] args)
    {
        BorderLayoutDemo obj= new BorderLayoutDemo();
    }
}
After executing the preceeding code, the output is displayed as shown in the following figure.
Using GridLayout
GridLayout divides the container into rows and columns.The intersection of the row and the column is called a cell.The cell contains only one component.The position of a component in a grid is determined by the order in which the components are added to the grid.
The GridLayout class provides the various constructors that can be used to create an instance.Some of these constructors are:
- GridLayout(): Creates an instance with one column and one row.
- GridLayout(int rows,int cols): Creates an instance with the specified number of rows and columns.
- GridLayout(int rows,int cols,int hgap, int vgap): Creates an instance with the specified number of rows and columns and with the specified horizontal and vertical spaces between the components.
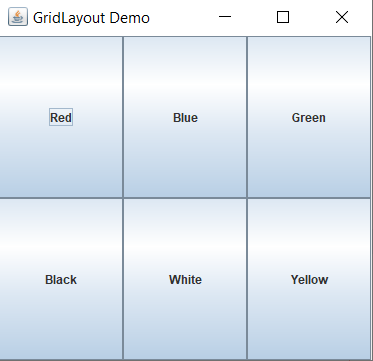
For example,you want to add six buttons,red,blue,green,black,white and yellow in a grid of two rows and three columns.For this, you can use the following code:
import java.awt.GridLayout;
import javax.swing.JButton;
import javax.swing.JFrame;

public class GridLayoutDemo extends JFrame
{
    JButton red,blue,green,black,white,yellow;
    public GridLayoutDemo()
    {
        red=new JButton("Red");
        blue=new JButton("Blue");
        green=new JButton("Green");
        black=new JButton("Black");
        white=new JButton("White");
        yellow=new JButton("Yellow");

        setVisible(true);
        setSize(300,300);
        setTitle("GridLayout Demo");

        setLayout(new GridLayout(2,3));
        add(red);
        add(blue);
        add(green);
        add(black);
        add(white);
        add(yellow);
    }
    public static void main(String[] args)
    {
        GridLayoutDemo obj= new GridLayoutDemo();
    }
}
After executing the preceeding code, the output is displayed as shown in the following figure.
Using BoxLayout
BoxLayout organizes multiple componenets either vertically, such as stack or horizontally , such as row. When frame size is changed, it does not affect in placing the components.BoxLayout works with the following axis parameters:
- X_AXIS: places the components horizontally from left to right.
- Y_AXIS: places the components vertically from top to bottom.
- LINE_AXIS: places the components in a column according to the container's ComponentOrientation property.
- PAGE_AXIS: places the components in a row according to the container's ComponentOrientation property.
The following constructor can be used to create an instance of the BoxLayout class:
- BoxLayout(Container target, int axis): Creates an instance that lays out components along the given axis.
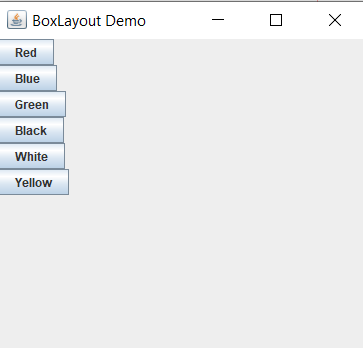
For example,you want to add six buttons,red,blue,green,black,white and yellow along the Y axis.For this, you can use the following code:
import javax.swing.BoxLayout;
import javax.swing.JButton;
import javax.swing.JFrame;

public class BoxLayoutDemo extends JFrame
{
    JButton red,blue,green,black,white,yellow;
    public BoxLayoutDemo()
    {
        red=new JButton("Red");
        blue=new JButton("Blue");
        green=new JButton("Green");
        black=new JButton("Black");
        white=new JButton("White");
        yellow=new JButton("Yellow");

        setLayout(new BoxLayout(this.getContentPane(), BoxLayout.Y_AXIS));
        setVisible(true);
        setSize(300,300);
        setTitle("BoxLayout Demo");

        add(red);
        add(blue);
        add(green);
        add(black);
        add(white);
        add(yellow);
    }
    public static void main(String[] args)
    {
        BoxLayoutDemo obj= new BoxLayoutDemo();
    }
}
After executing the preceeding code, the output is displayed as shown in the following figure.