Get this book -> Problems on Array: For Interviews and Competitive Programming
Reading time: 30 minutes | Coding time: 20 minutes
Autoencoder is a neural network tries to learn a particular feature of converting an input to an output data and generate back the input given the output. It includes two parts:
- encoder: which learns the features of the data or given answers
- decoder: which tries to generate the answers from the learnt features/ questions
This technique is widely used for a variety of situations such as generating new images, removing noise from images and many others.
In this article, we will learn how autoencoders can be used to generate the popular MNIST dataset and we can use the result to enhance the original dataset. We will build an autoencoder from scratch in TensorFlow and generate the grayscale images from colored images.
For this, we shall use Undercomplete autoencoder which has a latent space dimension is smaller than the input and it results in learning salient features from the training data better.
Read about various applications of AutoencodersBasic idea of using Autoencoder for this
We will follow the following steps:
- Convert colored images to grayscale using OpenCV which uses image processing techniques
- Encoder part will learn how colors are added to convert grayscale images to colored images
- Decoder part will try to reverse the process by regenerating the grayscale images using the colored images
The basic idea of using Autoencoders for generating grayscale images is as follows:
-
Encoder part of autoencoder will learn the features of colored images by analyzing the actual dataset. For example, X is the grayscale image and Y is the feature of adding colors. Our encoder part is a function F such that F(X) = Y.
-
Decoder part of autoencoder will try to reverse process by generating the actual grayscale images from the features. At this point, we have Y in F(X)=Y and try to generate the input X for which we will get the output.
Implementation
The basic steps to follow are-
Import all the libraries that we will need, namely tensorflow, cv2, glob, numpy and matplotlib.
import tensorflow as tf
import cv2
import glob as gl
import numpy as np
import matplotlib.pyplot as plt
from matplotlib.pyplot import savefig
Define path variables for the different flowers. These will be used for training purposes. Store these path variables into a list.
path_daisy = 'flower_photos/daisy/*.jpg'
path_dandelion = 'flower_photos/dandelion/*.jpg'
path_roses = 'flower_photos/roses/*.jpg'
path_sunflowers = 'flower_photos/sunflowers/*.jpg'
path_tulips = 'flower_photos/tulips/*.jpg'
paths_list = [path_daisy, path_dandelion, path_roses, path_sunflowers, path_tulips]
Iterate through the list. Convert each image to grayscale using cv2.cvtColor() function from the OpenCV library. Finally, the RGB and grayscale images are renamed and written in their respective new folders.
count = 1
for path in paths_list:
    filenames = glob.glob(path)
        for filename in filenames:
        image = cv2.imread(filename)
        gray_img = cv2.cvtColor(image, cv2.COLOR_BGR2GRAY)
        image = cv2.resize(image, (128, 128))
        gray_img = cv2.resize(gray_img, (128, 128))
        cv2.imwrite("gray_images/gray_" +str(count) +".jpg", gray_img)
        cv2.imwrite("color_images/color_" +str(count) +".jpg", image)
        count += 1
Here we prepare the dataset which will be used later for testing the model. Read all the flowers from the specified folder and store it in a variable. Iterate through each image and convert into grayscale while also resizing each image to 128* 128 pixels. Write the converted images into a new folder.
filenames = gl.glob("flower_images\*.png")
count = 1
for file in filenames:
    img = cv2.imread(file, 0)
    img = cv2.resize(img, (128, 128))
    cv2.imwrite('actual_gray_test/gray_' +str(count) +'.jpg', img)
    count += 1
We import all the training and testing datasets which will be used by the autoencoder.
dataset = []

#Read all color images and append into numpy list
for i in range(1, num_images+1):
    img = cv2.imread("color_images/color_" +str(i) +".jpg" )
    dataset.append(np.array(img))

dataset_source = np.asarray(dataset)
print(dataset_source.shape)

dataset_tar = []

#Read all grayscale images and append into numpy list
for i in range(1, num_images+1):
    img = cv2.imread("gray_images/gray_" +str(i) +".jpg", 0)
    dataset_tar.append(np.array(img))

dataset_target = np.asarray(dataset_tar)
print(dataset_target.shape)
This function is where we use our undercomplete autoencoder. The encoder uses the convolutional operation over the image results in an activation map which is wrapped around a non-linear activation function to improve the generalization capabilities of the network. Then it runs a pooling operation on the activation maps to extract dominating features and reduce the dimensionality of the activation maps for efficient computation. The decoder uses nearest neighbor interpolation for unsampling data. Convolutional operation is performed on the upsampled image to make the network learn the optimal filters for reconstructing the image.
def autoencoder(inputs):

    # Encoder
    net = tf.layers.conv2d(inputs, 128, 2, activation = tf.nn.relu)
    net = tf.layers.max_pooling2d(net, 2, 2, padding = 'same')

    # Decoder
    net = tf.image.resize_nearest_neighbor(net, tf.constant([129, 129]))
    net = tf.layers.conv2d(net, 1, 2, activation = None, name = 'outputOfAuto')

    return net
Loss function is calculated as below. The RGB image is sent as input data to the above function autoencoder(input) which returns the grayscaled image. The difference between the target image and the network generated grayscale image is obtained and stored in loss variable. Minimize the loss by finding the right set of weights for the network using Adam optimizer.
ae_inputs = tf.placeholder(tf.float32, (None, 128, 128, 3), name = 'inputToAuto')
ae_target = tf.placeholder(tf.float32, (None, 128, 128, 1))

ae_outputs = autoencoder(ae_inputs)
lr = 0.001 # learning rate

loss = tf.reduce_mean(tf.square(ae_outputs - ae_target))
train_op = tf.train.AdamOptimizer(learning_rate = lr).minimize(loss)
init = tf.global_variables_initializer() #This will be used to run a session for training
The code below will be used to train the network.
# define the constant variables
batch_size = 32
epoch_num = 50
saving_path = 'K:/autoencoder_color_to_gray/SavedModel/AutoencoderColorToGray.ckpt'
saver_ = tf.train.Saver(max_to_keep = 3)

# input data to the network is stored in variables
batch_img = dataset_source[0:batch_size]
batch_out = dataset_target[0:batch_size]
num_batches = num_images//batch_size

# Create a session object and run the global variable which was defined earlier
sess = tf.Session()
sess.run(init)

# new images are sent into the network in batches of 32
for ep in range(epoch_num):
    batch_size = 0
    for batch_n in range(num_batches): # batches loop

        # runs the computational graph in the autoencoder with the given input data and target data
        _, c = sess.run([train_op, loss], feed_dict = {ae_inputs: batch_img, ae_target: batch_out})
        print("Epoch: {} - cost = {:.5f}" .format((ep+1), c))
        batch_img = dataset_source[batch_size: batch_size+32]
        batch_out = dataset_target[batch_size: batch_size+32]
        batch_size += 32

    saver_.save(sess, saving_path, global_step = ep)

sess.close()
The code below will be used to test the network on the testing dataset.
saver = tf.train.Saver()
init = tf.global_variables_initializer()
sess = tf.Session()
sess.run(init)
saver.restore(sess, 'K:/autoencoder_color_to_gray/SavedModel/AutoencoderColorToGray.ckpt-49')

test_data = []
for file in filenames[0:100]:
    test_data.append(np.array(cv2.imread(file)))

test_dataset = np.asarray(test_data)
batch_imgs = test_dataset
gray_imgs = sess.run(ae_outputs, feed_dict = {ae_inputs: batch_imgs})

for i in range(gray_imgs.shape[0]):
    cv2.imwrite('gen_gray_images/gen_gray_' +str(i) +'.jpeg', gray_imgs[i])
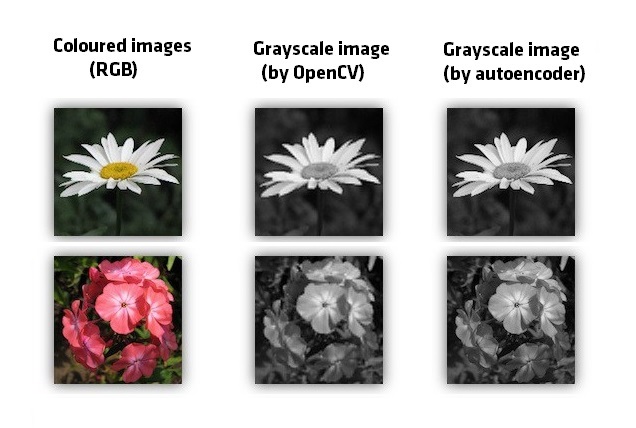
Following are 2 examples of our Autoencoder: