
Hello everyone let us continue our journey in exploring pancreas segmentation. In this article at OpenGenus, we will expand our approach to involve pancreas volumetry detection using deep learning algorithms.
Introduction:
As we all know that early detection of pancreas diseases specially early detection of pancreas neoplasm, increase in the health screening program, and the aging of the population.
Also pancreas volume is reduced in individual with diabetes type 1 and 2 on the other hand the volume increase with successful therapy in type 2 diabetes.
So, pancreas volume follow up is a good monitor for diabetes progression and treatment response.
Also it is critical to follow up the pancreas volume after resection of benign or malignant tumors.
All this reasons indicate the importance of pancreas segmentation and volumentry in the health care systems, But this calculation of the volume of the pancreas currently requires manual segmentation of the pancreas by a well-trained reader So the hole operation is laborious and also error-prone.
From here the urgent need to AI-based system to help in calculation of pancreas volume, But it still a challenging process as the pancreas is structurally diverse from individual to another and live in a small region in the abdomen, and attached to other organs, such as the duodenum and gallbladder which make from the segmentation a somewhat difficult operation.
And also as all of artificial intelligence systems, the algorithm is sooo sensitive to the features that enter the network, So the clinical assessment of the pancreatic segmentation performance is very necessary.
Difference between segmentation and volumentry
The basic difference between two concepts is the Dimensionality while segmentation can be done for 2D images, We can have the volume of object from segmentation of 3D images.
So, the two concepts are related to each other, pancreas segmentation is giving each pixel contribute to the pancreas a "1" label while all the other pixels "0" labels and if this segmentation is done for 3D pancreas images we can have the number of all the voxels participate in the pancreas.
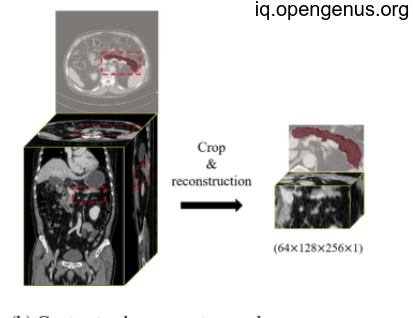
An image to pancreas volumetry:
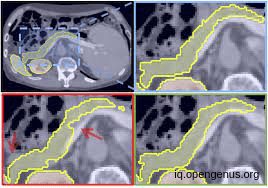
Another image For pancreas segmentation :
AND in our article we will discuss two approaches for calculating the pancreas volume, the first and the most efficient is the 3d approach which can capture the full 3D context of the image but is computationally consumer. while the 2d approach "slice by slice" is computationally efficient and can achieve good results, but it may not capture the full 3D context of the image and may lead to errors in the segmentation.
Let's dive more into them
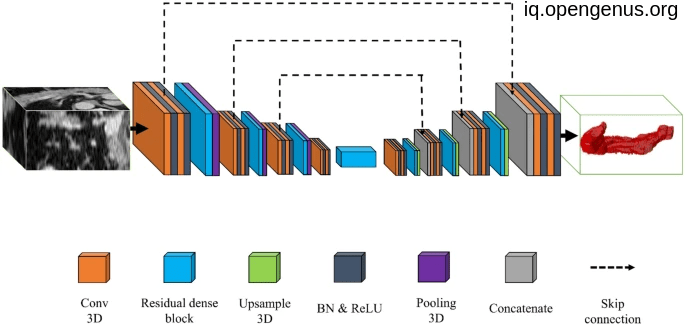
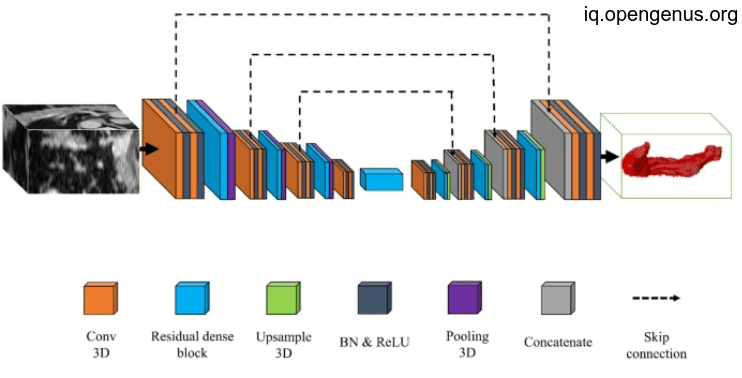
The 3D approach :
As I said this approach is the most efficient as it capture the full 3D context of the image but it's computationally hunger so we will turn to divide the full 3D images to smaller 3D patches (256,256,256) image to (64,64,64) images to fit the memory, So our full 3D images will be 64 patches
of size (64,64,64) then each batch will enter the model for image segmentation, our model will be U net with vgg16 backbone for encoder that pre-trained on imagenet dataset. and use soft dice loss and also softmax activation function.
our model expect 3 channels for input so we defined a stack function for this purpose
I will use patchify library to do this process and also to put patches back after predictions.
!pip install patchify
also instead building 3D unet from scratch i prefer to use segmentation-models-3D library to use 3d unet from it, it has 2 dependencies as illustrated.
#the classification-model-3D and efficientnet-3D are 2 dependencies for segmentation-models-3D library.
!pip install classification-models-3D
!pip install efficientnet-3D
!pip install segmentation-models-3D
then Importing our libraries:
import tensorflow as tf
import keras
#for using 3D unet
import segmentation_models_3D as sm
#for reading 3D image specially in tif extension
from skimage import io
#for dividing the full 3D image and reverse the process
from patchify import patchify, unpatchify
import numpy as np
from matplotlib import pyplot as plt
from keras import backend as K
#for one-hot encoding
from keras.utils import to_categorical
#For splitting the data to train val and test splits.
from sklearn.model_selection import train_test_split
our image is .tif and (256,256,256) size and our mask is the same .
image = io.imread('image/path/train_images_256_256_256.tif')
#using step argument = 64 mean that our patches have no overlaping voxels
img_patches = patchify(image, (64, 64, 64), step=64)


mask = io.imread('image/path/train_masks_256_256_256.tif')
mask_patches = patchify(mask, (64, 64, 64), step=64)
this process will produce a (4,4,4,64,64,64) image size meaning it divide each dimension alone so to gather all patches in one dimension:
input_img = np.reshape(img_patches, (-1, img_patches.shape[3], img_patches.shape[4], img_patches.shape[5]))
input_mask = np.reshape(mask_patches, (-1, mask_patches.shape[3], mask_patches.shape[4], mask_patches.shape[5]))

print(input_img.shape)  # n_patches, x, y, z
# (64,64,64,64)
But our 3D unet expecting 3 channels images and our images are gray so we will try to stack each image volume to itself 3 times:
train_img = np.stack((input_img,)*3, axis=-1)
#only one channels for the mask
train_mask = np.expand_dims(input_mask, axis=4)
Then difining Loss Function and metrics using during the training :
def soft_dice_coefficient(y_true, y_pred):
    smoothing_factor = 1
    flat_y_true = K.flatten(y_true)
    flat_y_pred = K.flatten(y_pred)
    return (2. * K.sum(flat_y_true * flat_y_pred) + smoothing_factor) / (K.sum(K.square(flat_y_true)) + K.sum(K.square(flat_y_pred)) + smoothing_factor)

def soft_dice_loss(y_true, y_pred):
    return 1 - soft_dice_coefficient(y_true, y_pred)
there are many backbones for unet encoder we can use, such as ['resnet18', 'resnet34', 'resnet50', 'resnet101', 'resnet152', 'seresnet18', 'seresnet34', 'seresnet50', 'seresnet101', 'seresnet152', 'seresnext50', 'seresnext101', 'senet154', 'resnext50', 'resnext101', 'vgg16', 'vgg19', 'densenet121', 'densenet169', 'densenet201', 'inceptionresnetv2', 'inceptionv3', 'mobilenet', 'mobilenetv2', 'efficientnetb0', 'efficientnetb1', 'efficientnetb2', 'efficientnetb3', 'efficientnetb4', 'efficientnetb5', 'efficientnetb6', 'efficientnetb7']
Then defining some parameters for our medel :
encoder_weights = 'imagenet'
BACKBONE = 'vgg16'
activation = 'sigmoid'
patch_size = 64
channels=3
Then defining the pre-process method for our data to fit the model :
preprocess_input = sm.get_preprocessing(BACKBONE)

#Preprocess input data
X_train_prep = preprocess_input(train_img)
The model:
#Define the model. Here we use 3D unet architectures from the library with vgg16 encoder backbone.
model = sm.Unet(BACKBONE,
                input_shape=(patch_size, patch_size, patch_size, channels),
                encoder_weights=encoder_weights,
                activation=activation)

model.compile(optimizer = "Adam", loss=soft_dice_loss, metrics=soft_dice_coefficient)
then fit the model:
#Fit the model
history=model.fit(X_train_prep,
          train_mask,
          batch_size=16,
          epochs=100)
After training our model we need to use it for predict pancreas segmentation for 3d image to calculate the volume:
#Break the large image into patches of same size as the training images (patches)
image = io.imread('/mypath/51x512x512.tif')
image_patches = patchify(image, (64, 64, 64), step=64)  #Step=64 for 512 pexel means no overlap
then predict each of the patches and reorder them to get our volume mask:
# Predict each 3D patch
predicted_patches = []
for i in range(image_patches.shape[0]):
  for j in range(image_patches.shape[1]):
    for k in range(image_patches.shape[2]):
      #print(i,j,k)
      single_patch = patches[i,j,k, :,:,:]
      single_patch_3ch = np.stack((single_patch,)*3, axis=-1)
      single_patch_3ch_input = preprocess_input(np.expand_dims(single_patch_3ch, axis=0))
      single_patch_prediction = model.predict(single_patch_3ch_input)
      binary_mask = np.where(single_patch_prediction >= 0.5, 1, 0)

      predicted_patches.append(binary_mask)
#Convert list to numpy array
predicted_patches = np.array(predicted_patches)

#Reshape to the shape we had after patchifying
predicted_patches_reshaped = np.reshape(predicted_patches,
                                       (patches.shape[0], patches.shape[1], patches.shape[2],patches.shape[3], patches.shape[4], patches.shape[5]) )
Finally we can reconstruct our mask :
#Repach individual patches into the orginal volume shape
reconstructed_image = unpatchify(predicted_patches_reshaped,image.shape)
For calculating the volume of pancreas we should take into account the voxel space :
# Define the voxel spacing in millimeters
voxel_spacing = 1.0

# Compute the volume of the segmented pancreas in millimeters cubed
pancreas_volume = np.sum(reconstructed_image) * (voxel_spacing ** 3)
this is the basic idea for the 3D approach.
the results :
As we will see each batch we result as part of the final mask as we will collect them in the final result.
And after collection will be like this:
which give us more precise implementation for pancreas volumentry that will be used in various application as we illustrated above.
The 2D approach:
It is called slice by slice approach in which we segment each slice of the 3D image on his own and then recombine the masks to 3d mask, this approach is computationally efficient but but it may not capture the full 3D context of the image and may lead to errors in the segmentation.
We will use a classic U-net model with adam optimizer and soft dice loss to train on each slice of the 3D image which will be reshaped to (1,image_size,image_size,1) to match the model input, then after training we will loop for each slice to predict the mask then concatenate slice masks to give our final output.
Let's dive into it :
First we define the model :
from keras.models import Model
from keras.layers import Input, Conv2D, MaxPooling2D, UpSampling2D, concatenate, Conv2DTranspose, Dropout, Lambda
from keras.optimizers import Adam
from keras.layers import Activation, MaxPool2D, Concatenate


def conv_block(input, num_filters):
    x = Conv2D(num_filters, 3, padding="same")(input)
    x = Activation("relu")(x)

    x = Conv2D(num_filters, 3, padding="same")(x)
    x = Activation("relu")(x)

    return x

#Encoder block: Conv block followed by maxpooling


def encoder_block(input, num_filters):
    x = conv_block(input, num_filters)
    p = MaxPool2D((2, 2))(x)
    return x, p

#Decoder block
#skip features gets input from encoder for concatenation

def decoder_block(input, skip_features, num_filters):
    x = Conv2DTranspose(num_filters, (2, 2), strides=2, padding="same")(input)
    x = Concatenate()([x, skip_features])
    x = conv_block(x, num_filters)
    return x

#Build Unet using the blocks
def build_unet(input_shape):
    inputs = Input(input_shape)

    s1, p1 = encoder_block(inputs, 64)
    s2, p2 = encoder_block(p1, 128)
    s3, p3 = encoder_block(p2, 256)
    s4, p4 = encoder_block(p3, 512)

    b1 = conv_block(p4, 1024) #Bridge

    d1 = decoder_block(b1, s4, 512)
    d2 = decoder_block(d1, s3, 256)
    d3 = decoder_block(d2, s2, 128)
    d4 = decoder_block(d3, s1, 64)

    outputs = Conv2D(1, 1, padding="same", activation="sigmoid")(d4)  #Binary

    model = Model(inputs, outputs, name="U-Net")
    return model
import numpy as np
import tensorflow as tf

# Load the 3D medical image data this time is .npy extension of shape(256,256,32) also the mask
image_data = np.load('image_data.npy')
segmentation_data = np.load('segmentation_data.npy')

# Define the slice size
slice_size = 256

# Define the 2D U-Net model
my_model = build_unet((256, 256, 1))

# Compile the model
model.compile(optimizer="Adam", loss=soft_dice_loss, metrics=soft_dice_coefficient)


# Train the model slice-by-slice
for i in range(train_images.shape[0]): # patch size
    for j in range(train_images.shape[2]): # depth dimension
        # Extract the current slice from the 3D image and corresponding segmentation label
        slice_image = train_images[i, :, :, j]
        slice_label = train_labels[i, :, :, j]

        # Reshape the slice image and label to (1, slice_size, slice_size, 1)
        slice_image = np.expand_dims(slice_image, axis=0)
        slice_image = np.expand_dims(slice_image, axis=-1)
        slice_label = np.expand_dims(slice_label, axis=0)
        slice_label = np.expand_dims(slice_label, axis=-1)

        # Train the 2D U-Net on the current slice and label
        my_model.train_on_batch(slice_image, slice_label)
After training the 2D unet let's try predicting the 3d mask:
# Loop through each slice in the 3D image
slices = []
for i in range(image_data.shape[2]):
    # Extract the current slice from the 3D image
    slice_data = image_data[:, :, i]

    # Resize the slice to the desired size for the 2D U-Net model
    resized_slice = tf.image.resize(slice_data, [slice_size, slice_size])

    # Add the resized slice to the list of slices
    slices.append(np.expand_dims(resized_slice, axis=-1))

# Convert the list of slices to a NumPy array
slices = np.asarray(slices)

# Perform the segmentation on each slice using the 2D U-Net model
segmented_slices = []
for i in range(slices.shape[0]):
    # Perform the segmentation on the current slice
    segmented_slice = my_model.predict(np.expand_dims(slices[i], axis=0))

    # Add the segmented slice to the list of segmented slices
    segmented_slices.append(segmented_slice.squeeze())

# Convert the list of segmented slices to a NumPy array
segmented_slices = np.asarray(segmented_slices)

segmented_image = np.zeros_like(image_data)
for z in range(segmented_slices.shape[0]):
    # Extract the current segmented slice
    segmented_slice = segmented_slices[z, :, :]

    # Resize the segmented slice back to the original size of the 3D image
    resized_segmented_slice = tf.image.resize(segmented_slice, [image_data.shape[0], image_data.shape[1]])

    # Add the resized segmented slice to the segmented image
    segmented_image[:, :, z] = resized_segmented_slice

segmented_image = np.where(segmented_image>=0.5,1,0)
Then by the same way we can compute the pancreas volume as above:
# Define the voxel spacing in millimeters
voxel_spacing = 1.0

# Compute the volume of the segmented pancreas in millimeters cubed
pancreas_volume = np.sum(segmented_image) * (voxel_spacing ** 3)
the result:
After stacking the 2D masks together will result the 3D mask we want but will be less efficient than the first 3D approach due to loss of some 3D context.
Finally the two approach are good for calculating the volume of pancreas, this deep learning approach may help a lot in health care systems.
Thanks for stacking with us.