
testdisk is a powerful data recovery tool, its primary function is to recover lost partitions or rebuild boot sectors using data backups, these functionalities can also be used to recover lost files in Linux. In this article we discuss how to recover such files.
Table of contents.
- Introduction.
- Recovering a deleted file.
- Summary.
- References.
Introduction.
testdisk is a command-line data recovery tool used to recover data from deleted or lost partitions. It can also be used to;
- recover corrupt partitions or files.
- Recover corrupt FAT32 tables.
- Rebuild boot sectors using data backups.
- Restore files from Windows filesytems.
- Restore removed files.
Recovering a deleted file.
First we create a log file which will store essential information pertaining data recovery and partitions.
To create a log file we execute the command,
testdisk
The output is as follows,
Use arrow keys to select, then press Enter key:
>[ Create ] Create a new log file
 [ Append ] Append information to log file
 [ No Log ] Don’t record anything
The options include,
- Create, to create a new log file for testdisk.
- Append to add information to an existing log file.
- No Log tells testdisk not to use a log file for the recovery process.
So we create a new log file by selecting create option.
Next we enter a password after being prompted since this requires administrative privileges.
After entering the password we are redirected to another screen where we select a disk we want to recover data from.
Select a media (use Arrow keys, then press Enter):
>Disk /dev/sda - 500 GB / 465 GiB - ST500VT000-1DK142

>[Proceed ]  [  Quit  ]
We select a drive and proceed.
Next we choose a partition table type, by default the system will identify the correct partition table type.
Disk /dev/sda - 500 GB / 465 GiB - ST500VT000-1DK142

Please select the partition table type, press Enter when done.
>[Intel  ] Intel/PC partition
 [EFI GPT] EFI GPT partition map (Mac i386, some x86_64...)
 [Humax  ] Humax partition table
 [Mac    ] Apple partition map (legacy)
 [None   ] Non partitioned media
 [Sun    ] Sun Solaris partition
 [XBox   ] XBox partition
 [Return ] Return to disk selection

Hint: Intel partition table type has been detected.
We select the most appropriate choice then proceed
At this point we can either choose Advanced or Analyze recovery options.
- Lets choose Advanced and see how it plays out,
Disk /dev/sda - 500 GB / 465 GiB - ST500VT000-1DK142
     CHS 60801 255 63 - sector size=512

 [ Analyse  ] Analyse current partition structure and search for lost partitions
>[ Advanced ] Filesystem Utils
 [ Geometry ] Change disk geometry
 [ Options  ] Modify options
 [ MBR Code ] Write TestDisk MBR code to first sector
 [ Delete   ] Delete all data in the partition table
 [ Quit     ] Return to disk selection
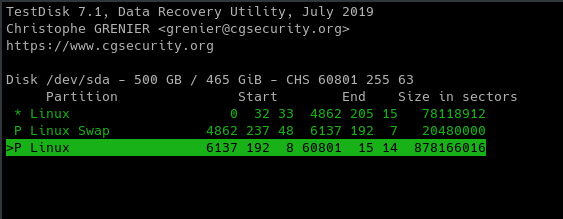
After selecting a recovery option we now select a partition from the disk which we previously selected.
Disk /dev/sda - 500 GB / 465 GiB - CHS 60801 255 63

     Partition                  Start        End    Size in sectors
  1 * Linux                    0  32 33  4862 205 15   78118912
  2 P Linux Swap            4862 237 48  6137 192  7   20480000
> 3 P Linux                 6137 192  8 60801  15 14  878166016

 [  Type  ]  [Superblock] >[  List  ]  [Image Creation]  [  Quit  ]
We choose the appropriate partition and select List option at the bottom of the screen.
The next step is to browse to the directory in which we lost the file
 3 P Linux                 6137 192  8 60801  15 14  878166016
Directory /
                                                   Previous
 -rw-r--r--  1000  1001       482 14-Apr-2021 01:08 .emacs
 -rw-------  1000  1001        48 31-Jan-2022 03:22 .Xauthority
 -rw-r--r--  1000  1001        25 29-Jan-2022 13:35 .dmrc
 -rw-------  1000  1001     82229 31-Jan-2022 15:12 .xsession-errors
 drwx------  1000  1001      4096 29-Jan-2022 13:35 .gconf
 drwxr-xr-x  1000  1001      4096 31-Jan-2022 13:16 .cache
 drwxr-xr-x  1000  1001      4096 31-Jan-2022 15:08 Downloads
 drwxr-xr-x  1000  1001      4096 29-Jan-2022 13:35 Public
 drwxr-xr-x  1000  1001      4096 31-Jan-2022 04:29 Documents
 drwxr-xr-x  1000  1001      4096 29-Jan-2022 13:35 Music
 drwxr-xr-x  1000  1001      4096 29-Jan-2022 13:35 Pictures
 drwxr-xr-x  1000  1001      4096 29-Jan-2022 13:35 Videos
After selecting a directory, we will navigate into it and see all files and subdirectories in the selected partition.
Deleted files will be highlighted with red.
To recover files, copy and paste them in another directory as follows,
Move with the arrow keys to highlight the lost file.
Press C to copy a deleted file then navigate to a directory where you want to save the recovered file and press C to paste it there.
After copying a you will be notified in a light green color "Copy done !" text
We exit the application by pressing q until testdisk is closed.
- If you cannot locate your deleted files, you can select Analyze recovery option.
Disk /dev/sda - 500 GB / 465 GiB - ST500VT000-1DK142
     CHS 60801 255 63 - sector size=512

>[ Analyse  ] Analyse current partition structure and search for lost partitions
 [ Advanced ] Filesystem Utils
 [ Geometry ] Change disk geometry
 [ Options  ] Modify options
 [ MBR Code ] Write TestDisk MBR code to first sector
 [ Delete   ] Delete all data in the partition table
 [ Quit     ] Return to disk selection
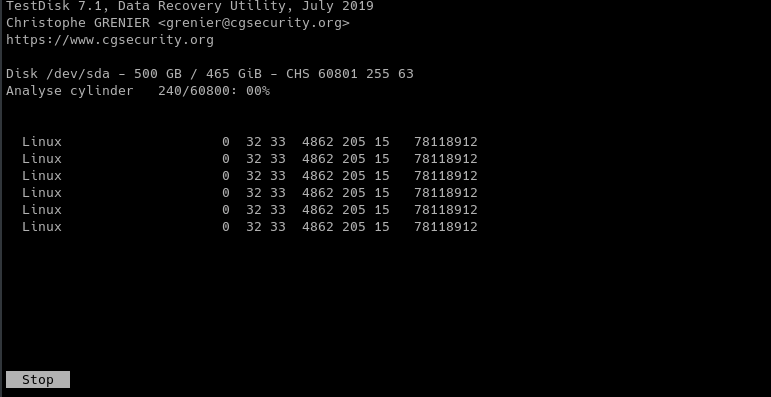
Then you select Quick Search option and let the search proceed until all inodes have been scanned.
Disk /dev/sda - 500 GB / 465 GiB - CHS 60801 255 63
Current partition structure:
     Partition                  Start        End    Size in sectors

 1 * Linux                    0  32 33  4862 205 15   78118912
 2 P Linux Swap            4862 237 48  6137 192  7   20480000
 3 P Linux                 6137 192  8 60801  15 14  878166016

*=Primary bootable  P=Primary  L=Logical  E=Extended  D=Deleted
>[Quick Search]  [ Backup ]
We then shall see a screen as shown below, we then select the partition we want to scan.
Scanning we start, expect output to be as shown in the image below,
Once done, we select the partition we want to browse file to locate lost files.
As we have stated before, we locate lost files(those in red) and copy them then paste them in another or the same directory.
However if no files have been highlighted after the two procedures that means that they cannot be recovered by testdisk.
Summary.
testdisk is useful for recovering deleted partitions, restoring corrupted disks, rebuilding boot sectors using backups.
References.
- Execute man testdisk for testdisk's manual page.