
Open-Source Internship opportunity by OpenGenus for programmers. Apply now.
In this code-driven tutorial at OpenGenus, we will build a Timestamp Microservice in JavaScript using the Express.js framework. This microservice accepts a date as a parameter and returns its Unix timestamp and UTC time. We will cover each step in detail, from project setup to error handling.
Introduction: Understanding the Project
Timestamp Microservices are a critical component of modern web and software architecture. They are a subset of microservices that serve a specific purpose related to time and date processing. Microservices, in general, are an architectural style for building applications by decomposing them into small, independent services that communicate over well-defined APIs. These microservices can run independently, scale easily, and are commonly used in conjunction with containerization technologies like Docker.
What is a Microservice?
A microservice is a self-contained, loosely coupled service that performs a specific function within a larger application. Microservices architecture is characterized by breaking down a complex application into a set of smaller, independently deployable services. Each microservice is responsible for a single business capability and interacts with other microservices through well-defined APIs. This architectural style is known for its flexibility, scalability, and maintainability, making it a popular choice in modern software development.
Timestamp Microservices in Production
Timestamp Microservices, as a specific type of microservice, play a vital role in handling date and time-related tasks within a larger application or system. They are used in various production scenarios, including:
-
Logging and Auditing: Timestamp Microservices are employed to log events and actions within an application, complete with precise timestamps. This data is crucial for auditing and troubleshooting.
-
Real-time Data Processing: Applications that deal with real-time data, such as financial trading platforms or sensor networks, use Timestamp Microservices to ensure data is processed with accurate timestamps.
-
Scheduling and Automation: Systems that require scheduling and automation tasks leverage Timestamp Microservices to manage when actions should be executed.
-
Data Versioning: Timestamps are commonly used in data versioning systems to track changes and historical data records.
-
Authentication and Authorization: Timestamps play a role in security systems to manage authentication and authorization mechanisms effectively.
-
Record-Keeping: Timestamps are essential for record-keeping in various domains, including legal, medical, and scientific applications.
In all these cases, Timestamp Microservices ensure precise and standardized handling of date and time-related data, guaranteeing accuracy and consistency in critical processes.
Now, let's dive into building this Timestamp Microservice step by step.
Project Requirements:
-
Date Input: The microservice must accept a date as a parameter provided through the URL.
-
Unix Timestamp: It should calculate and return the Unix timestamp for the given date, which represents the number of milliseconds since January 1, 1970.
-
UTC Time: The service should also return the UTC (Coordinated Universal Time) representation of the provided date.
-
Input Flexibility: It should handle various input formats, including empty input (which defaults to the current date), Unix timestamps in milliseconds, and dates in the "YYYY-MM-DD" format.
Key Features:
-
Error Handling: The microservice will gracefully handle invalid date inputs and provide an "Invalid Date" response to notify the client.
-
Testing: We'll provide instructions for testing the Timestamp Microservice to ensure it functions as expected, using tools such as Postman.
By the end of this OpenGenus tutorial, you will have a robust Timestamp Microservice capable of handling a wide range of date inputs, returning Unix timestamps, UTC times, and notifying clients when inputs are invalid.
Now, let's dive into building this microservice step by step.
Table of Contents
- Project Setup
- Understanding the Requirements
- Setting Up the Express App
- Handling Different Input Cases
- Error Handling
- Testing the Timestamp Microservice
- Conclusion
1. Project Setup
To start, let's set up the project using your favorite Integrated Development Environment (IDE)and we have postman installed on our vscode, to install postman in your vscode you can click on the extension icon on the vscode and search for postman after that click on the install button then you are good to go. In this tutorial, we assume you are using Visual Studio Code (VSCode). Open your terminal and follow these steps:
# Create a new project directory
mkdir timestamp-microservice
cd timestamp-microservice

# Initialize the project with a package.json file
npm init -y

# Install the required dependencies (Express.js)
npm install express
2. Understanding the Requirements
Before we dive into the code, let's understand what our Timestamp Microservice is expected to do:
- Accept a date as a parameter.
- Return the Unix timestamp and UTC time for the provided date.
- Handle different input cases, including empty input, valid date formats, and Unix timestamps.
3. Setting Up the Express App
To create our Timestamp Microservice, we'll utilize the Express.js framework. Express.js is a fast, unopinionated, and minimalist web framework for Node.js. It simplifies the process of building web applications and APIs.
In this step, we'll set up our Express application:
const express = require('express');
const app = express();
const PORT = process.env.PORT || 3000;

app.listen(PORT, () => {
  console.log(`Server is running on port ${PORT}`);
});
- We begin by requiring the Express library, which we've installed as a dependency.
- We create an Express app instance with
const app = express();. - We set the port on which our server will listen. In this example, it uses the provided environment variable or defaults to port 3000.
- We start our server by calling
app.listen(PORT, callback), which informs us when the server is up and running.
By setting up Express, we're ready to handle HTTP requests and build the core of our Timestamp Microservice. The next steps will focus on handling different input cases and error responses to ensure our service functions as expected.
Certainly, here's the code explanation following the format you've specified:
4. Handling Different Input Cases
In the previous section, we set up our Express application to listen for incoming HTTP requests. Now, we'll focus on handling different input cases, which is the core functionality of our Timestamp Microservice and run node app.js in your terminal in order to get these requests sent below to the server.
Code Explanation
app.get("/api/:date?", (req, res) => {
  // Extract the date_string parameter from the URL
  const date_string = req.params.date;

  // Initialize variables for date, unix, and utc
  let date;
  let unix;
  let utc;

  // **Case 1**: If date_string is empty, set it to the current date and time
  if (!date_string) {
    date = new Date();
  }

  // **Case 2**: Check if date_string is a Unix timestamp in milliseconds
  else if (/^\d{5,}$/.test(date_string)) {
    date = new Date(parseInt(date_string));
  }

  // **Case 3**: Assume date_string is a date in the format "YYYY-MM-DD"
  else {
    date = new Date(date_string);

    // Check if the parsed date corresponds to the input
    const inputDate = date_string.split('-').map(Number); // Split the input date string
    const parsedYear = date.getFullYear();
    const parsedMonth = date.getMonth() + 1; // JavaScript months are 0-based

    if (
      inputDate[0] !== parsedYear ||
      inputDate[1] !== parsedMonth ||
      inputDate[2] !== date.getDate()
    ) {
      // The parsed date does not match the input, so it's invalid
      res.json({ error: "Invalid Date" });
      return;
    }
  }

  if (!isNaN(date)) {
    // If the date is valid, set the unix and utc values
    unix = date.getTime();
    utc = date.toUTCString();

    // Send a JSON response with the unix and utc values
    res.json({ unix, utc });
  } else {
    // **Case 4**: Trigger an error message when the input is not a valid date
    res.json({ error: "Invalid Date" });
  }
});
This code is structured into four cases:
-
Case 1: If
date_stringis empty, the code setsdateto the current date and time usingnew Date(). -
Case 2: If
date_stringis a numeric string with at least 5 characters, it's treated as a Unix timestamp in milliseconds, and the code parses it into aDateobject. -
Case 3: If none of the above conditions are met, the code attempts to parse
date_stringas a date in the format "YYYY-MM-DD." It then checks if the parsed date corresponds to the input date, and if it doesn't, it returns "Invalid Date." -
Case 4: If the parsed
dateis not a valid date (e.g., a string that can't be parsed as a date), the code triggers an error message and returns "Invalid Date."
The enhanced code now ensures that not only are invalid dates handled properly, but it also checks if the parsed date corresponds to the input date, providing a more robust validation process.
5.Error Handling
We handle errors by sending a JSON response with an error message when the input is not a valid date. This error response is triggered by the res.json({ error: "Invalid Date" }) line in the code.
To trigger an "Invalid Date" response, you can send an input that cannot be converted into a valid date. For example:
-
Send a string that doesn't represent a valid date:
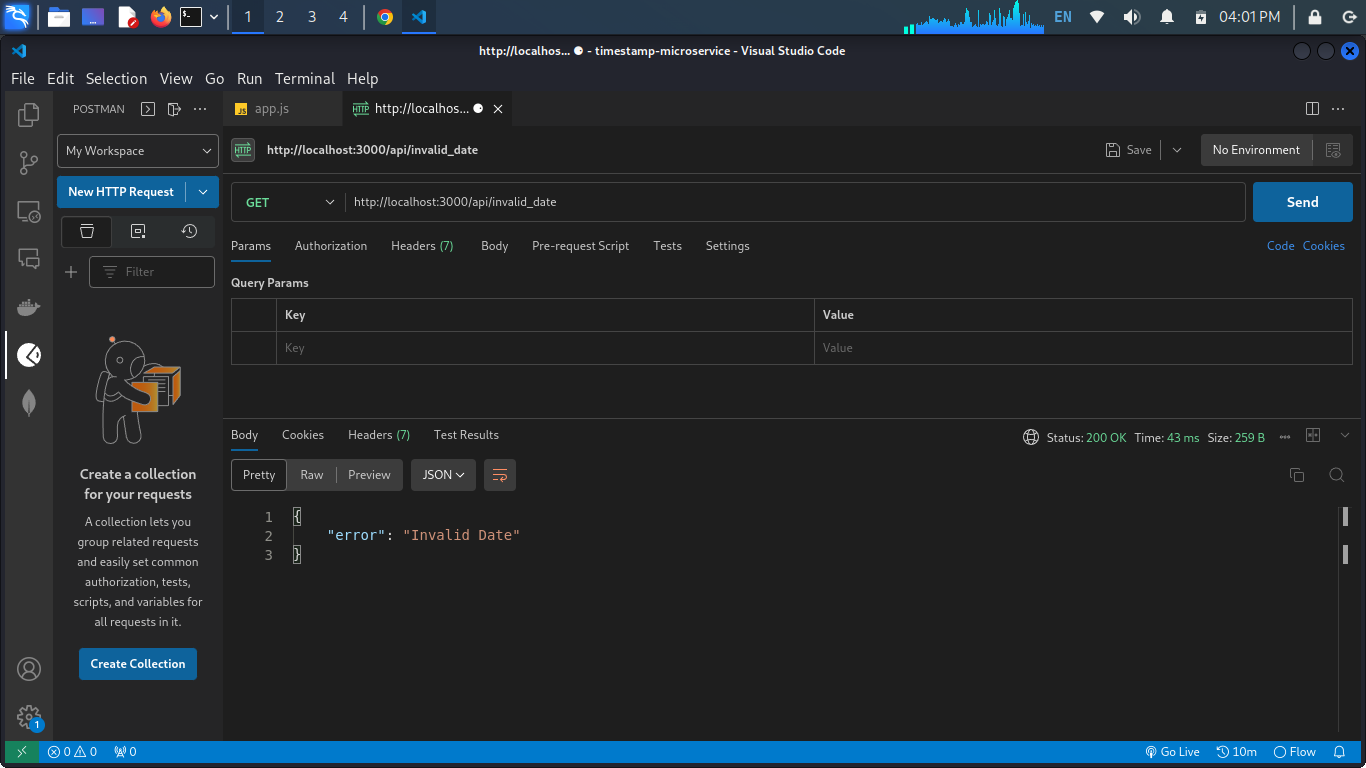
http://localhost:3000/api/invalid_date
-
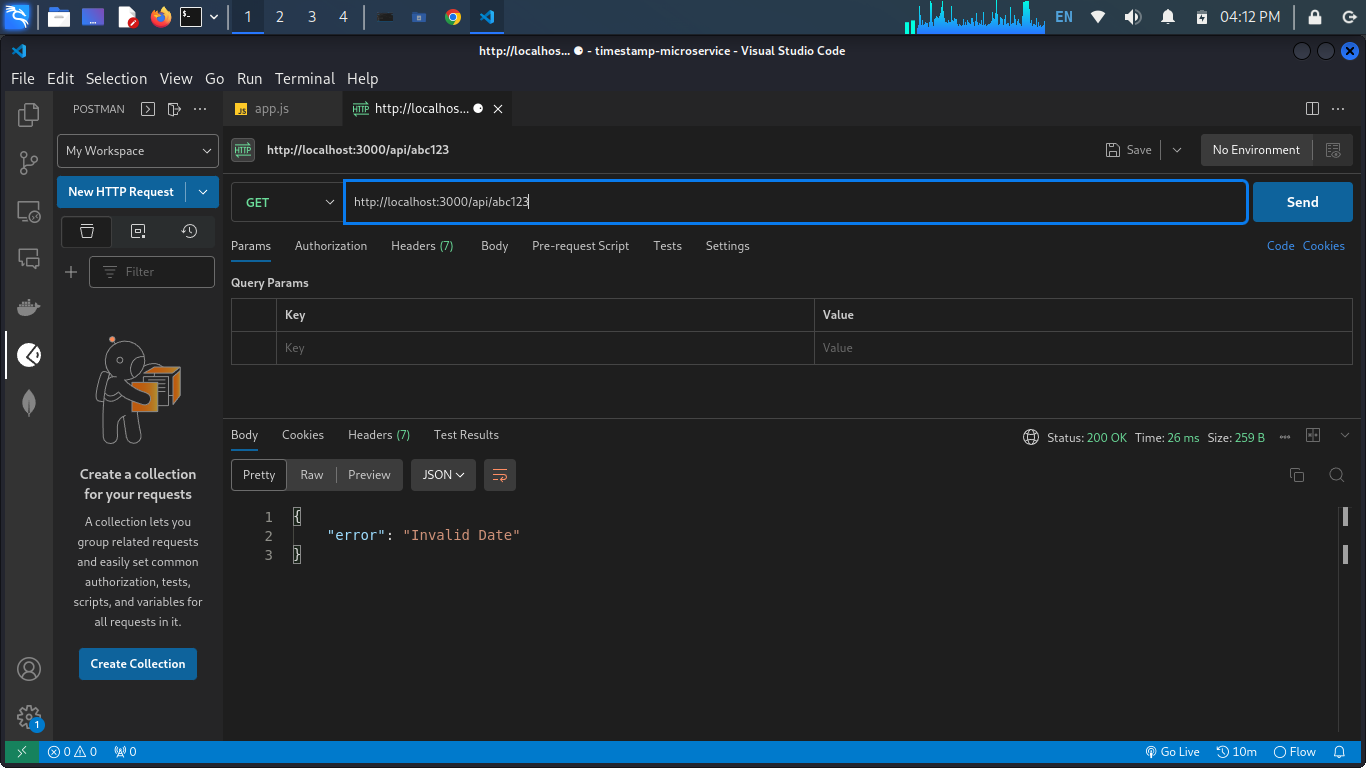
Send a string that contains non-numeric characters in the case of Unix timestamp (Unix timestamps should only contain numbers):
http://localhost:3000/api/abc123
In all these cases, your code will recognize that the input is not a valid date, and it will respond with:
{ "error": "Invalid Date" }
This is the image for the both error cases below:
6. Testing the Timestamp Microservice
Now that we've implemented our Timestamp Microservice, it's time to test it to ensure it functions correctly. To do this, we'll send HTTP requests to our service and examine the responses.
Testing the Microservice
You can use tools like Postman or command-line tools like curl to test your Timestamp Microservice. We'll use curl for this example.
-
Open your terminal, run node app.js.
-
Send a GET request to your local server or the server where your Timestamp Microservice is deployed. Replace
http://localhost:3000with the appropriate URL.
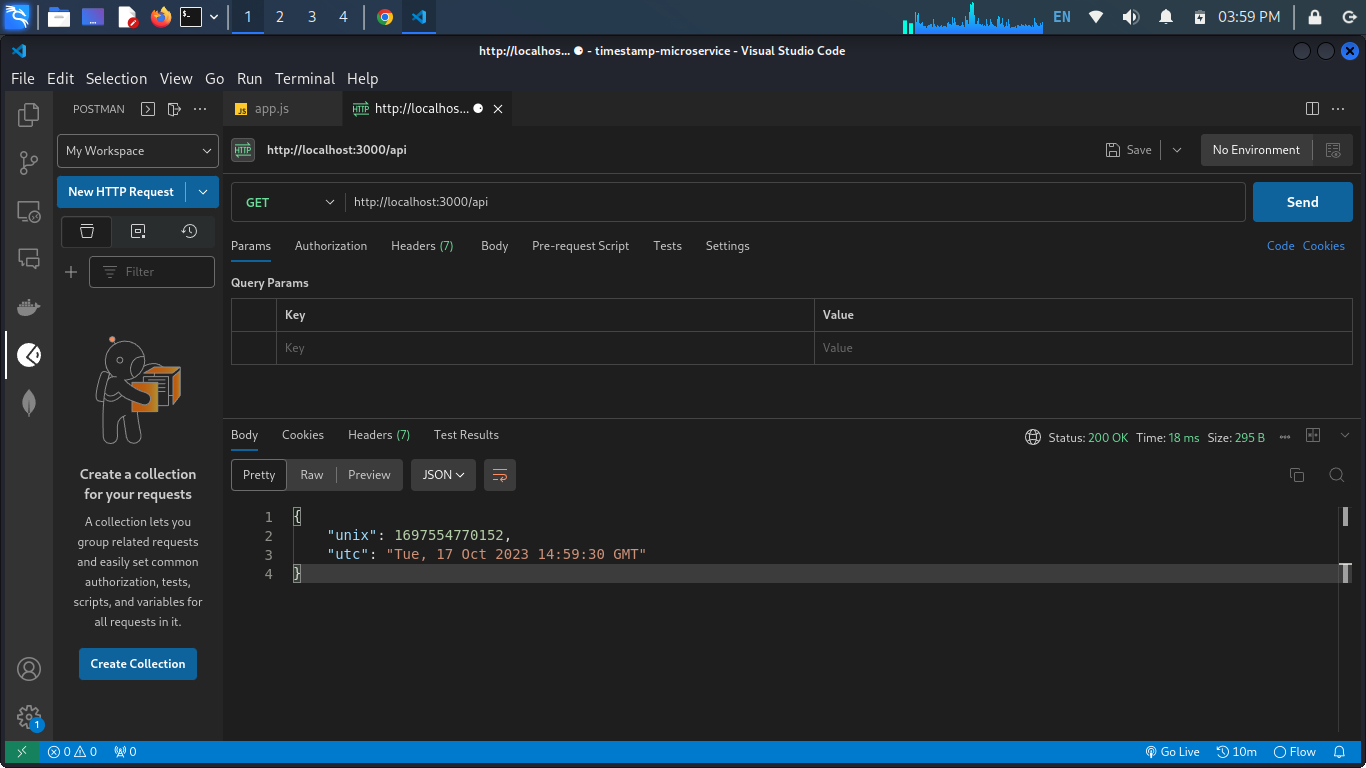
curl http://localhost:3000/api
This request will return the current Unix timestamp and UTC time like this below:
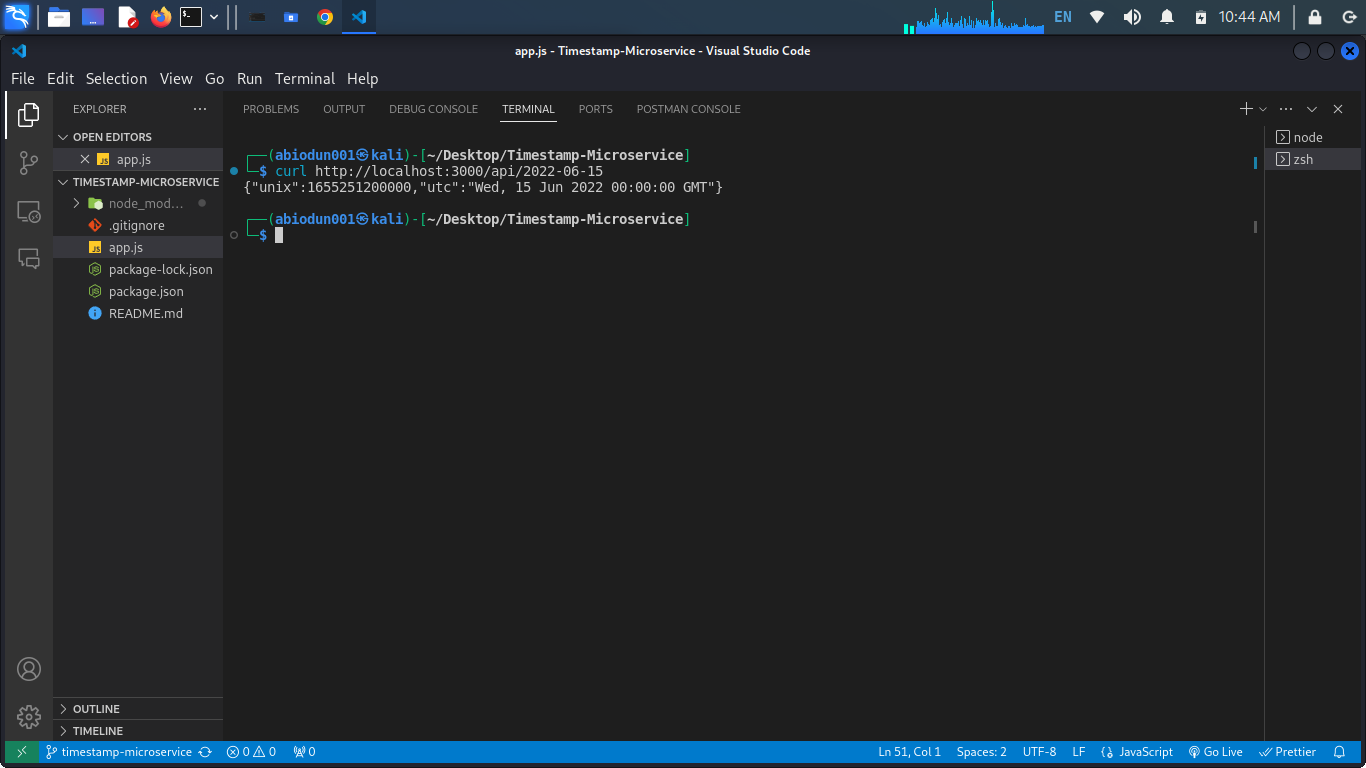
- Now, send a request with a date parameter in the format "YYYY-MM-DD."
curl http://localhost:3000/api/2022-06-15
This request will return the Unix timestamp and UTC time for the specified date like this below:
- Finally, send a request with a Unix timestamp in milliseconds.
curl http://localhost:3000/api/1623744000000
This request will return the Unix timestamp and UTC time for the provided timestamp like this below:
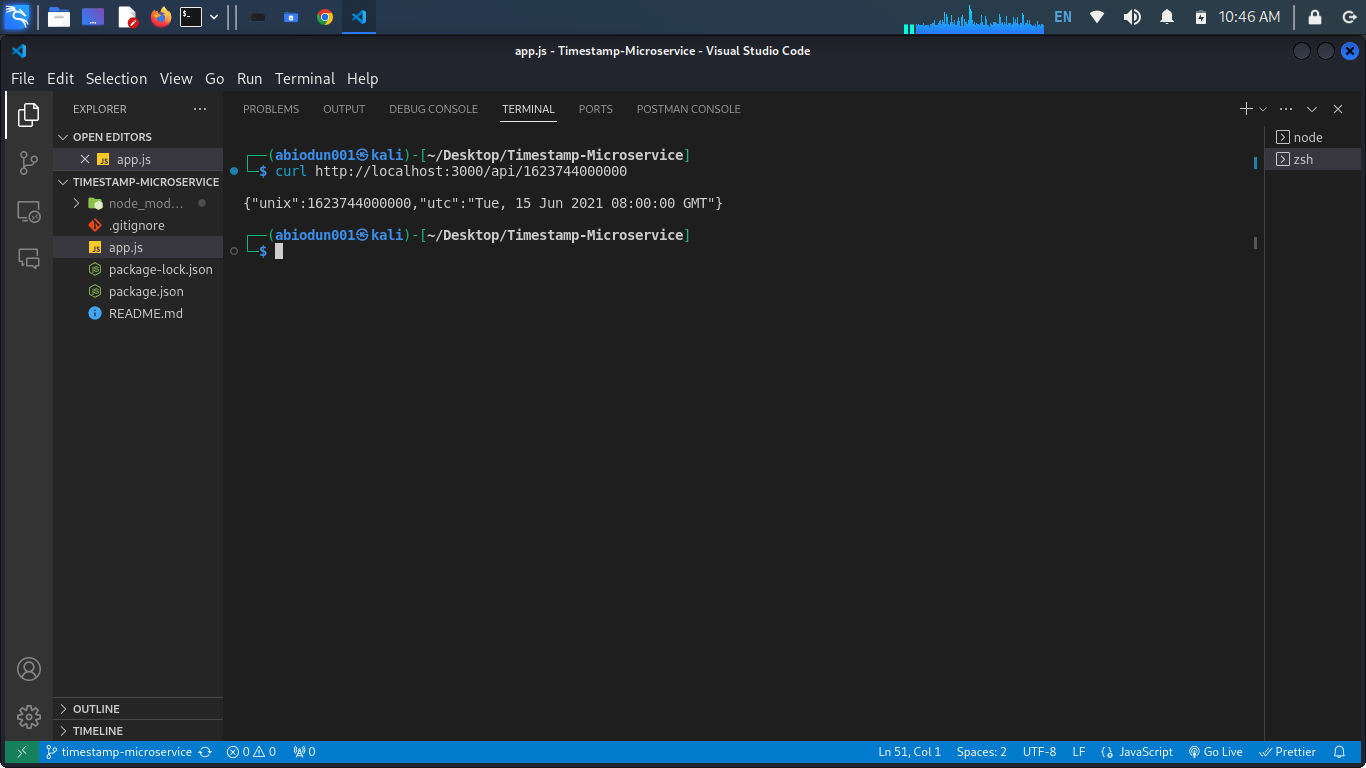
Example Output
Here's an example of the expected output for the above requests:
{"unix":1673846400000,"utc":"Tue, 15 June 2021 00:00:00 GMT"}
7. Conclusion
By following this code-driven tutorial, you have built a robust Timestamp Microservice capable of handling a wide range of date inputs effectively, returning the current Unix timestamp and UTC time when no date is provided, and correctly triggering an "Invalid Date" response for inputs that don't conform to the expected date format. This exercise enhances your web development skills and equips you to handle date and time data effectively in web applications.