
Open-Source Internship opportunity by OpenGenus for programmers. Apply now.
In this article at OpenGenus, we will be discussing about the process of developing a virtual keyboard using HTML, CSS, and JavaScript. The virtual keyboard allows users to input text through a graphical interface, and it includes features like caps lock, enter key, and space key.
Table of Contents
- Introduction
- Features
- Overview of the project structure
- Step-by-Step implementation
- Conclusion
Introduction
The virtual keyboard is a useful UI component that can be integrated into various web applications to provide an alternative method of text input. This project will demonstrate how to create a basic virtual keyboard using HTML, style it with CSS, and add interactive behavior using JavaScript.
Features
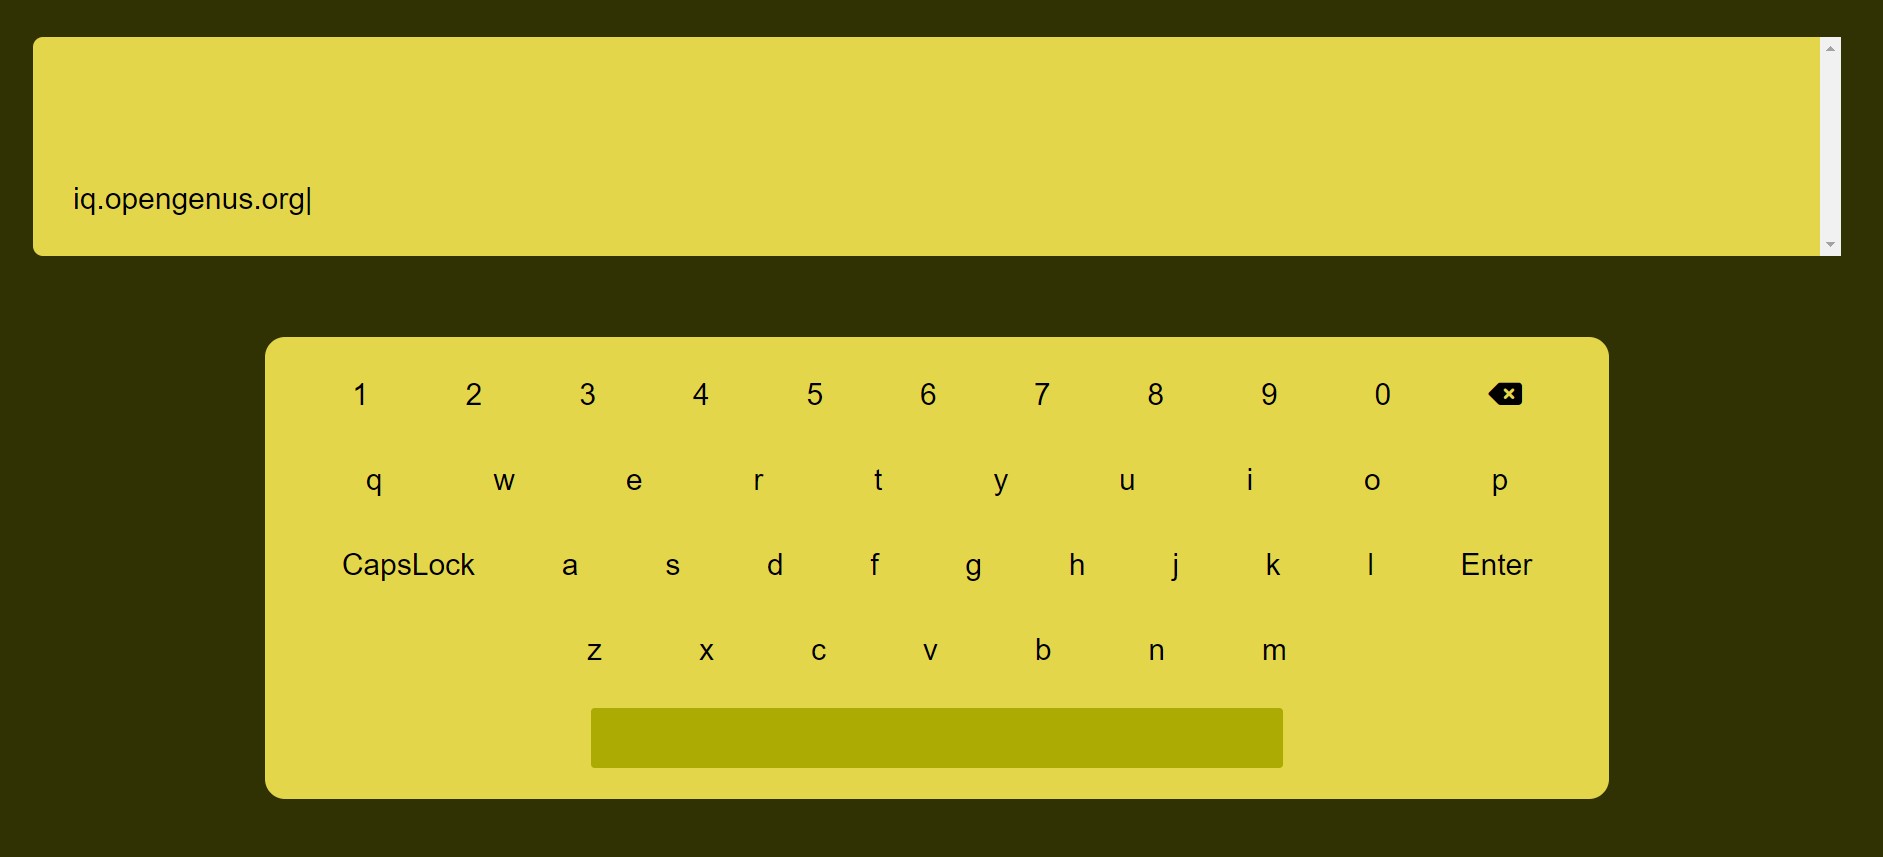
- Layout and Appearance:
- The virtual keyboard layout is designed with rows of keys, including numeric keys, alphabet keys, special keys (such as CapsLock, Backspace, Enter), and the space key.
- The keyboard is visually displayed on the webpage with a responsive design, adjusting to different screen sizes.
- Text Display:
- A text container is provided where the user's entered text is displayed.
- The text container allows scrolling if the content exceeds the visible area.
- Cursor Indicator:
- A cursor indicator "|" is used to show the current typing position within the entered text.
- The cursor moves as new characters are typed.
- Physical Keyboard Input:
- The virtual keyboard supports input from the physical keyboard.
- Key presses like Backspace, Enter, Space, and alphanumeric characters are processed.
- On-Screen Keyboard Input:
- Users can also click on the virtual keyboard keys to input characters.
- Clicking on the keys updates the text container accordingly.
- Backspace Key:
- The Backspace key removes the character before the cursor position.
- It works for both physical keyboard and on-screen keyboard clicks.
- Enter Key:
- The Enter key adds a newline to the entered text.
- It works for both physical keyboard and on-screen keyboard clicks.
- Space Key:
- The Space key adds a space character to the entered text.
- It works for both physical keyboard and on-screen keyboard clicks.
- CapsLock Key:
- The CapsLock key toggles the capitalization of entered characters.
- It works for both physical keyboard and on-screen keyboard clicks.
- Visual feedback is provided to indicate the active state of CapsLock.
- Typing Differentiation:
- The system can differentiate between typing using the physical keyboard and typing through the on-screen keyboard.
- Responsive Design:
- The keyboard layout and text display are designed to adapt to different screen sizes, providing a good user experience across devices.
- Visual Feedback:
- When a key is pressed (either through physical keyboard or on-screen keyboard), the key visually changes its appearance to provide feedback.
These features collectively create a functional and interactive virtual keyboard that supports both physical keyboard input and on-screen keyboard interaction, making it useful for users who may not have access to a physical keyboard or prefer a visual input method.
Overview of the Project Structure
Project Setup
To start, create a new project folder and organize your files:
index.html- The main HTML file.style.css- The stylesheet for styling the keyboard.script.js- The JavaScript file for adding functionality to the keyboard.
HTML Structure
The HTML file (index.html) contains the basic structure of the virtual keyboard along with placeholders for keys and input display. Here's a breakdown of the HTML structure:
- The
<head>section includes metadata and links to external CSS and Font Awesome. - The
<body>section contains two main elements:.textContainer: This div will display the text input..keyboard: This div will hold the rows and keys of the virtual keyboard.
Styling with CSS
The CSS file (style.css) is used to style the virtual keyboard and create an appealing visual design. The CSS includes styling for the keyboard layout, rows, keys, and special keys like caps lock, enter, and space. Here's a summary of the key CSS styles:
.keyboard: Styles the main keyboard container..row: Styles each row of keys..key: Styles individual keys, including their appearance and cursor behavior..active: Styles the caps lock key when active.
Adding Functionality with JavaScript
The JavaScript file (script.js) is responsible for adding interactivity to the virtual keyboard. It handles physical keyboard input, clicking on virtual keys, and updating the text display. Here's an overview of the JavaScript functionality:
- Event Listeners: Listen for keyboard events such as keydown and click events on virtual keys.
handleTyping: Function to handle typing on the virtual keyboard.updateContent: Function to update the displayed content.updateCursor: Function to update the cursor position.- Event Listeners for Special Keys: Implement click events for delete, enter, space, and caps lock keys.
- Caps Lock Functionality: Toggle between uppercase and lowercase characters.
Step-by-Step Implementation:
HTML
<!DOCTYPE html>
<html lang="en">

<head>
    <meta charset="UTF-8">
    <meta http-equiv="X-UA-Compatible" content="IE=edge">
    <meta name="viewport" content="width=device-width, initial-scale=1.0">
    <title>Virtual Keyboard</title>
    <link rel="stylesheet" href="./style.css">
    <link rel="stylesheet" href="https://cdnjs.cloudflare.com/ajax/libs/font-awesome/6.2.0/css/all.min.css"
        integrity="sha512-xh6O/CkQoPOWDdYTDqeRdPCVd1SpvCA9XXcUnZS2FmJNp1coAFzvtCN9BmamE+4aHK8yyUHUSCcJHgXloTyT2A=="
        crossorigin="anonymous" referrerpolicy="no-referrer" />
</head>

<body>
    <div class="textContainer">
    </div>
    <div class="keyboard">
        <div class="row">
            <div class="key">1</div>
            <div class="key">2</div>
            <div class="key">3</div>
            <div class="key">4</div>
            <div class="key">5</div>
            <div class="key">6</div>
            <div class="key">7</div>
            <div class="key">8</div>
            <div class="key">9</div>
            <div class="key">0</div>
            <div class="key delete"><i class="fa-solid fa-delete-left"></i></div>
        </div>
        <div class="row">
            <div class="key">q</div>
            <div class="key">w</div>
            <div class="key">e</div>
            <div class="key">r</div>
            <div class="key">t</div>
            <div class="key">y</div>
            <div class="key">u</div>
            <div class="key">i</div>
            <div class="key">o</div>
            <div class="key">p</div>
        </div>
        <div class="row">
            <div class="key capslock">CapsLock</div>
            <div class="key">a</div>
            <div class="key">s</div>
            <div class="key">d</div>
            <div class="key">f</div>
            <div class="key">g</div>
            <div class="key">h</div>
            <div class="key">j</div>
            <div class="key">k</div>
            <div class="key">l</div>
            <div class="key enter">Enter</div>
        </div>
        <div class="row last">
            <div class="key">z</div>
            <div class="key">x</div>
            <div class="key">c</div>
            <div class="key">v</div>
            <div class="key">b</div>
            <div class="key">n</div>
            <div class="key">m</div>
        </div>
        <div class="row">
            <div class="key space"></div>
        </div>
    </div>
</body>
<script src="./script.js"></script>

</html>
<!DOCTYPE html>: This declaration specifies that the document is written in HTML5.<html lang="en">: The opening tag for the HTML document. Thelangattribute specifies the language of the document, which is set to English.<head>: This section contains metadata and external resources that provide information about the document, like its title, character encoding, linked stylesheets, and scripts.<meta charset="UTF-8">: This meta tag specifies the character encoding of the document as UTF-8, which supports a wide range of characters from different languages.<meta http-equiv="X-UA-Compatible" content="IE=edge">: This meta tag provides compatibility instructions for Internet Explorer. It indicates that the document should be displayed using the latest rendering engine.<meta name="viewport" content="width=device-width, initial-scale=1.0">: This meta tag sets the viewport properties for responsive design. It ensures that the webpage is displayed correctly on various device sizes.<title>Virtual Keyboard</title>: This sets the title of the webpage, which appears in the browser's title bar or tab.<link rel="stylesheet" href="./style.css">: This link tag connects an external CSS file named "style.css" to the HTML document. It's used to style the elements on the page.<link rel="stylesheet" href="https://cdnjs.cloudflare.com/ajax/libs/font-awesome/6.2.0/css/all.min.css" ...>: This link tag includes the Font Awesome icon library for using icons in the project. It links to a CSS file hosted externally.</head>: Closes the head section.<body>: This section contains the visible content of the webpage.<div class="textContainer">: A container for displaying the entered text content.<div class="keyboard">: A container for the virtual keyboard keys.- Inside the
.keyboarddiv, there are four.rowdivs that group the keys into rows. - Inside each
.rowdiv, there are several.keydivs representing individual keyboard keys. For example, the numeric keys, alphabet keys, special keys like CapsLock, and the space key. </body>: Closes the body section.<script src="./script.js"></script>: This script tag links an external JavaScript file named "script.js" to the HTML document. The JavaScript code contains the functionality for the virtual keyboard.</html>: Closes the HTML document.
In summary, your HTML code defines the structure of your virtual keyboard project. It includes the necessary metadata, external resources (CSS and JavaScript), and the layout for the text display area and the virtual keyboard keys. The keyboard keys are organized into rows, with each key having a specific class that can be targeted for styling and functionality using CSS and JavaScript.
CSS
body {
    margin: 0;
    padding: 0;
    box-sizing: border-box;
    background-color: rgb(49, 50, 4);
    font-family: sans-serif;
    display: flex;
    flex-direction: column;
    align-items: center;
    justify-content: space-evenly;
    height: 100vh;
    font-size: 1.5rem;
}
body: Styles for the entire webpage's body.margin,padding: Sets margin and padding to zero for consistent spacing.box-sizing: Specifies the box-sizing model as "border-box" which includes padding and border within the element's total width and height.background-color: Sets the background color of the body.font-family: Defines the preferred font family for text content.display: Specifies the display type as flex, enabling flexible layout.flex-direction: Sets the main axis of the flex container as vertical, creating a column layout.align-items: Aligns flex items vertically at the center.justify-content: Distributes space evenly between flex items along the main axis.height: Sets the body's height to 100 viewport height units.font-size: Sets the base font size for text content.
.textContainer {
    height: 15vh;
    width: 90vw;
    background: rgb(227, 214, 74);
    border-radius: 0.5rem;
    outline: none;
    padding: 2rem;
    overflow-y: scroll;
    display: flex;
    flex-direction: column-reverse;
}
.textContainer: Styles for the container holding the text input.height,width: Sets the container's height to 15% and width to 90% of the viewport width.background: Sets the background color of the container.border-radius: Adds rounded corners to the container.outline: Removes any outline (focus) styling.padding: Adds internal spacing to the container's content.overflow-y: Enables vertical scrolling if content overflows.display: Sets the display type as flex for flexible layout.flex-direction: Places flex items in a column layout, with the content aligned to the bottom.
.keyboard {
    display: flex;
    flex-direction: column;
    justify-content: space-evenly;
    height: 50vh;
    width: 70vw;
    background-color: rgb(227, 214, 74);
    border-radius: 1rem;
}
.keyboard: Styles for the virtual keyboard container.display: Sets the display type as flex for flexible layout.flex-direction: Places flex items in a column layout.justify-content: Distributes space evenly between keyboard rows.height: Sets the keyboard's height to 50% of the viewport height.width: Sets the keyboard's width to 70% of the viewport width.background-color: Sets the background color of the keyboard.border-radius: Adds rounded corners to the keyboard container.
.row {
    display: flex;
    justify-content: space-evenly;
    align-items: center;
}
.row: Styles for a row of keys within the virtual keyboard.display: Sets the display type as flex for flexible layout.justify-content: Distributes space evenly between keys within the row.align-items: Aligns keys vertically at the center.
.last {
    width: 65%;
    margin: 0 auto;
}
.last: Styles specifically for the last row of keys.width: Sets the width of the last row to 65% of its container's width.margin: Sets margin horizontally to auto, which centers the row within its container.
.space {
    background: rgb(171, 171, 2);
    width: 50%;
    height: 2rem;
}
.space: Styles for the space key within the keyboard.background: Sets the background color of the space key.width: Sets the width of the space key to 50% of its container's width.height: Sets the height of the space key.
.key {
    cursor: pointer;
    padding: 0.5rem;
    border-radius: 3px;
}
.key: Styles for the individual keys within the keyboard.cursor: Sets the cursor appearance to a pointer when hovering over the key.padding: Adds internal spacing within the key element.border-radius: Adds rounded corners to the keys.
.key:active {
    background: rgb(171, 171, 2);
}
.key:active: Styles applied to a key when it is in an active (pressed) state.background: Changes the background color of the key when active.
.active {
    background-color: rgb(171, 171, 2);
}
.active: Styles applied to elements that have the class "active".background-color: Changes the background color of the element with this class.
This CSS code provides the visual styling for your virtual keyboard project, defining the appearance of the keyboard layout, keys, and text input area. It uses flexbox for layout flexibility and responsive design techniques.
JavaScript
let textContainer = document.querySelector(".textContainer");
let deleteKey = document.querySelector(".delete");
let enterKey = document.querySelector(".enter");
let spaceKey = document.querySelector(".space");
let capsLock = document.querySelector(".capslock");
let allKey = document.querySelectorAll(".key");
let isCaps = false;

let isTypingWithKeyboard = false; // Flag to differentiate keyboard input
In this section, you're declaring variables to store references to various elements in your HTML. These variables will be used later for event handling and manipulation.
textContainer: Holds a reference to the element with the class "textContainer" that displays the entered text.deleteKey: Holds a reference to the element with the class "delete," representing the delete key.enterKey: Holds a reference to the element with the class "enter," representing the enter key.spaceKey: Holds a reference to the element with the class "space," representing the space key.capsLock: Holds a reference to the element with the class "capslock," representing the CapsLock key.allKey: Holds references to all elements with the class "key," representing all keys on the virtual keyboard.isCaps: A boolean variable that tracks whether CapsLock is active or not.isTypingWithKeyboard: A boolean flag to differentiate between typing from the physical keyboard and typing via on-screen keyboard.
function updateContent() {
  let content = textContainer.innerText.replace("|", "");
  textContainer.innerText = content;
}
updateContent(): This function updates the displayed content in thetextContainerby removing the cursor indicator ("|") if it's present. However, it doesn't seem to be used in the rest of the code.
function handleTyping(text) {
  let content = textContainer.innerText;
  let cursorIndex = content.indexOf("|");

  if (cursorIndex === -1) {
    content += text;
  } else {
    content = content.slice(0, cursorIndex) + text + content.slice(cursorIndex);
    cursorIndex += text.length;
  }

  textContainer.innerText = content;
  updateCursor(cursorIndex + text.length); // Move cursor beside the last letter typed
}
handleTyping(text): This function handles typing on the virtual keyboard. It adds the pressed character to the content at the appropriate cursor position, considering the presence of the cursor indicator ("|"). It then updates the content and moves the cursor indicator.
function updateCursor(cursorIndex) {
  let content = textContainer.innerText;
  content = content.replace("|", "");

  if (cursorIndex >= 0 && cursorIndex <= content.length) {
    textContainer.innerHTML =
      content.slice(0, cursorIndex) +
      "<span class='cursor'>|</span>" +
      content.slice(cursorIndex);
  }
}
updateCursor(cursorIndex): This function updates the position of the cursor indicator. It replaces the cursor indicator ("|") with an HTML element (<span class='cursor'>|</span>) at the specified index.
document.addEventListener("keydown", function (event) {
  let key = event.key;

  // Set the flag for keyboard input
  isTypingWithKeyboard = true;

  if (key === "Backspace") {
    let cursorIndex = textContainer.innerText.indexOf("|");
    if (cursorIndex > 0) {
      handleTyping(""); // Delete at cursor position
    }
  } else if (key === "Enter") {
    handleTyping("\n");
  } else if (key === " ") {
    handleTyping(" ");
  } else if (key === "CapsLock") {
    capsLock.click();
  } else if (key.length === 1) {
    handleTyping(isCaps ? key.toUpperCase() : key.toLowerCase());
  }
});
This event listener captures physical keyboard keydown events. It handles various key presses:
- Backspace: Calls
handleTyping("")to delete at the cursor position. - Enter: Calls
handleTyping("\n")to add a newline. - Space: Calls
handleTyping(" ")to add a space. - CapsLock: Simulates a click on the CapsLock element to toggle capitalization.
- Character keys: Calls
handleTyping()with the lowercase or uppercase character based on the CapsLock state.
for (let key of allKey) {
  key.addEventListener("click", function () {
    if (
      key.classList.contains("delete") ||
      key.classList.contains("enter") ||
      key.classList.contains("space") ||
      key.classList.contains("capslock")
    ) {
      return;
    }

    // Handle typing only if not typing with the keyboard
    if (!isTypingWithKeyboard) {
      handleTyping(key.innerText);
    }

    // Reset the flag after handling the click
    isTypingWithKeyboard = false;
  });
}
This loop adds event listeners to each on-screen key. It handles key clicks for all keys except special keys like Delete, Enter, Space, and CapsLock. It also checks if the typing is not done with the physical keyboard (using the flag) to avoid duplicating input.
deleteKey.addEventListener("click", function () {
  let textContainerContent = textContainer.innerText;
  if (textContainerContent.length == 0) {
    return;
  }
  console.log(textContainerContent);
  let newContent = textContainerContent.slice(
    0,
    textContainerContent.length - 1
  );
  textContainer.innerText = newContent;
  updateCursor(newContent.length); // Move cursor beside the last letter typed
});

enterKey.addEventListener("click", function () {
  let content = textContainer.innerText;
  let newContent = content + "\n";
  textContainer.innerText = newContent;
  updateCursor(newContent.length); // Move cursor beside the last letter typed
});

spaceKey.addEventListener("click", function () {
  let content = textContainer.innerText;
  let newContent = content + "\u00A0";
  textContainer.innerText = newContent;
  updateCursor(newContent.length); // Move cursor beside the last letter typed
});

capsLock.addEventListener("click", function () {
  if (isCaps) {
    capsLock.classList.remove("active");
    for (let key of allKey) {
      if (
        key.classList.contains("delete") ||
        key.classList.contains("enter") ||
        key.classList.contains("space") ||
        key.classList.contains("capslock")
      ) {
        //
      } else key.innerText = key.innerText.toLowerCase();
    }
  } else {
    capsLock.classList.add("active");
    for (let key of allKey) {
      if (
        key.classList.contains("delete") ||
        key.classList.contains("enter") ||
        key.classList.contains("space") ||
        key.classList.contains("capslock")
      ) {
        //
      } else key.innerText = key.innerText.toUpperCase();
    }
  }
  isCaps = !isCaps;
});
- Event listeners for special keys (
deleteKey,enterKey,spaceKey,capsLock): These functions handle the clicks on these keys, performing specific actions such as deleting characters, adding new lines or spaces, and toggling capitalization. They also update the cursor position accordingly.
In summary, the JavaScript code provides the functionality for your virtual keyboard project. It handles both physical keyboard input and on-screen keyboard clicks, manages the cursor position, and updates the displayed content and key states accordingly.
Conclusion
Developing a virtual keyboard involves creating an HTML structure, styling it with CSS, and adding interactive functionality using JavaScript. This project provides a practical example of how these technologies can be integrated to create a user-friendly virtual keyboard that can be integrated into various web applications. By following this step-by-step guide, we’ve discussed how to build a virtual keyboard from scratch and gained insights into the development process. Feel free to enhance the keyboard further by adding more features and customizations based on your requirements.