Open-Source Internship opportunity by OpenGenus for programmers. Apply now.
Reading time: 35 minutes
Data augmentation is the technique of increasing the size of data used for training a model. For reliable predictions, the deep learning models often require a lot of training data, which is not always available. Therefore, the existing data is augmented in order to make a better generalized model.
Although data augmentation can be applied in various domains, it's commonly used in computer vision. Some of the most common data augmentation techniques used for images are:
- Position augmentation
- Scaling
- Cropping
- Flipping
- Padding
- Rotation
- Translation
- Affine transformation
- Color augmentation
- Brightness
- Contrast
- Saturation
- Hue
Let's go through the above techniques one-by-one and implement them in PyTorch. First, let's define a helper function to plot the images.
import PIL.Image
import matplotlib.pyplot as plt
import torch
from torchvision import transforms

def imshow(img, transform):
    """helper function to show data augmentation
    :param img: path of the image
    :param transform: data augmentation technique to apply"""

    img = PIL.Image.open(img)
    fig, ax = plt.subplots(1, 2, figsize=(15, 4))
    ax[0].set_title(f'original image {img.size}')
    ax[0].imshow(img)
    img = transform(img)
    ax[1].set_title(f'transformed image {img.size}')
    ax[1].imshow(img)
Position augmentation
In position augmentations, the pixel positions of an image is changed.
Scaling
In scaling or resizing, the image is resized to the given size e.g. the width of the image can be doubled.
loader_transform = transforms.Resize((140, 140))
imshow('/home/harshit/Pictures/tiger.jpg', loader_transform)

Cropping
In cropping, a portion of the image is selected e.g. in the given example the center cropped image is returned.
loader_transform = transforms.CenterCrop(140)
imshow('/home/harshit/Pictures/tiger.jpg', loader_transform)

Flipping
In flipping, the image is flipped horizontally or vertically.
# horizontal flip with probability 1 (default is 0.5)
loader_transform = transforms.RandomHorizontalFlip(p=1)
imshow('/home/harshit/Pictures/tiger.jpg', loader_transform)

Padding
In padding, the image is padded with a given value on all sides.
# left, top, right, bottom
loader_transform = transforms.Pad((2, 5, 0, 5))
imshow('/home/harshit/Pictures/tiger.jpg', loader_transform)

Rotation
The image is rotated randomly in rotation.
loader_transform = transforms.RandomRotation(30)
imshow('/home/harshit/Pictures/tiger.jpg', loader_transform)

Translation
In translation, the image is moved either along the x-axis or y-axis.
Affine transformation
The affine transformation preserves points, straight lines, and planes. It can be used for scaling, tranlation, shearing, rotation etc.
# random affine transformation of the image keeping center invariant
loader_transform = transforms.RandomAffine(0, translate=(0.4, 0.5))
imshow('/home/harshit/Pictures/tiger.jpg', loader_transform)

Color augmentation
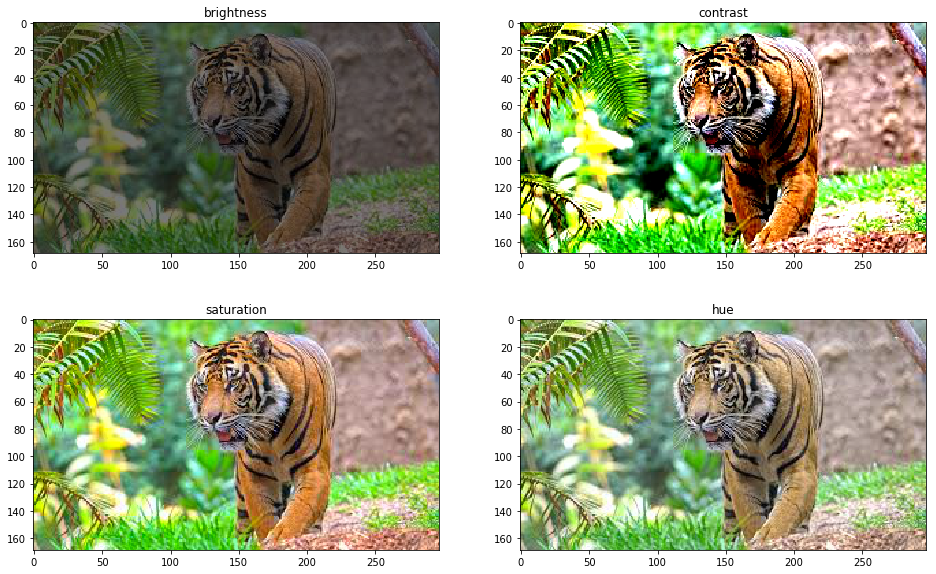
Color augmentation or color jittering deals with altering the color properties of an image by changing its pixel values.
Brightness
One way to augment is to change the brightness of the image. The resultant image becomes darker or lighter compared to the original one.
Contrast
The contrast is defined as the degree of separation between the darkest and brightest areas of an image. The contrast of the image can also be changed.
Saturation
Saturation is the separation between colors of an image.
Hue
Hue can be described of as the shade of the colors in an image.
img = PIL.Image.open('/home/harshit/Pictures/tiger.jpg')
fig, ax = plt.subplots(2, 2, figsize=(16, 10))

# brightness
loader_transform1 = transforms.ColorJitter(brightness=2)
img1 = loader_transform1(img)
ax[0, 0].set_title(f'brightness')
ax[0, 0].imshow(img1)

# contrast
loader_transform2 = transforms.ColorJitter(contrast=2)
img2 = loader_transform2(img)
ax[0, 1].set_title(f'contrast')
ax[0, 1].imshow(img2)

# saturation
loader_transform3 = transforms.ColorJitter(saturation=2)
img3 = loader_transform3(img)
ax[1, 0].set_title(f'saturation')
ax[1, 0].imshow(img3)
fig.savefig('color augmentation', bbox_inches='tight')

# hue
loader_transform4 = transforms.ColorJitter(hue=0.2)
img4 = loader_transform4(img)
ax[1, 1].set_title(f'hue')
ax[1, 1].imshow(img4)

fig.savefig('color augmentation', bbox_inches='tight')

Grayscale
The color image can be converted into grayscale for augmentation.
loader_transform = transforms.Grayscale()
imshow('/home/harshit/Pictures/tiger.jpg', loader_transform)

Advanced methods
-
The Generative Adversarial Networks are used to generate new samples of images. The generated new samples can also be augmented to the training set.
-
Neural Style transfer is used to combine the content of one image with the style of another. Though fairly new compared to the classical methods, these methods can also be used for data augmentation.
Conclusion
The above mentioned data augmentation techniques are often applied in combination e.g. cropping after resizing. Also, note that data augmentation is only applied on the training set, not on the testing set.
# random rotation > resizing > cropping > flipping
loader_transform = transforms.Compose([
    transforms.RandomRotation(30),
    transforms.RandomResizedCrop(140),
    transforms.RandomHorizontalFlip()
])
imshow('/home/harshit/Pictures/tiger.jpg', loader_transform)

Data augmentation not only helps in increasing the size of the training set but also in avoiding overfitting. By increasing the size of data and adding diversity in data, data augmentation helps the model generalize better, hence preventing overfitting.
