
In this article, we learn about GUI in Java with Java AWT, Swing, JavaFX, and some other relevant concepts.
We'll discuss:
- Intrdoduction
- Java AWT (Absract Window Toolkit)
- Java Swing
- JavaFX
- Creating Layout
- BorderLayout
- FlowLayout
- GridLayout
- Event Handling
- Working with Images and Audio Files
- Conclusion
Introduction
Graphical User Interface (GUI) is an essential part of modern software development. It provides a visual interface for users to interact with the computer and access its functions and features. GUI has become an indispensable aspect of software development, making it easier for users to perform tasks and interact with the computer.
Java, one of the most popular programming languages in the world, provides several libraries for GUI development. Over the years, Java's GUI libraries have evolved to cater to the changing needs of software development, and today, Java offers some of the most advanced and sophisticated GUI libraries available.
In this blog, we will explore the basics of GUI development in Java, including the history of Java's GUI libraries, and delve into the key features and examples of using the Abstract Window Toolkit (AWT), Swing, and JavaFX. We will also cover important concepts such as layout management, event handling, and working with images and media. By the end of this blog, you will have a solid understanding of GUI development in Java and be able to create your own GUI interfaces with confidence.
Java AWT (Abstract Window Toolkit)
The Abstract Window Toolkit (AWT) was introduced as part of Java's standard library in its early days and was the first GUI library for Java. AWT provides a set of basic components and widgets, such as buttons, labels, text fields, and more, that developers can use to create simple GUI interfaces.
One of the key features of AWT is its cross-platform compatibility. AWT was designed to provide a consistent look and feel across different operating systems, allowing developers to write once and run anywhere. This is achieved by using the underlying operating system's native GUI components, and abstracting the differences between different platforms.
AWT is still widely used today, particularly for applications that require a simple and straightforward GUI. Here are a few examples of using AWT to create basic GUI interfaces:
- Creating a simple window:
// Import the required classes from the java.awt and java.awt.event packages
import java.awt.*;
import java.awt.event.*;
public class AWTExample {
// Declare the components of the GUI
private Frame mainFrame;
private Label headerLabel;
private Label statusLabel;
private Panel controlPanel;
public AWTExample() {
// Call the prepareGUI method to set up the GUI
prepareGUI();
}
public static void main(String[] args) {
// Create an instance of the AWTExample class and call the showEventDemo method
AWTExample awtExample = new AWTExample();
awtExample.showEventDemo();
}
private void prepareGUI() {
// Create the main frame and set its size and layout
mainFrame = new Frame("Java AWT Examples");
mainFrame.setSize(400, 400);
mainFrame.setLayout(new GridLayout(3, 1));
// Add a window listener to the main frame to close the application when the close button is clicked
mainFrame.addWindowListener(
new WindowAdapter() {
public void windowClosing(WindowEvent windowEvent) {
System.exit(0);
}
}
);
// Create the header label and set its alignment
headerLabel = new Label();
headerLabel.setAlignment(Label.CENTER);
// Create the status label and set its alignment and size
statusLabel = new Label();
statusLabel.setAlignment(Label.CENTER);
statusLabel.setSize(350, 100);
// Create the control panel and set its layout
controlPanel = new Panel();
controlPanel.setLayout(new FlowLayout());
// Add the header label, control panel, and status label to the main frame
mainFrame.add(headerLabel);
mainFrame.add(controlPanel);
mainFrame.add(statusLabel);
// Make the main frame visible
mainFrame.setVisible(true);
}
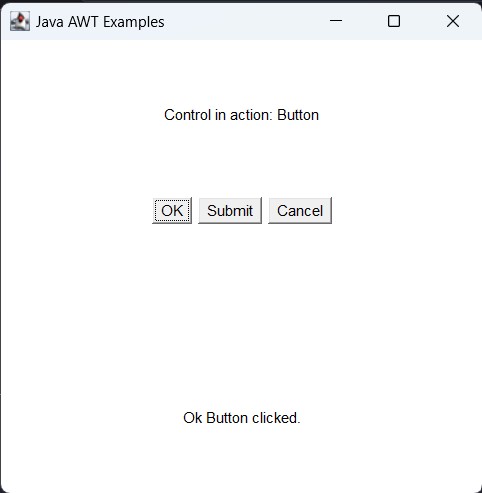
private void showEventDemo() {
// Set the text of the header label
headerLabel.setText("Control in action: Button");
// Create the buttons and add action listeners to them
Button okButton = new Button("OK");
Button submitButton = new Button("Submit");
Button cancelButton = new Button("Cancel");
okButton.addActionListener(
new ActionListener() {
public void actionPerformed(ActionEvent e) {
// Set the text of the status label when the OK button is clicked
statusLabel.setText("Ok Button clicked.");
}
}
);
submitButton.addActionListener(
new ActionListener() {
public void actionPerformed(ActionEvent e) {
// Set the text of the status label when the Submit button is clicked
statusLabel.setText("Submit Button clicked.");
}
}
);
cancelButton.addActionListener(
new ActionListener() {
public void actionPerformed(ActionEvent e) {
// Set the text of the status label when the Cancel button is clicked
statusLabel.setText("Cancel Button clicked.");
}
}
);
// Add buttons to the control panel
controlPanel.add(okButton);
controlPanel.add(submitButton);
controlPanel.add(cancelButton);
// Set the visibility of the main frame to true
mainFrame.setVisible(true);
}
}
The output look like this:
- Creating a simple dialog box:
// Import the required libraries for the AWT components and event handling
import java.awt.*;
import java.awt.event.*;
public class AWTDialogExample {
// Declare the main frame and the required labels and panels
private Frame mainFrame;
private Label headerLabel;
private Label statusLabel;
private Panel controlPanel;
public AWTDialogExample() {
// Call the prepareGUI method to set up the main frame and its components
prepareGUI();
}
public static void main(String[] args) {
// Create a new instance of the AWTDialogExample class and call the showEventDemo method
AWTDialogExample awtDialogExample = new AWTDialogExample();
awtDialogExample.showEventDemo();
}
private void prepareGUI() {
// Initialize the main frame
mainFrame = new Frame("Java AWT Dialog Example");
mainFrame.setSize(400, 400);
// Set the layout of the main frame to a 3x1 grid layout
mainFrame.setLayout(new GridLayout(3, 1));
// Add a window listener to the main frame to exit the program when the window is closed
mainFrame.addWindowListener(new WindowAdapter() {
public void windowClosing(WindowEvent windowEvent) {
System.exit(0);
}
});
// Initialize the header label and set its alignment to center
headerLabel = new Label();
headerLabel.setAlignment(Label.CENTER);
// Initialize the status label, set its alignment to center, and set its size
statusLabel = new Label();
statusLabel.setAlignment(Label.CENTER);
statusLabel.setSize(350, 100);
// Initialize the control panel and set its layout to a flow layout
controlPanel = new Panel();
controlPanel.setLayout(new FlowLayout());
// Add the header label, control panel, and status label to the main frame
mainFrame.add(headerLabel);
mainFrame.add(controlPanel);
mainFrame.add(statusLabel);
// Set the main frame to be visible
mainFrame.setVisible(true);
}
private void showEventDemo() {
// Set the text of the header label to "Control in action: Dialog"
headerLabel.setText("Control in action: Dialog");
// Initialize a button to show the dialog
Button showDialogButton = new Button("Show Dialog");
// Add an action listener to the show dialog button
showDialogButton.addActionListener(new ActionListener() {
public void actionPerformed(ActionEvent e) {
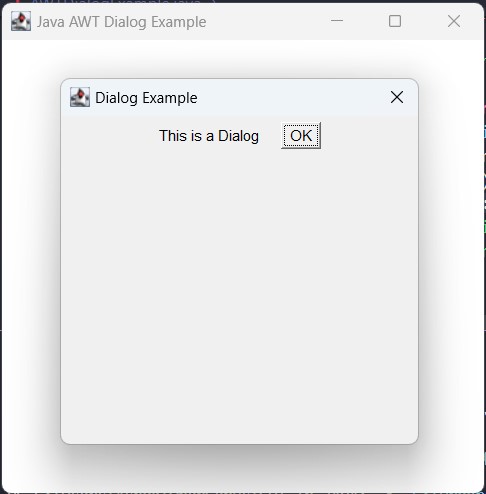
// Initialize a new dialog with the main frame as its parent, a title of "Dialog Example", and modality set to true
Dialog d = new Dialog(mainFrame, "Dialog Example", true);
// Set the layout of the dialog to a flow layout
d.setLayout(new FlowLayout());
// Initialize a button to dispose of the dialog
Button b = new Button("OK");
b.addActionListener(new ActionListener() {
public void actionPerformed(ActionEvent e) {
// Dispose of the dialog when the OK button is
d.dispose();
}
});
d.add(new Label("This is a Dialog")); //add a label to the Dialog
d.add(b); //add the OK button to the Dialog
d.setSize(300, 300); //set the size of the Dialog
d.setVisible(true); //make the Dialog visible to the user
}
});
// add the showDialogButton to the mainFrame
controlPanel.add(showDialogButton);
//make the mainFrame visible to the user
mainFrame.setVisible(true);
}
}
The dialog box will look like this:
AWT is still a popular choice for GUI development, especially for applications that require a simple and straightforward GUI. However, AWT has several limitations and drawbacks, such as its lack of advanced features and poor performance compared to more modern GUI libraries.
In the next section, we will take a look at the Swing library, which was introduced as an improvement over AWT and provides many additional features and improvements.
Java Swing
Java Swing is a GUI widget toolkit for Java that provides a platform-independent and lightweight solution for building rich graphical user interfaces. It was introduced as a part of the Java Foundation Classes (JFC) and is an improvement over the earlier Abstract Window Toolkit (AWT) in terms of performance, features, and versatility.
Some of the key features of Java Swing include:
-
Lightweight components: Swing components are lightweight, meaning they are drawn entirely in software, which makes them more flexible and versatile.
-
Platform-independent: Java Swing is platform-independent, which means that applications built using Swing can run on any operating system that supports Java without the need for any modification.
-
Rich set of components: Swing provides a rich set of components, including buttons, labels, text boxes, tables, trees, and more.
-
Customizable look and feel: The look and feel of the Swing components can be customized, either by using the built-in look and feel options or by creating a custom look and feel.
-
Model-View-Controller (MVC) architecture: Swing components are based on the Model-View-Controller (MVC) architecture, which separates the data representation from the user interface, making it easier to develop, maintain, and update the application.
Here is an example of a simple Java Swing program that creates a basic window with a button:
import javax.swing.;
import java.awt.;
import java.awt.event.*;

// Main class
public class SwingExample {
    // Variables for frame, labels and panel
    private JFrame mainFrame;
    private JLabel headerLabel;
    private JLabel statusLabel;
    private JPanel controlPanel;
    // Constructor
    public SwingExample() {
        prepareGUI();
    }

    public static void main(String[] args) {
        // Create instance of the class
        SwingExample swingExample = new SwingExample();
        swingExample.showEventDemo();
    }

    // Method to initialize the GUI components
    private void prepareGUI() {
        // Create a frame and set its properties
        mainFrame = new JFrame("Java Swing Examples");
        mainFrame.setSize(400, 400);
        // Set layout to be a BoxLayout with Y_AXIS orientation
        mainFrame.setLayout(new BoxLayout(mainFrame.getContentPane(), BoxLayout.Y_AXIS));
        // Add a window listener to exit the program when the window is closed
        mainFrame.addWindowListener(new WindowAdapter() {
            public void windowClosing(WindowEvent windowEvent) {
                System.exit(0);
            }
        });

        // Initialize the header label and set its properties
        headerLabel = new JLabel("", JLabel.CENTER);
        // Initialize the status label and set its properties
        statusLabel = new JLabel("", JLabel.CENTER);
        statusLabel.setSize(350, 100);

        // Initialize the control panel
        controlPanel = new JPanel();
        controlPanel.setLayout(new FlowLayout());

        // Add the header label, control panel, and status label to the main frame
        mainFrame.add(headerLabel);
        mainFrame.add(controlPanel);
        mainFrame.add(statusLabel);
        mainFrame.setVisible(true);
    }

    // Method to display event demo
    private void showEventDemo() {
        // Set the text for the header label
        headerLabel.setText("Control in action: Button");

        // Create an "OK" button
        JButton okButton = new JButton("OK");
        // Set the action command for the button to "OK"
        okButton.setActionCommand("OK");
        // Add an action listener to the button
        okButton.addActionListener(new ButtonClickListener());

        // Add the button to the control panel
        controlPanel.add(okButton);
        mainFrame.setVisible(true);
    }

    // Inner class for the button click listener
    private class ButtonClickListener implements ActionListener {
        public void actionPerformed(ActionEvent e) {
            // Get the action command from the button
            String command = e.getActionCommand();
            // Check if the action command is "OK"
            if (command.equals("OK")) {
                // If it is, set the text of the status label to "OK Button clicked."
                statusLabel.setText("OK Button clicked.");
            }
        }
    }
}
The output of the code is:
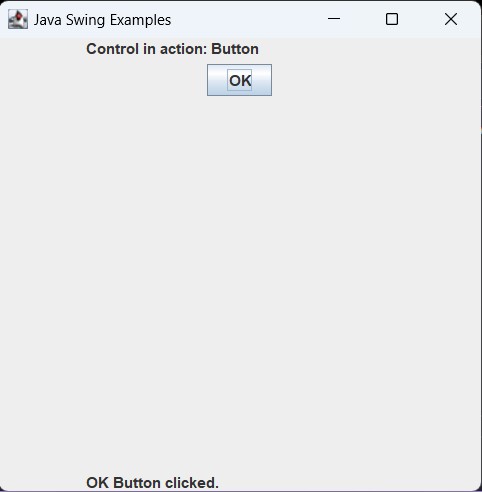
In this example, a JFrame is created, which serves as the main window for the application. A JLabel is used to display text at the top of the window, a JPanel is used to contain the buttons, and a JButton is used to trigger an action when clicked. The button's action is defined by an ActionListener, which is a separate class in this example. When the button is clicked, the text in the JLabel changes to reflect the action.
This is just a simple example, but it demonstrates the basic building blocks of a Java Swing application and how they work together to create a functional GUI. Java Swing provides many more components and features that can be used to create more complex and sophisticated user interfaces.
Difference between Java AWT and Java Swing
-
Java AWT (Abstract Window Toolkit) is the original Java GUI toolkit, introduced in the early days of Java. It provides a basic set of graphical user interface (GUI) components, such as buttons, text boxes, and labels, among others.
-
Java Swing, on the other hand, is a more advanced and feature-rich GUI toolkit that builds on top of AWT. It provides a wider range of components, including table, tree, and tabbed panels, as well as advanced components such as progress bars and sliders.
-
In terms of performance, Swing is faster and more efficient than AWT because it is implemented entirely in Java and does not rely on native components. AWT components, on the other hand, are implemented as native components, which can lead to performance issues and platform-specific quirks.
-
When it comes to look and feel, AWT components have a basic and plain look, whereas Swing components can be customized to match the look and feel of the underlying operating system or a specific look and feel.
-
In conclusion, both Java AWT and Java Swing have their own strengths and weaknesses, and the choice between the two largely depends on the specific requirements of your project. For simple GUI applications, AWT may be sufficient, but for more complex applications with advanced requirements, Swing is the better choice.
JavaFX
JavaFX is a modern and powerful GUI toolkit that was introduced as a part of Java SE in Java 8. It provides a rich set of graphical user interface components, animation, and multimedia capabilities. JavaFX is designed to provide a consistent and unified look and feel across all platforms, regardless of the underlying operating system.
Creating a simple JavaFX interface involves several steps:
-
Setting up the environment: JavaFX is bundled with Java SE, so you don't need to install any additional libraries. You'll need to make sure that you have the latest version of Java installed, and then set up your development environment with a suitable Java IDE, such as Eclipse or IntelliJ IDEA.
-
Creating a new JavaFX project: In your IDE, create a new JavaFX project and add a new JavaFX class to the project.
-
Writing the code: In the JavaFX class, you'll write code to create the interface. JavaFX uses a declarative programming style, where you specify the components and their properties, and the underlying system takes care of rendering the components.
Here is an example code to create a simple JavaFX interface with a button and a label:
import javafx.application.Application;
import javafx.event.ActionEvent;
import javafx.event.EventHandler;
import javafx.scene.Scene;
import javafx.scene.control.Button;
import javafx.scene.control.Label;
import javafx.scene.layout.StackPane;
import javafx.stage.Stage;

// JavaFXExample class extends the Application class
public class JavaFXExample extends Application {

    public static void main(String[] args) {
        launch(args);
    }

    @Override
    public void start(Stage primaryStage) {
        // Set the title for the primary stage
        primaryStage.setTitle("JavaFX Example");

        // Create a button and set its text
        Button btn = new Button();
        btn.setText("Click Me");
        // Add an action event to the button
        btn.setOnAction(new EventHandler<ActionEvent>() {
            @Override
            public void handle(ActionEvent event) {
                System.out.println("Hello JavaFX");
            }
        });

        // Create a label and set its text
        Label label = new Label();
        label.setText("Welcome to JavaFX");

        // Create a StackPane layout and add the button and label
        StackPane root = new StackPane();
        root.getChildren().add(btn);
        root.getChildren().add(label);

        // Set the scene to the primary stage and show the stage
        primaryStage.setScene(new Scene(root, 300, 250));
        primaryStage.show();
    }
}
In the code above, we create a button and a label, and add them to a StackPane layout. The StackPane layout allows components to be stacked on top of each other. We also set the text for the button and label, and attach an event handler to the button to print a message when it's clicked. Finally, we create a scene and set it as the content of the primary stage, and show the stage.
Here's a brief overview of the difference between the two:
-
Architecture: Swing is based on the Model-View-Controller (MVC) architecture, while JavaFX uses a Scene Graph architecture. The Scene Graph architecture allows for more sophisticated UI design and animation capabilities compared to the MVC architecture used by Swing.
-
Look and Feel: JavaFX provides a more modern and aesthetically pleasing look and feel compared to Swing. JavaFX also offers a wider range of UI components and more flexible styling options.
-
Performance: JavaFX has better performance compared to Swing, especially when it comes to UI animations and graphics-intensive applications.
-
Features: JavaFX offers a number of advanced features such as built-in support for 3D graphics, video and audio playback, and multi-touch gestures. These features are not available in Swing.
-
Ease of Development: JavaFX provides a more streamlined and easy-to-use API compared to Swing, making it easier for developers to create complex and sophisticated UIs.
Overall, JavaFX provides a more modern and advanced approach to UI design compared to Swing, and is better suited for complex and sophisticated UI applications. However, Swing is still widely used and has a large user community, and may be a better choice for projects with specific requirements or constraints.
Creating Layout
When building graphical user interfaces in Java, it is important to consider the layout of the interface. A well-designed layout not only improves the look and feel of the application, but also makes it more user-friendly. Java offers several built-in layout managers to arrange components in a GUI, such as BorderLayout, FlowLayout, and GridLayout. In this section, we will introduce these layout managers and show examples of how they can be used to arrange components in a GUI.
BorderLayout
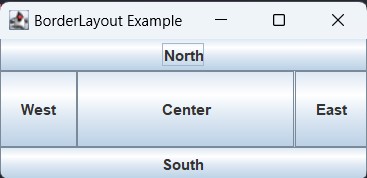
BorderLayout is one of the most commonly used layout managers in Java. It divides a container into five areas: north, south, east, west, and center. Components can be added to each of these areas, and they will be positioned accordingly. For example, a button can be added to the north region, and it will be positioned at the top of the container.
import java.awt.*;
import javax.swing.*;

public class BorderLayoutExample {
    public static void main(String[] args) {
        // create the JFrame with title "BorderLayout Example"
        JFrame frame = new JFrame("BorderLayout Example");
        // set the default close operation of the frame
        frame.setDefaultCloseOperation(JFrame.EXIT_ON_CLOSE);

        // get the contentPanel of the frame
        Container contentPanel = frame.getContentPane();
        // set the layout manager of the contentPane to BorderLayout
        contentPanel.setLayout(new BorderLayout());

        // create button1 and set its text to "North"
        JButton button1 = new JButton("North");
        // add button1 to the north region of the contentPane
        contentPanel.add(button1, BorderLayout.NORTH);

        // create button2 and set its text to "South"
        JButton button2 = new JButton("South");
        // add button2 to the south region of the contentPane
        contentPanel.add(button2, BorderLayout.SOUTH);

        // create button3 and set its text to "East"
        JButton button3 = new JButton("East");
        // add button3 to the east region of the contentPane
        contentPanel.add(button3, BorderLayout.EAST);

        // create button4 and set its text to "West"
        JButton button4 = new JButton("West");
        // add button4 to the west region of the contentPane
        contentPanel.add(button4, BorderLayout.WEST);

        // create button5 and set its text to "Center"
        JButton button5 = new JButton("Center");
        // add button5 to the center region of the contentPane
        contentPanel.add(button5, BorderLayout.CENTER);

        // pack the frame so that all its components are at or above their preferred sizes
        frame.pack();
        // set the visibility of the frame to true
        frame.setVisible(true);
    }
}
Border Layout will look like this:
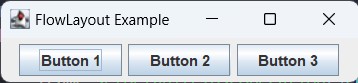
FlowLayout
FlowLayout is another popular layout manager in Java. It positions components in a left-to-right, top-to-bottom flow. When the components reach the end of the container, they will be positioned on a new row.
import java.awt.*;
import javax.swing.*;

public class FlowLayoutExample {
    public static void main(String[] args) {
        // Create a new JFrame instance with the title "FlowLayout Example"
        JFrame frame = new JFrame("FlowLayout Example");
        // Set the default close operation for the frame to exit the application
        frame.setDefaultCloseOperation(JFrame.EXIT_ON_CLOSE);

        // Get the content pane of the frame and set its layout to FlowLayout
        Container contentPane = frame.getContentPane();
        contentPane.setLayout(new FlowLayout());

        // Create three buttons with text "Button 1", "Button 2", and "Button 3"
        JButton button1 = new JButton("Button 1");
        contentPane.add(button1);

        JButton button2 = new JButton("Button 2");
        contentPane.add(button2);

        JButton button3 = new JButton("Button 3");
        contentPane.add(button3);

        // Pack the frame and set it to be visible
        frame.pack();
        frame.setVisible(true);
    }
}
Flow Layout will look like this:
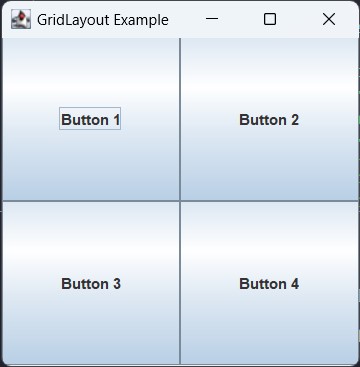
GridLayout
GridLayout is used to arrange components in a grid of equally sized cells. The number of rows and columns can be specified, and components will be positioned in the cells based on their index.
import java.awt.GridLayout;
import javax.swing.JButton;
import javax.swing.JFrame;
import javax.swing.JPanel;

public class GridLayoutExample {
    public static void main(String[] args) {
        JFrame frame = new JFrame("GridLayout Example");
        JPanel panel = new JPanel();
        panel.setLayout(new GridLayout(2, 2));
        panel.add(new JButton("Button 1"));
        panel.add(new JButton("Button 2"));
        panel.add(new JButton("Button 3"));
        panel.add(new JButton("Button 4"));
        frame.add(panel);
        frame.setSize(300, 300);
        frame.setDefaultCloseOperation(JFrame.EXIT_ON_CLOSE);
        frame.setVisible(true);
    }
}
Grid Layout will look like this:
Event Handling
Event handling is a fundamental part of creating GUI interfaces in Java. An event is a user-generated action such as a mouse click, button press, or key press. In Java GUI, event handling is implemented using event listeners, which listen for events and take the appropriate action when the event occurs.
Java provides a wide range of event listeners to handle different types of events, including mouse events, keyboard events, and action events. In this section, we'll cover some of the most commonly used event listeners and demonstrate how to use them to handle events in Java GUI.
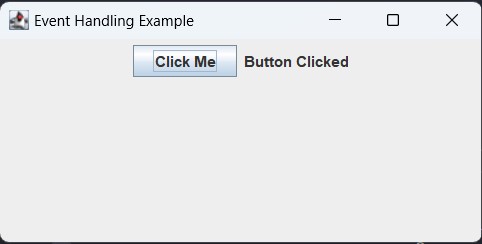
- ActionEvent Listener: The ActionEvent listener is used to handle action events such as button clicks. To use an ActionEvent listener, you must create an action listener class that implements the ActionListener interface and register it with the button using the
addActionListener()method.
Here is an example of how to use an ActionEvent listener to handle a button click:
import java.awt.FlowLayout;
import java.awt.event.ActionEvent;
import java.awt.event.ActionListener;

import javax.swing.JButton;
import javax.swing.JFrame;
import javax.swing.JLabel;

public class ActionEventHandlingExample {
    public static void main(String[] args) {
        // Create a JFrame with the title "Event Handling Example"
        JFrame frame = new JFrame("Event Handling Example");

        // Set the layout of the frame to FlowLayout
        frame.setLayout(new FlowLayout());

        // Set the size of the frame to 400x200
        frame.setSize(400, 200);

        // Set the default close operation to exit the program when the frame is closed
        frame.setDefaultCloseOperation(JFrame.EXIT_ON_CLOSE);

        // Create a JButton with the text "Click Me"
        JButton button = new JButton("Click Me");

        // Create a JLabel to display the button click event
        JLabel label = new JLabel();

        // Add an action listener to the button
        button.addActionListener(new ActionListener() {
            @Override
            public void actionPerformed(ActionEvent e) {
                // When the button is clicked, set the text of the label to "Button Clicked"
                label.setText("Button Clicked");
            }
        });

        // Add the button and label to the frame
        frame.add(button);
        frame.add(label);

        // Make the frame visible
        frame.setVisible(true);
    }
}
The output of this code is:
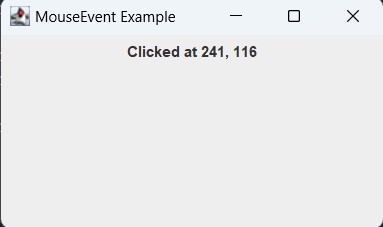
- MouseEvent Listener: The MouseEvent listener is used to handle mouse events such as mouse clicks and mouse movements. To use a MouseEvent listener, you must create a mouse listener class that implements the MouseListener interface and register it with the component using the
addMouseListener()method.
Here is an example of how to use a MouseEvent listener to handle a mouse click:
import java.awt.event.MouseAdapter;
import java.awt.event.MouseEvent;
import java.awt.*;

import javax.swing.JFrame;
import javax.swing.JLabel;

public class MouseEventHandlingExample extends JFrame {
    // Declare a JLabel instance variable to display status
    private JLabel statusBar;

    // constructor to set up the GUI components
    public MouseEventHandlingExample() {
        // Set the layout to FlowLayout
        setLayout(new FlowLayout());

        // Initialize the JLabel with default text
        statusBar = new JLabel("default");
        // Add the JLabel to the frame
        add(statusBar);

        // Add mouse listener to the frame
        addMouseListener(new MouseClass());
    }

    // Inner class to handle mouse events
    private class MouseClass extends MouseAdapter {
        public void mouseClicked(MouseEvent event) {
            // Set the text of the JLabel to the mouse click coordinates
            statusBar.setText(String.format("Clicked at %d, %d", event.getX(), event.getY()));
        }
    }

    // Main method to create the frame and display it
    public static void main(String[] args) {
        // Create an instance of MouseEventHandlingExample
        MouseEventHandlingExample mouseEventExample = new MouseEventHandlingExample();
        // Set the default close operation to EXIT_ON_CLOSE
        mouseEventExample.setDefaultCloseOperation(JFrame.EXIT_ON_CLOSE);
        // Set the size of the frame
        mouseEventExample.setSize(300, 100);
        // Set the visibility of the frame to true
        mouseEventExample.setVisible(true);
        // Set the title of the frame
        mouseEventExample.setTitle("MouseEvent Example");
    }
}
The output of this code is:
There are many more event listeners that can be used in Java GUI applications to handle different types of events. Some of the common event listeners include KeyListener, WindowListener, FocusListener, ComponentListener, and ContainerListener.
here is a brief description of each of the listeners:
-
KeyListener: A KeyListener listens for events related to the user's interaction with the keyboard. It is used to track when a key is pressed, released, or typed.
-
WindowListener: A WindowListener listens for events related to windows, such as when a window is opened or closed, minimized or maximized, or when it gains or loses focus.
-
FocusListener: A FocusListener listens for events related to the focus of a component, such as when a component gains or loses focus. This is useful for tracking which component has the focus at any given time.
-
ContainerListener: A ContainerListener listens for events related to the components contained within a container, such as when a component is added or removed from the container. This is useful for tracking changes to the structure of a container and updating the GUI accordingly.
Working with Images and Media
Java provides built-in support for working with images and media in GUI applications. You can easily display images and play audio files in your Java GUI applications by using the appropriate classes and methods provided by the Java libraries.
For displaying images, you can use the javax.swing.ImageIcon class. This class provides a simple way to load an image and display it in your application. To display the image, you simply need to create an instance of the ImageIcon class, passing the path to the image file as a parameter, and then set the icon of a JLabel to the instance of the ImageIcon class.
ImageIcon image = new ImageIcon("path/to/image.jpg");
JLabel imageLabel = new JLabel(image);
For playing audio files, you can use the javax.sound.sampled.AudioSystem class. This class provides a simple way to play audio files in your application. To play an audio file, you simply need to create an instance of the AudioClip class, passing the path to the audio file as a parameter, and then call the start() method on the instance.
AudioClip audio = AudioSystem.getClip();
audio.open(AudioSystem.getAudioInputStream(new File("path/to/audio.wav")));
audio.start();
In conclusion, working with images and media in Java GUI is a simple and straightforward process, thanks to the built-in support provided by the Java libraries. With a few lines of code, you can easily display images and play audio files in your applications, adding an extra layer of interactivity and visual appeal.
Conclusion
In this article at OpenGenus, we have covered various aspects of creating graphical user interfaces in Java, including the history and importance of GUI, the key features and differences between the various GUI libraries in Java (AWT, Swing, and JavaFX), the different layout managers in Java GUI, event handling in Java GUI, and working with images and audio files in Java GUI.
In conclusion, Java offers several options for creating interactive and visually appealing graphical user interfaces, each with its own strengths and limitations. Whether you are creating a basic GUI interface using AWT, a more advanced interface using Swing, or a visually appealing interface using JavaFX, Java provides the tools and resources necessary to get the job done. In addition, the event handling and media support provided by Java make it a powerful and versatile platform for GUI development.