
Get this book -> Problems on Array: For Interviews and Competitive Programming
In the world of studying, learning, and growth, books are an integral part of our journey. Whether obtained online or offline, libraries have always been a source of knowledge for many. However, managing a library is far from simple. With a vast collection of books, it requires intensive effort and manpower. This is where library management systems (LMS) come into play.
LMS emerged as a response to the need for efficient organization and management of libraries. Before their advent, manual processes like card catalogs and paper-based systems were time-consuming and prone to errors. The development of computer technology in the 1960s and 1970s paved the way for automation in libraries.
The first LMS, known as Integrated Library Systems (ILS), were introduced in the late 1960s. These systems aimed to streamline tasks such as cataloging, circulation, and inventory management. As time went on, LMS evolved to include more advanced features like online public access catalogs (OPACs), enabling users to search for materials remotely.
With the introduction of the internet in the 1990s, LMS underwent further revolutionization. Libraries could now offer digital resources and services alongside their physical collections. Today, LMS play a crucial role in libraries of all sizes by facilitating efficient collection management, circulation tracking, access to digital resources, and supporting administrative functions.
In this article we will try to implement a basic prototype of a library management system.
Table of Content
- Introduction
- Getting Started
- Connecting to the database
- Starting with GUI
- Admin
- Handling Login
- Admin Dashboard
- Inserting Books
- Handling Logout
- User
- Signup Page
- Handling Signup
- Validation
- Login
- User Dashboard
- Populating Tables
- Potential
Introduction
The primary objective of this project is to create a user-friendly interface that allows users to easily issue and return books, while providing administrators with the ability to manage the library's inventory effectively. The system will incorporate a graphical user interface (GUI) for seamless interaction and a database to store book and user details securely.
To begin with, the LMS should have separate login portals for users and administrators. Users should be able to create accounts or log in using their credentials. Once logged in, they should be able to search for books based on various criteria such as title, author, genre, or ISBN. Additionally, users should have the option to view book availability status and check out books by providing necessary details like their membership ID or barcode.
On the other hand, administrators should have exclusive access to an admin portal where they can perform various tasks related to book management. This includes adding new books to the system by entering relevant information such as title, author, publication date, ISBN, and quantity available. Administrators should also be able to remove books from the inventory if necessary.
Furthermore, both users and administrators should have access to a feature that allows them to view their respective profiles. Users can update their personal information like contact details or change passwords if required. Administrators can view and edit user profiles as well as monitor borrowing history.
To ensure data integrity and security, it is imperative that all book and user details are stored in a database system. The database should be capable of handling large volumes of data efficiently while maintaining data consistency. It should also support backup mechanisms for data recovery purposes.
Getting Started
To develop a comprehensive Library Management System (LMS), we will utilize JavaFX as the front-end framework for user interaction. JavaFX provides a rich set of tools and components that enable the creation of a visually appealing and user-friendly interface.
For data storage, we will employ MySQL, a widely-used and reliable relational database management system. MySQL will serve as the backend database to store essential information such as books and user details. Its robust features and scalability make it an ideal choice for managing large amounts of data efficiently.
By combining JavaFX for the front-end and MySQL for the database, we can create a powerful and intuitive LMS that meets the requirements of both administrators and users.
If we consider the project design, it will consist of several classes. To maintain a compact and organized structure, we will implement separate controller classes. The main class will be named Main.java, following the convention for Java projects. The GUI will be loaded using lms.fxml.
The project can be accessed in two ways: User and Admin. If the user option is selected, it will navigate to UserLoginSignUpController.java and load userLogin.fxml. If the user chooses to sign up, userSignup.fxml will be loaded. If the user opts to log in, the credentials will be validated through appropriate functions. Upon successful validation, the user will be logged in and directed to userPanel.fxml.
The interaction for admin is similar. The admin can choose to sign in, and upon successful validation of credentials, it will lead to adminPanel.fxml for GUI display. AdminLoginController is used for this purpose. When adding a new book, newBook.fxml is loaded for GUI display and then returns to the previous FXML.
Additionally, separate book controllers such as BooksAdminController.java and BooksUserController.java are utilized as controllers for tables to populate data into them. This is achieved by utilizing the Books.java class to map data received from the database.
Regarding the database, we have a database with the same name as the project: LMS. Within this LMS database, there is a Users table that stores details of registered users and a Books table that stores information about available books in the database. Furthermore, every time a user registers, a new table with their username is generated to store issued books specifically for that user.
Connecting to the database
In order to establish a seamless connection between our application and the local database, we can proceed by downloading a compatible connector. Once the connector has been successfully downloaded, we can then incorporate it as a necessary dependency within our project. This will enable our application to effectively communicate and interact with the local database, ensuring smooth data retrieval and storage operations.
Starting with GUI
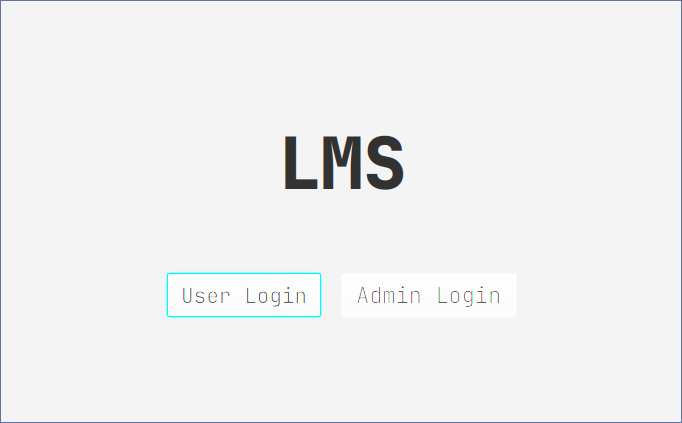
In order to ensure efficient functionality, we will create two distinct sections within the Library Management System: one for administrators and another for users. The admin section will grant administrators the ability to add books to the system, while the user section will allow users to sign up, log in, and perform actions such as issuing or returning books. This clear division of roles and functionalities will enhance the overall user experience and streamline the management of the library resources.
 public void admin() throws IOException {
        fxmlLoader = new FXMLLoader(Main.class.getResource("adminLogin.fxml"));
        mainStage.setScene(new Scene(fxmlLoader.load()));
    }

    public void user() throws IOException {
        fxmlLoader = new FXMLLoader(Main.class.getResource("userLogin.fxml"));
        mainStage.setScene(new Scene(fxmlLoader.load()));
    }
Admin
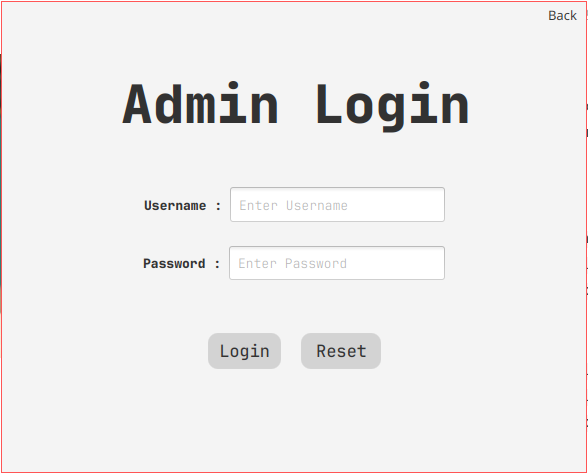
To implement the admin login functionality in our Library Management System, we will create an admin login page that prompts the user to enter their username and password. Upon submission, the system will verify the credentials provided.
If the entered credentials are correct, the user will be redirected to the admin panel, where they can perform various administrative tasks, such as adding books to the system.
To create the graphical user interface (GUI), we will utilize FXML, a markup language that allows for the design and layout of JavaFX applications. FXML provides a declarative approach to building the UI, making it easier to separate the design from the application logic.
By generating the GUI in FXML, we can create a visually appealing and interactive admin login page that enhances the user experience and ensures a seamless login process for administrators.
To enable successful login functionality in our Library Management System, we will implement a controller class that handles interactions such as button clicks and input field validations.
In order to authenticate the admin login, we will need to connect to the database and verify the entered credentials against the stored admin credentials.
String serverName = "localhost";
String mydatabase = "lms";
String url = "jdbc:mysql://" + serverName + "/" + mydatabase;
Connection conn DriverManager.getConnection(url,username,password);
Handling Login
public void adminLoginButton() throws IOException {
        String serverName = "localhost";
        String mydatabase = "lms";
        String url = "jdbc:mysql://" + serverName + "/" + mydatabase;

        try {
            conn = DriverManager.getConnection(url,adminUsername.getText(),adminPasword.getText());
            connected = conn.isValid(1);
        } catch (SQLException ignored) {
        } finally {
            if(connected){
                signinError.setText("");
                BooksAdminController.loadBooks(conn);
                fxmlLoader = new  FXMLLoader(Main.class.getResource("adminPanel.fxml"));
                Main.getMainStage().setScene(new Scene(fxmlLoader.load()));

            }else{
                signinError.setText("Invalid Credentials or DB Inaccessible");
            }
        }
    }
To implement the logout functionality in our Library Management System, we can add a logout button to the admin panel GUI. When the user clicks on the logout button, the system will close the database connection and redirect the user back to the homepage FXML.
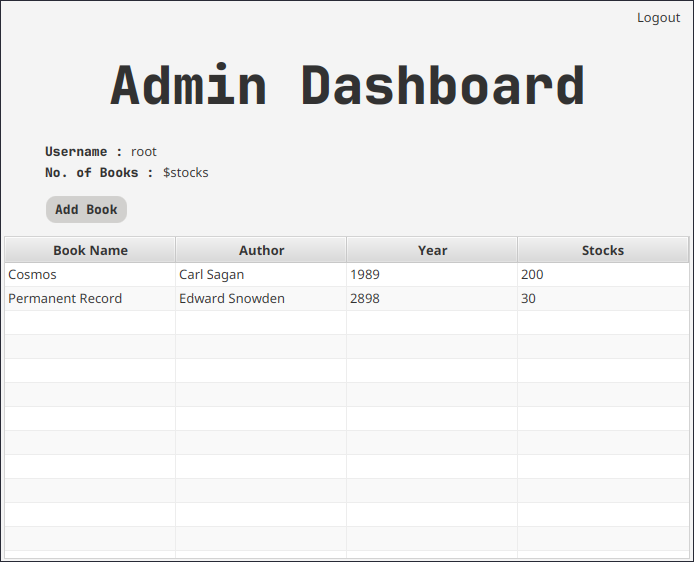
Admin Dashboard
To display the available books and allow the admin to add more books in the admin dashboard, we can use a table to show the book details and provide a form for the admin to enter new book information.
In the admin dashboard, we can create a table that displays the book details such as title, author, and quantity. We can use a TableView component in your GUI framework to achieve this. The table should be populated with the available books from your database.
To add more books, we can provide a form or input fields where the admin can enter the details of the new book. Once the admin submits the form, we can validate the input and then add the new book to your database. After adding the book, we can update the table to display the newly added book.
The user interface is created using FXML, and elements are injected into the controller classes to handle events. TableView is similarly injected into the controller class.
To update the table view, we must first run the database query to obtain the database, which we will then utilize to update the table view.
SELECT * FROM Books
 public static void loadBooks(Connection conn) {
            String getDataQuery = "SELECT * FROM Books";
            connection = conn;
            booksObservableList = FXCollections.observableArrayList();
            try{
                Statement s = connection.createStatement();
                ResultSet rs = s.executeQuery(getDataQuery);
                while(rs.next()){
                    Books book = new Books(rs.getString("Book Name"),rs.getString("Author"),rs.getInt("Year"),rs.getInt("Stocks"));
                    booksObservableList.add(book);
                    System.out.println(rs.getString("Book Name"));
                    System.out.println(rs.getString("Author"));
                }
            } catch (SQLException e) {
                throw new RuntimeException(e);
            }
    }
Inserting Books
Initially, it is necessary to collect input from the admin regarding the precise categories of books that require inclusion. Subsequently, the query will be modified according to this input and executed to effectively update the database, which holds great importance.
 void addBook(Connection conn,TableView<Books> adminBooksTable){
        booksTable = adminBooksTable;
        connection = conn;
        try {
            FXMLLoader loader = new FXMLLoader(getClass().getResource("newBook.fxml"));
            panelScene = Main.getMainStage().getScene();
            Main.mainStage.setScene(new Scene(loader.load()));
        } catch (IOException e) {
            e.printStackTrace();
        }
    }

    // updating DB with new book detail
    public void Book2DB() throws SQLException, IOException {
        PreparedStatement newBook = connection.prepareStatement("INSERT INTO Books VALUES(?,?,?,?)");
        newBook.setString(1,newBookName.getText());
        newBook.setString(2,newBookAuthor.getText());
        newBook.setInt(3,Integer.parseInt(newBookYear.getText()));
        newBook.setInt(4,Integer.parseInt(newBookStocks.getText()));
        newBook.execute();
        FXMLLoader fxmlLoader = new FXMLLoader(Main.class.getResource("adminPanel.fxml"));
        Main.mainStage.setScene(new Scene(fxmlLoader.load()));
    }
Handling logout
Connection will be closed and homepage fxml will be loaded.
 public void logout(){
        try {
            connection.close();
            fxmlLoader = new FXMLLoader(Main.class.getResource("lms.fxml"));
            Main.getMainStage().setScene(new Scene(fxmlLoader.load()));
        } catch (IOException | SQLException e) {
            throw new RuntimeException(e);
        }
    }
User
Sign up
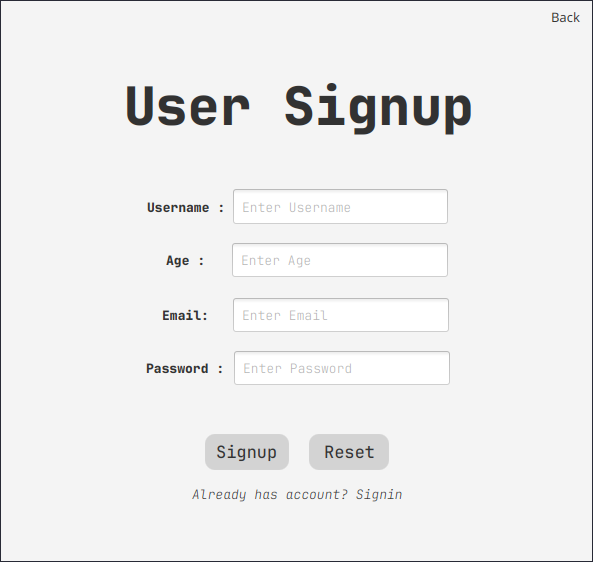
In order to access the signup page, the user will initially encounter the login page, which serves as a precautionary measure in case the user already possesses an account. Alternatively, there is a signup button available to navigate to the signup screen.
During the signup process, the user is required to provide basic information such as email, username, password, and age, which will be stored in the Users table.
Additionally, a table is created for each user to manage their books, where the user's name is used as the identifier for storing issued books.
Handling Sign up
Before proceeding with the signup process, basic validation is performed to ensure that the input meets certain criteria, such as checking the length of inputs and verifying if all fields are filled. Once the validation is successful, the query is updated with the respective inputs and executed.
After the query execution, a user is added with limited and essential privileges, ensuring that they have only the necessary access rights.
 public void signUp() {
        String serverName = "localhost";
        String mydatabase = "lms";
        String url = "jdbc:mysql://" + serverName + "/" + mydatabase;

        boolean status = false;
        try {
            if(validate()){
                conn = DriverManager.getConnection(url, "UserManager", "password");

                // query to create user
                String createUAquery = "CREATE USER '" + signupUsername.getText()+"'@'"+serverName + "' IDENTIFIED BY '" + signupPassword.getText()+"'";

                // query to create table of same name
                String createTablequery = "CREATE TABLE " + signupUsername.getText() + "(BookName VARCHAR(20),Author VARCHAR(20),Year INT(4))";

                //query to grant permissions to the new user
                String grantPrivquery = "GRANT INSERT,DELETE, SELECT,UPDATE on "+mydatabase+"."+signupUsername.getText()+" TO "+signupUsername.getText()+"@"+serverName;
                System.out.println(grantPrivquery);
                //query to read original books table
                String grantReadBookquery = "GRANT SELECT on "+mydatabase+".Books"+" TO "+signupUsername.getText()+"@"+serverName;
                System.out.println(grantReadBookquery);

                //updating users table with new user
                PreparedStatement updateUsers = conn.prepareStatement("INSERT INTO Users VALUES(?,?,?,?,?)");

                // creating statements and executing them
                Statement createTable = conn.createStatement();
                createTable.execute(createTablequery);
                Statement createUA = conn.createStatement();
                createUA.execute(createUAquery);
                Statement grantPriv = conn.createStatement();
                grantPriv.execute(grantPrivquery);
                Statement grantRead = conn.createStatement();
                grantRead.execute(grantReadBookquery);

                // settings prepared statement vars
                updateUsers.setString(1, signupUsername.getText());
                updateUsers.setString(2, signupPassword.getText());
                updateUsers.setInt(3, Integer.parseInt(signupAge.getText()));
                updateUsers.setString(4, signupMail.getText());
                updateUsers.setInt(5, 0);
                updateUsers.execute();
                status = true;
            }
        } catch (Exception e) {
            e.printStackTrace();
        } finally {
            if (status) {
                signupError.setText("Signup Successful! You can login now.");
            }
            else
                signupError.setText("Already exists");
        }

    }
If validation is successful, user is presented with a positive message, otherwise error is presented. After successful sign up, user can login.
Validation
 public boolean validate() {
        if (signupUsername.getText().contains(" ") || signupPassword.getText().contains(" ") || signupMail.getText().contains(" ") || signupAge.getText().contains(" ")) {
            signupError.setText("Fields can't contain spaces");
            return false;
        } else if (signupPassword.getLength() < 8) {
            signupError.setText("Password should be longer than 8 chars");
            return false;
        } else if (!signupMail.getText().contains("@") || signupMail.getText().endsWith(Arrays.toString(new String[]{".edu", ".com", ".in", ".org"}))) {
            signupError.setText("Enter valid mail");
            return false;
        } else if (signupMail.getText().isEmpty() || signupAge.getText().isEmpty() || signupUsername.getText().isEmpty() || signupPassword.getText().isEmpty()) {
            signupError.setText("All fields are mandatory");
            return false;
        }
        return true;
    }
Login
To log in successfully, both a username and password are required. If the provided credentials are accurate, the user will be redirected to the User Dashboard. The input fields will be filled with the provided details, and the query will be updated accordingly in preparation for execution. In the event of incorrect credentials, an error message will be displayed to the user.
public void userLoginButton(){
        String serverName = "localhost";
        String mydatabase = "lms";
        String url = "jdbc:mysql://" + serverName + "/" + mydatabase;
        System.out.println(loginUsername.getText());
        System.out.println(loginPassword.getText());
        try{
           conn = DriverManager.getConnection(url, loginUsername.getText(), loginPassword.getText());
           if(conn.isValid(1)){
               loginError.setText("");
               username = loginUsername.getText();
               BooksUserController.loadBooks(conn);
               fxmlLoader = new FXMLLoader(Main.class.getResource("userPanel.fxml"));
               Main.mainStage.setScene(new Scene(fxmlLoader.load()));
           }else{
               loginError.setText("Invalid credentials or inaccesible database");
           }
       }catch (IOException | SQLException e){
           e.printStackTrace();
        }

    }
User Dashboard
The user dashboard is divided into two sections. One section displays the available books, allowing the user to select books for issuance. The other section shows the books that have already been issued.
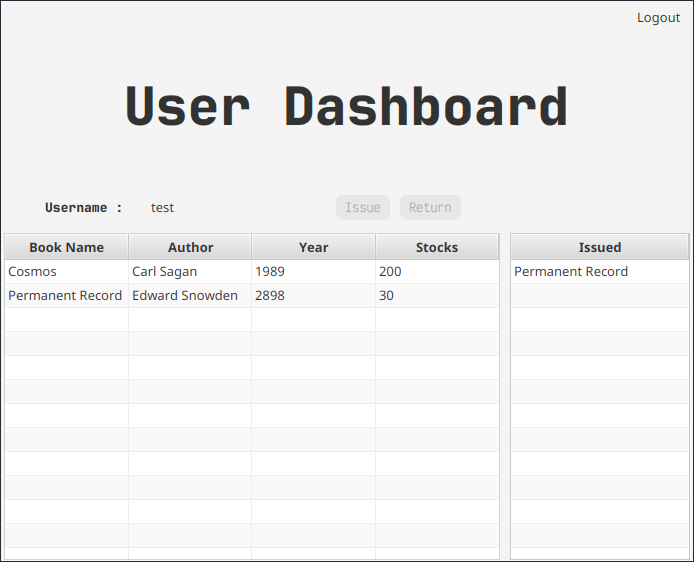
By default, the issue and return buttons are disabled until an item is selected from either of the tables. Once an item is selected, it updates an object that is used to update the queries and subsequently updates the tables accordingly.
We will handle the buttons in different controller class to keep things separate and clean.
- Issue Books
    public void issueBook() throws SQLException {
            String issueQuery = "INSERT INTO "+UserLoginSignupController.username+" VALUES(?,?,?)";
            PreparedStatement updateIssued = connection.prepareStatement(issueQuery);
            updateIssued.setString(1,selectedBook.getTitle());
            updateIssued.setString(2,selectedBook.getAuthor());
            updateIssued.setInt(3,selectedBook.getYear());
            updateIssued.execute();

    }
- Return Books
 public void returnBook() throws SQLException {
        String returnQuery = "DELETE FROM " + UserLoginSignupController.username + " WHERE `Author`=`" + selectedIssuedBook.getAuthor() + "`";
        Statement returnBook = connection.createStatement();
        returnBook.execute(returnQuery);
    }
Populating Tables
In order to populate the tables with book data, it is necessary to create a model class for book details. This model class will allow the received data to be mapped and stored appropriately.
public class Books {
    SimpleStringProperty title;
    SimpleStringProperty author;
    SimpleIntegerProperty year;
    SimpleIntegerProperty stocks;

    Books(String title,String author,int year,int stocks){
        this.title = new SimpleStringProperty(title);
        this.author = new SimpleStringProperty(author);
        this.year = new SimpleIntegerProperty(year);
        this.stocks = new SimpleIntegerProperty(stocks);
    }


    ////////////////////////////getters////////////////////////////////////
    //value return
    public String getAuthor() {
        return author.get();
    }

    public String getTitle() {
        return title.get();
    }

    public int getStocks() {
        return stocks.get();
    }

    public int getYear() {
        return year.get();
    }
}
Next, we must implement the Initializable interface and override the initialize() method. This will enable us to map the values before the user interface (UI) is loaded. Finally, we set the ObservableList of the received books, which contains the necessary data, to the table.
 @Override
    public void initialize(URL url, ResourceBundle resourceBundle) {

        usernameID.setText(UserLoginSignupController.username);
        bnameUser.setCellValueFactory(new PropertyValueFactory<Books,String>("title"));
        bauthorUser.setCellValueFactory(new PropertyValueFactory<Books,String>("author"));
        byearUser.setCellValueFactory(new PropertyValueFactory<Books,Integer>("year"));
        bstocksUser.setCellValueFactory(new PropertyValueFactory<Books,Integer>("stocks"));
        userAllTables.setItems(booksObservableList);
    }
Although this demonstration is not a comprehensive Library Management System (LMS), it serves as a basic conceptual representation. It is important to note that additional features can be incorporated into a fully functional LMS, such as limitations on the number of books that can be issued and the implementation of a fine system. These are just a few examples of the many features that can be integrated into a library management system.