
Get this book -> Problems on Array: For Interviews and Competitive Programming
In this article, we explore one of the most popular Frameworks for Java Developers - Spring Boot and compare it with other popular frameworks like Spring, Spring MVC, Hibernate, and Spring Data. To demonstrate the capabilities of the Spring Boot, the article shows all stages of application development from generating the project to its deployment.
Table of contents:
- Spring and Spring Boot overview
- Spring Boot requirements
- Dependency management
- Autoconfiguration
- Simplified deployment
- Conclusion
Spring and Spring Boot overview
Each of the Java learners must have heard about Spring, as this is the most popular framework among Java developers. The Spring official website lists quite a number of projects: Spring Framework, Spring Data, Spring Cloud, Spring Security, etc., with Spring Boot first on the list. So what is the difference between the Spring Boot from other Spring Projects and why is it on the top of the list?
The Spring, in general, can be thought of as the comprehensive programming and configuration model for Java-based applications, which includes tools for developing, testing, and integration:
- Core: dependency injection, events, type conversion, data binding, AOP
- Data Access: JDBC, ORM, transactions, DAO support
- Web: MVC and WebFlux frameworks
- Tests: Spring MVC Test, mock objects, TestContext framework
- Security: Spring Security module
- Languages: Java, Kotlin, Groovy
All these Spring modules are not necessary to use - the application can be developed in pure Java, what Spring does though is it makes use of repetitive boilerplate code and greatly reduces it, thus reducing and simplifying the development time.
The Spring Boot builds on top of the Spring technologies and simplifies development even further, allowing to program reactively with a focus on business logic. The key features of Spring Boot are simplified dependency management, simplified deployment, and opinionated autoconfiguration.
Spring Boot requirements
Spring Boot 2.7 provides explicit support for Spring Framework 5.3 or above, applications can be deployed to any servlet 3.1+ compatible container.
| Criteria | Requirement |
|---|---|
| Java version: | Requires Java 8 and is compatible up to Java 18 |
| Build tools: | Maven 3.5+, Gradle 6.8+ |
| Embedded Servlet Containers: | Tomcat 9.0, Jetty 9.4 or 10, Undertow 2.0 |
Dependency management
Manual dependency management with Spring
With Spring Framework all dependencies and versions have to be managed manually, which easily becomes complicated as versions can be incompatible. The example pom.xml file below for the Maven Spring project shows only some of the dependencies required for the basic web application. As dependencies can include dependencies for other projects, the problem of conflicting or circular dependencies is very often.
<!-- Spring Web dependencies -->
<dependency>
<groupId>org.springframework</groupId>
<artifactId>spring-web</artifactId>
<version>5.3.20</version>
</dependency>
<dependency>
<groupId>org.springframework</groupId>
<artifactId>spring-webmvc</artifactId>
<version>5.3.20</version>
</dependency>

<!-- Spring Core -->
<dependency>
<groupId>org.springframework</groupId>
<artifactId>spring-core</artifactId>
<version>5.3.20</version>
</dependency>

<!-- Tomcat dependencies -->
<dependency>
<groupId>org.apache.tomcat.embed</groupId>
<artifactId>tomcat-embed-core</artifactId>
<version>9.0.63</version>
</dependency>
<dependency>
<groupId>org.apache.tomcat.embed</groupId>
<artifactId>tomcat-embed-websocket</artifactId>
<version>9.0.63</version>
</dependency>
<!-- Other dependencies ... -->
Simplified dependency management with Spring Boot
Spring Boot has an Spring Initializr tool which is a web application that generates a skeleton structure and building file for the project and supports both Maven and Gradle build tools.
Spring Initializr allows to fast set up project settings and dependencies. The dependencies are organized into thematic categories: developer tools, web, template engines, security, SQL, NoSQL, Messaging, I/O, OPS, Observability, Testing, and Spring Cloud.
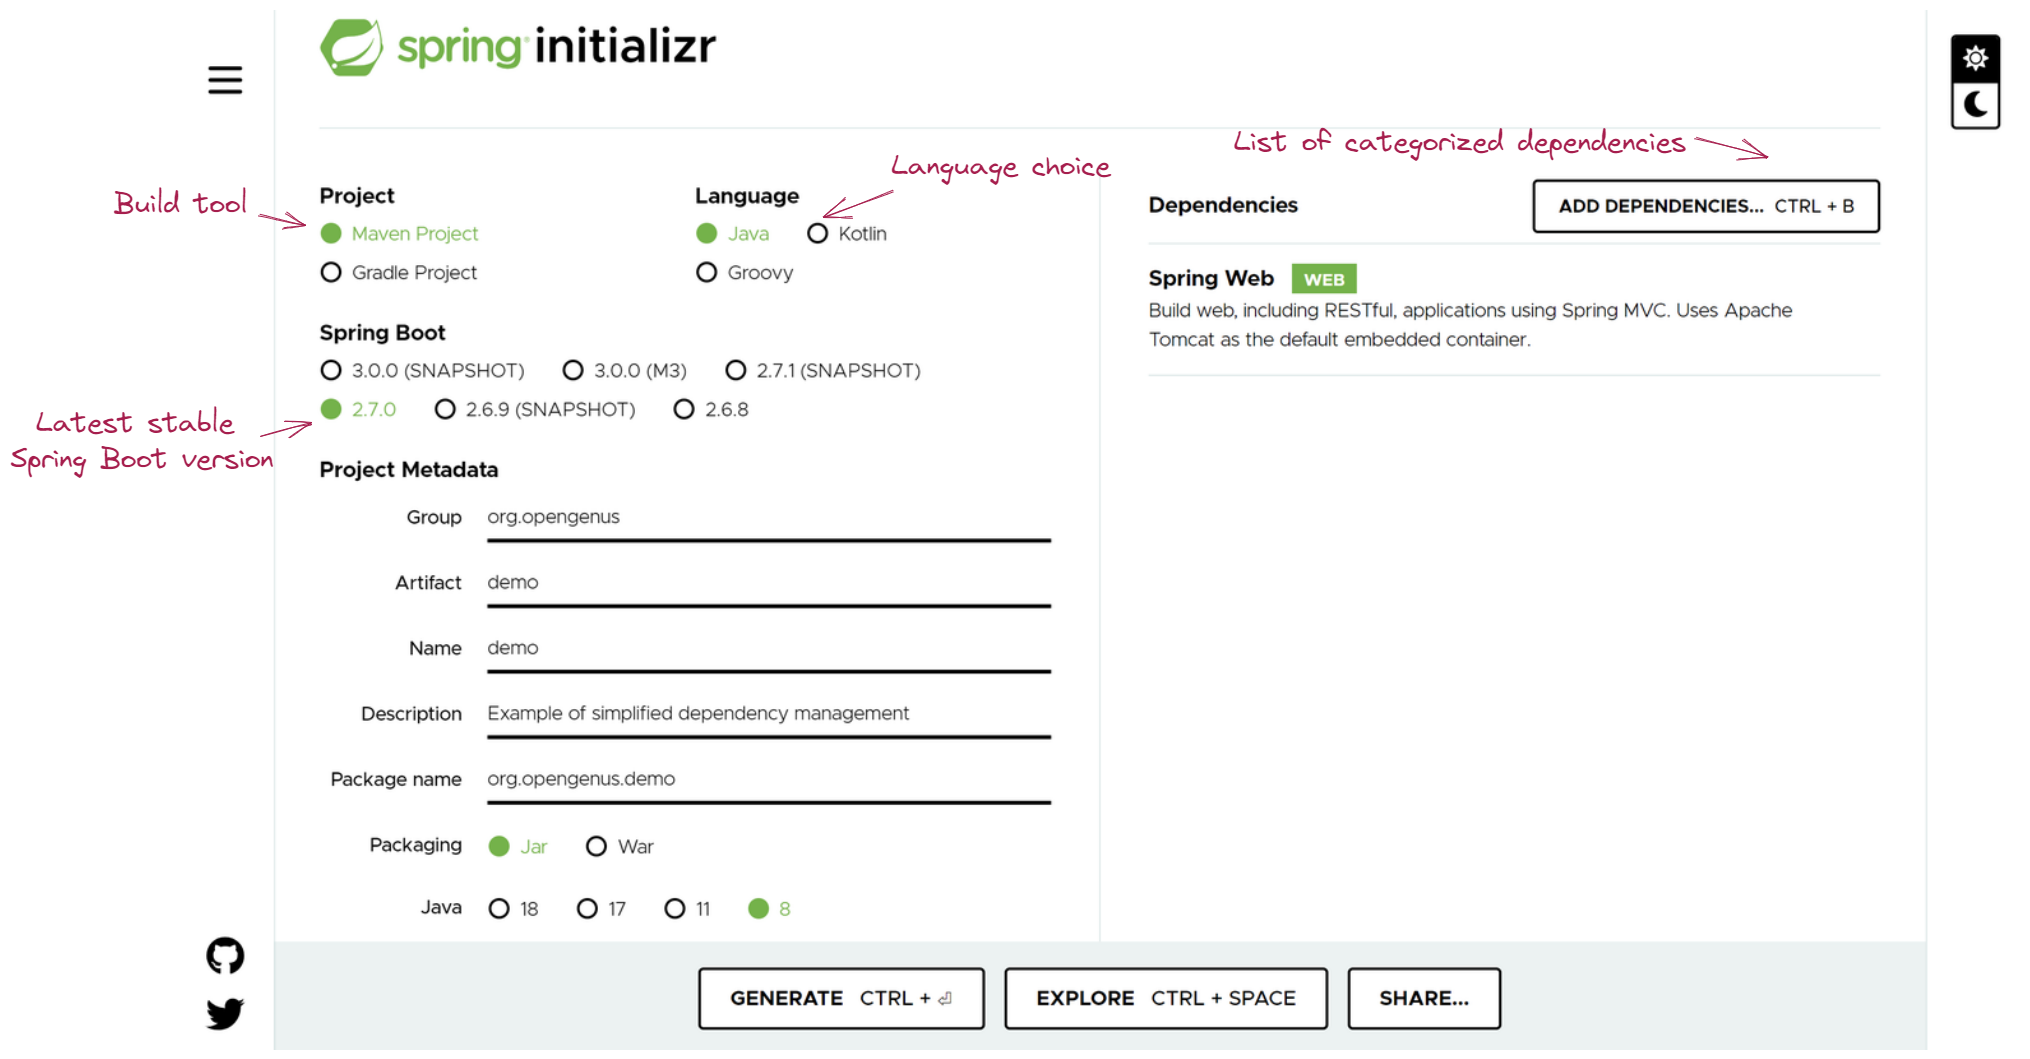
The single Spring Boot dependency from the Web category, for example, <artifactId>spring-boot-starter-web</artifactId>, contains Spring Web for building web applications, including RESTful, applications using Spring MVC and Apache Tomcat as the default embedded container. Each of the dependencies included in the spring-boot-starter-web is version-synchronized - they have been successfully tested together.
The generated project structure and pom.xml file are ready to be imported into the IDE (most popular IDEs include Eclipse, IntelliJ IDEA, and Apache Net-Beans), after which the dependency management is finished.
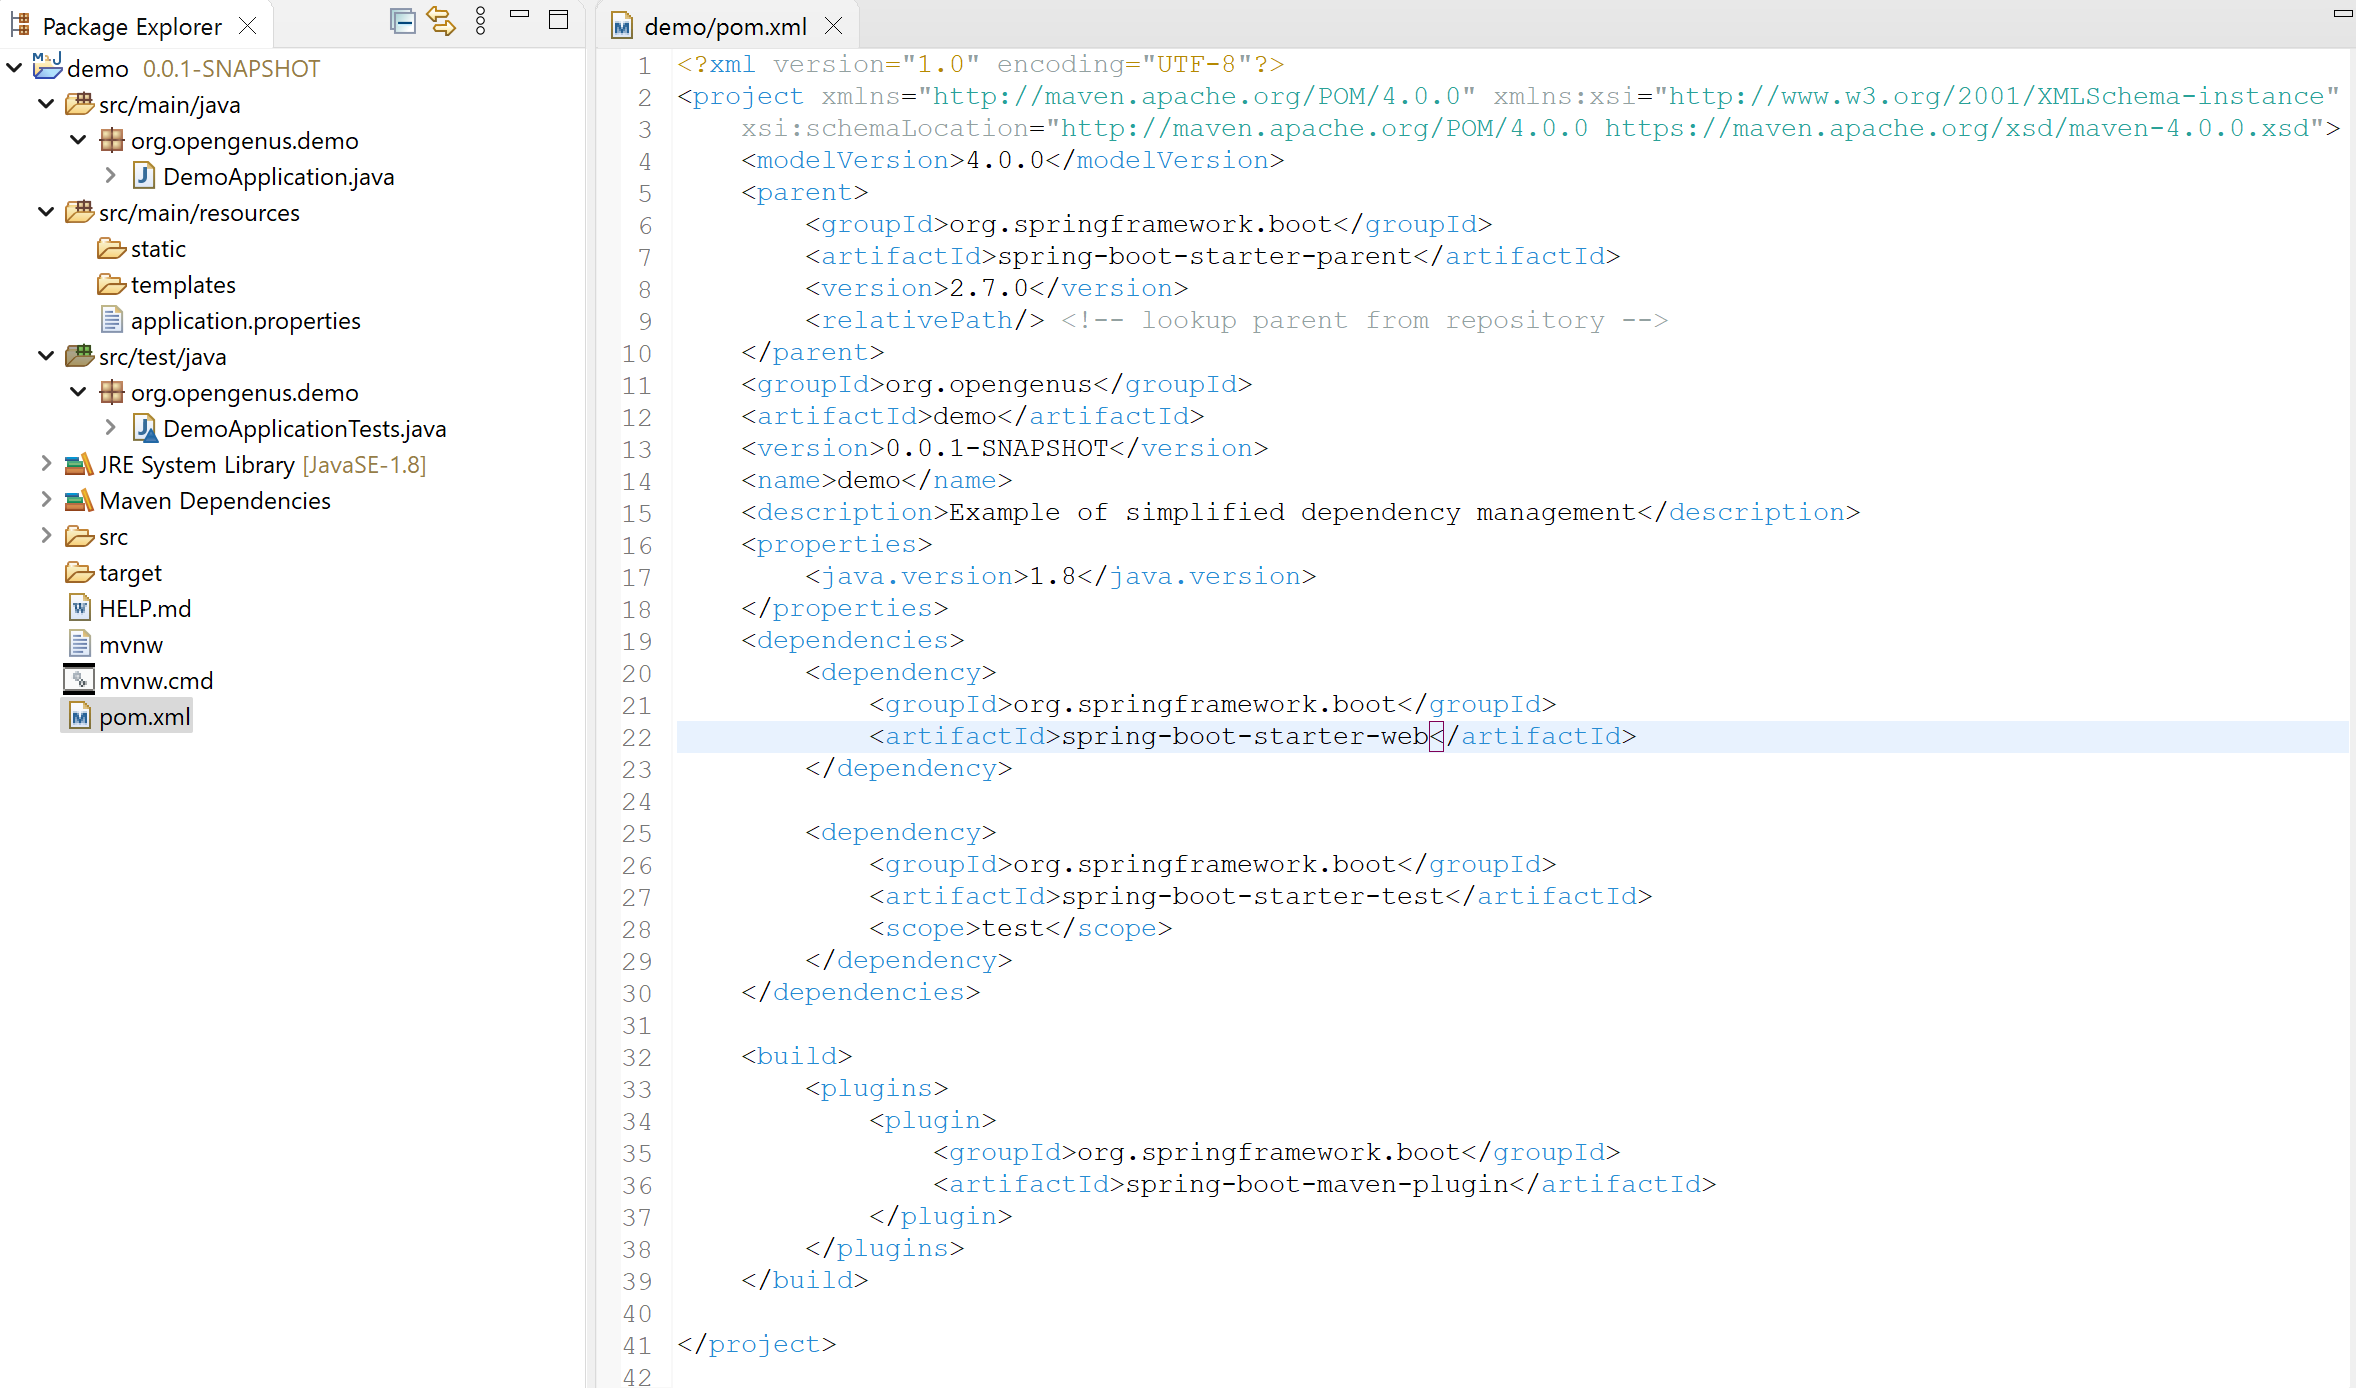
Note that the only dependencies included in the pom.xml file are the spring-boot-starter-web for web development and spring-boot-starter-test for testing, they encapsulate dependencies for spring boot, spring core, spring web, spring test, tomcat, mockito, jpa, jackson, json, and other jars.
Autoconfiguration
Startup with Spring MVC
For developing web applications, Spring introduces Spring MVC architecture that is designed around a central Servlet that dispatches requests to controllers.

Spring MVC requires manual configuration of the servlet engine, and manual configuration of the web content mappings within the web.xml file or in code, which soon becomes a repetitive task for the experienced developers.
Startup with Spring Boot
Spring Boot behind the scenes applies spring MVC architecture for the web applications but allows to skip initial configurations steps and launch the application right out of the box on the Tomcat servlet engine.
The Spring Initializr generates the DemoApplication class as an entry point of the Spring Boot Application. @SpringBootApplication is a top-level annotation that controls the start-up process, including checks of the environment, configuring the application, creation of the initial context, and launch of the Spring Boot Application.
package org.opengenus.demo;

import org.springframework.boot.SpringApplication;
import org.springframework.boot.autoconfigure.SpringBootApplication;

@SpringBootApplication
public class DemoApplication {

	public static void main(String[] args) {
		SpringApplication.run(DemoApplication.class, args);
	}

}
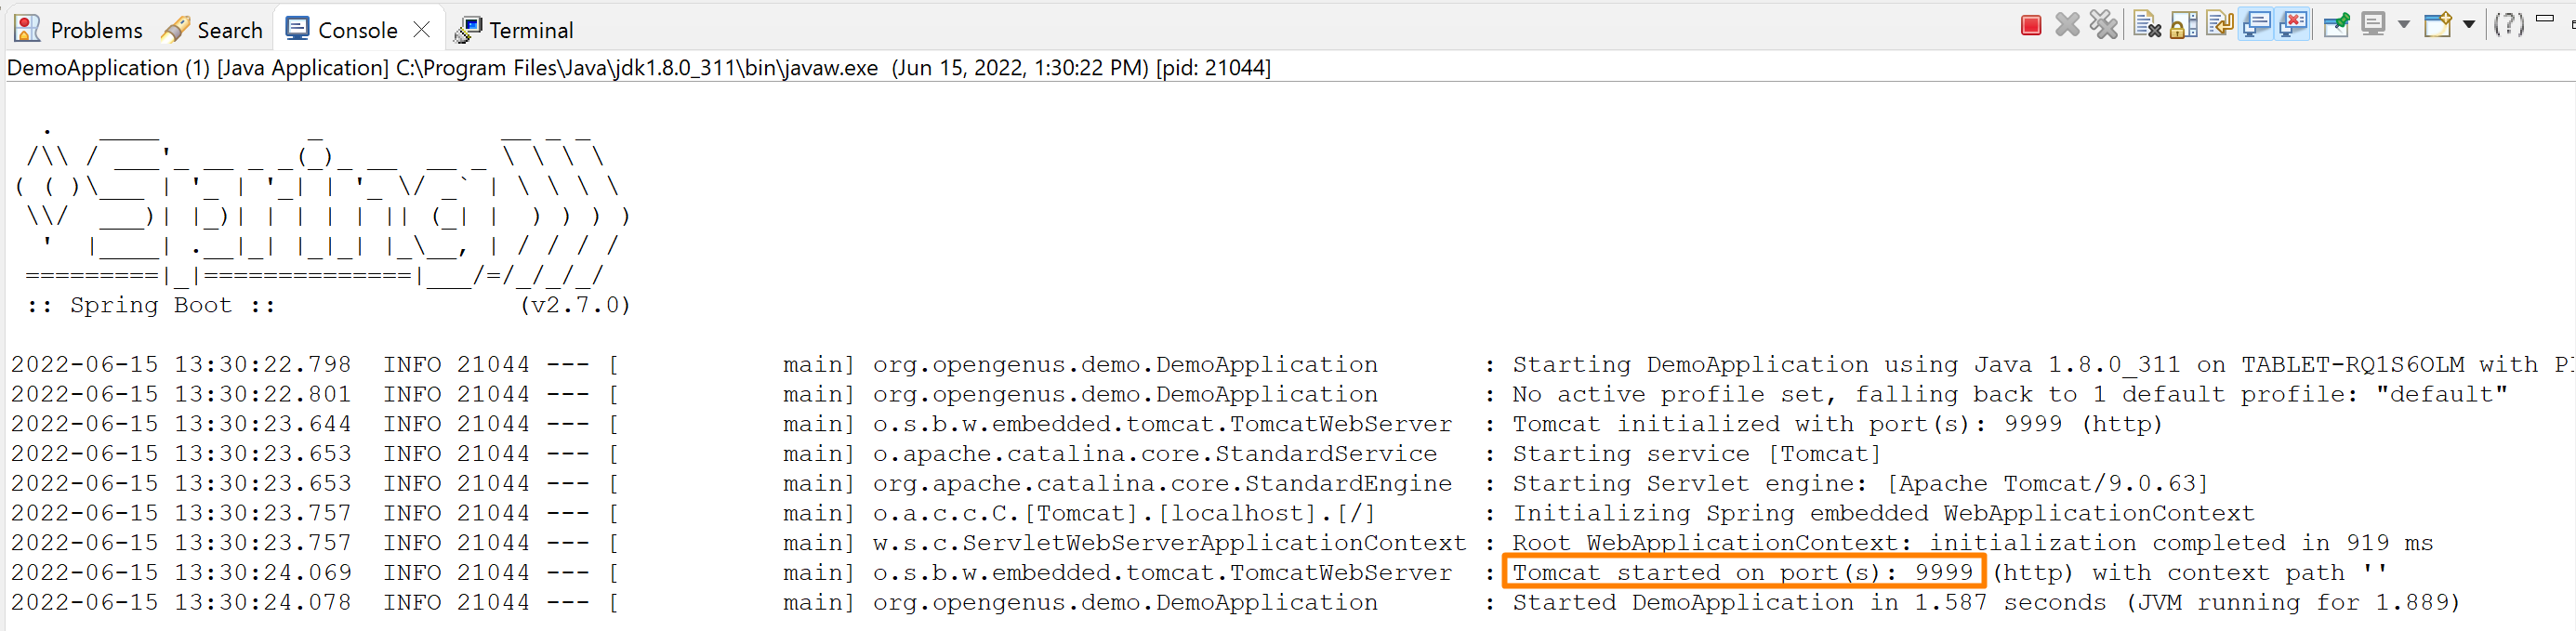
Spring Boot is opinionated, that is it autoconfigures the application with the most common configurations. The instance of the SpringApplication from the code above can already be launched, and the app runs on the default TomcatWebServer with HTTP port 8080.
At the same time, in cases when the specific task requires actions different from the convention, the Spring Boot default behavior can be overridden or turned off completely. The instance of the SpringApplication, for example, can be created and configured manually:
	public static void main(String[] args) {
		SpringApplication application = new SpringApplication(DemoApplication.class);

		// Customize application settings
		application.setWebApplicationType(WebApplicationType.NONE);

		application.run(args);
	}
The application.properties file is useful to adjust Spring Boot Application behavior, for example, the line server.port = 9999 changes the default port of the application from 8080 to 9999.
Database connection with Spring Data
Spring Data JDBC is a Spring framework that helps to implement access to the relational databases but does not provide features for caching of lazy loading. Spring Data JPA is another Spring framework that allows the implementation of CRUD operations with Repository interfaces.
To work with the database, Spring requires JPA configuration:
DriverManagerDataSourceto specify database connection settings (url/user/password)JpaTransactionManagerto implement transactions workflowJpaVendorAdapterto set up HibernateLocalContainerEntityManagerFactoryBeanto create EntityManagerFactory on a bootstrap
Added together, all these Spring-specific settings and configurations are becoming rather hard to learn and remember. Like with Spring MVC, Spring Boot helps to skip the settings of the Spring Data framework.
Database connection with Spring Boot
Spring Boot’s auto‐configuration takes into account the database driver on the classpath, the repository interface defined in the application, and the JPA entity class definitions and automatically creates database proxy beans.
To start with, add Spring Data JPA and database driver (in this example MySQL Driver). The easiest way to manage dependencies is to keep Spring Initializr open and copy-paste updated pom.xml into the project. I also added Lombok dependency to auto-generate getters, setters, and constructors.
    <dependency>
      <groupId>org.springframework.boot</groupId>
      <artifactId>spring-boot-starter-data-jpa</artifactId>
    </dependency>
    <dependency>
      <groupId>mysql</groupId>
      <artifactId>mysql-connector-java</artifactId>
      <scope>runtime</scope>
    </dependency>
    <dependency>
      <groupId>org.projectlombok</groupId>
      <artifactId>lombok</artifactId>
      <optional>true</optional>
    </dependency>
The Spring Boot needs to know the address and credentials to connect to the database, it checks for these parameters in the application.properties file in the resources folder. In the code below mydatabase is the name of the database, 3306 is the port used by MySQL by default, and username and password are the user credentials used in the MySQL database.
spring.datasource.url=jdbc:mysql://${MYSQL_HOST:localhost}:3306/mydatabase
spring.datasource.username=my_user_login
spring.datasource.password=my_user_password
spring.datasource.driver-class-name=com.mysql.cj.jdbc.Driver
The Pet Class represents a single entity that is stored in the database pets table, it has autogenerated id, name, and species String fields and can be classified as a POJO object. Note that to hide boilerplate code I used Lombok annotations.
package org.opengenus.demo.entities;

import javax.persistence.Entity;
import javax.persistence.GeneratedValue;
import javax.persistence.GenerationType;
import javax.persistence.Id;

import lombok.AllArgsConstructor;
import lombok.Data;
import lombok.NoArgsConstructor;


@Entity
@Data
@NoArgsConstructor
@AllArgsConstructor
public class Pet {

	@Id
	@GeneratedValue(strategy = GenerationType.IDENTITY)
	private int id;

	private String name;

	private String species;

}
Typically the next step would be to implement a DAO interface with CRUD operations for this entity Class: save(Pet pet), delete(Pet pet), find(int id) etc. The Spring Data JPA, and the Spring Boot on top of it, can automatically introduce a CRUD interface as an extension of the public interface CrudRepository<T, ID> interface:
package org.opengenus.demo.entities;

import org.springframework.data.repository.CrudRepository;

// Provides CRUD functionality for the Pet class
// Pet - Entity Class, Integer - Entity Class id type
public interface PetRepository extends CrudRepository<Pet, Integer>{}
The PetRepository is automatically instantiated by the Spring, it can be retrieved from the ApplicationContext with the context.getBean(Class) method. The application context itself can be autowired into any field/method during the bootstrap process. For tests, let's run some simple CRUD operations on adding/deleting entities.
@SpringBootApplication
public class DemoApplication {

	// Get reference to ApplicationContext
	@Autowired
	private ApplicationContext context;

	public static void main(String[] args) {
		SpringApplication.run(DemoApplication.class, args);
	}


	// Launch tests after the Spring Boot bootstrap is finished
	@EventListener(ApplicationReadyEvent.class)
	public void runCRUDtests() {

		System.out.println("------------ Tests--------------");

		// Get instance of PetRepository from the Spring container
		PetRepository repository = context.getBean(PetRepository.class);

		System.out.println("Trying to save a new Pet to the database: ");
		Pet pet = new Pet();
		pet.setName("Bucky");
		pet.setSpecies("dog");
		System.out.println("pet" + repository.save(pet) + " is saved\n");


		System.out.println("Trying to delete Pet from the database: ");
		repository.deleteById(10);
		System.out.println("The Pet was deleted by id");

		System.out.println("Trying to count Pets in the database: ");
		System.out.println("" + repository.count() + " pets");
	}
}
Output to the console, as well as MySQL WorkBench, show that CRUD operations add and delete data to the database as intended. Note that Spring Boot with Spring Data JPA automatically uses Hibernate to run JDBC requests.
---------------------- Tests ------------------------
Trying to save a new Pet to the database:
Hibernate: insert into pet (name, species) values (?, ?)
petPet(id=13, name=Bucky, species=dog) is saved

Trying to delete Pet from the database:
Hibernate: select pet0_.id as id1_0_0_, pet0_.name as name2_0_0_, pet0_.species as species3_0_0_ from pet pet0_ where pet0_.id=?
Hibernate: delete from pet where id=?
The Pet was deleted by id

Trying to count Pets in the database:
Hibernate: select count(*) as col_0_0_ from pet pet0_
6 pets
While Spring Boot automatically configures Hibernate, there is still a room for manual setting up when needed. Spring Boot configuration file application.properties accepts Hibernate properties with spring.jpa.hibernate name, for example, spring.jpa.properties.hibernate.format_sql=true to format SQL statements.
Spring MVC model
Spring MVC (Model-View-Controller) separates data, its delivery, and its presentation, assuming the views would be provided as a server-rendered web page. The @Controller annotation represents classes that manage data in the Model interface and provide it to the presentation layer of the application.
The presentation layer supports JSP (Java Server Pages) for legacy applications, the better practice nowadays is to use HTML generated by template engines like Thymeleaf, apply a combination of HTML and JavaScript or both.
For using the Thymeleaf HTML template generator, Spring MVC requires manually configuring:
ServletContextTemplateResolverto resolve template names into TemplateResolution objects that indicate the location, extensions of the templatesSpringTemplateEnginebean to connect spring with the Thymeleaf Template EngineThymeleafViewResolverbean to that is in charge of creating (and configuring) the View object
Spring Boot allows skipping these configuration steps and proceed with the @Controller classes.
Spring MVC with Spring Boot
Spring Initializr has Thymeleaf - "a modern server-side Java template engine for both web and standalone environments" in its dependencies list.
The Controller Class is annotated with the @Controller Spring annotation, inside it contains logic for different application routes:
GET http://localhost:9999/petsto load a web page with a list of petsPOST http://localhost:9999/petsto add a new pet to the database.
@GetMapping and @PostMapping annotations map incoming HTTP requests, Model object and its attributes help to connect application data with the representation on the Thymeleaf generated HTML.
package org.opengenus.demo.entities;
import org.springframework.stereotype.Controller;
import org.springframework.ui.Model;
import org.springframework.web.bind.annotation.GetMapping;
import org.springframework.web.bind.annotation.ModelAttribute;
import org.springframework.web.bind.annotation.PostMapping;

@Controller
public class PetController {

	// Reference to instance of petRepository from Spring Container
	private final PetRepository petRepository;

	public PetController(PetRepository petRepository) {
		this.petRepository = petRepository;
	}

	// Show all pets from the database
	@GetMapping("/pets") // HTML page address: http://localhost:9999/pets
	String getPets(Model model){

		// Retrieve data from the database and pass it to the Model attribute for use by the template engine
		model.addAttribute("allPets", petRepository.findAll());

		// Add empty Pet object for use by the "Add Pet" form
		model.addAttribute("pet", new Pet());

		// Return name of the html template
		return "pets";
	}

	// Add pet to the database
	@PostMapping("/pets")
	String addPet(@ModelAttribute Pet pet) { // Pet object is filled with values from the html form

		petRepository.save(pet);

		// Reload page
		return "redirect:/pets";
	}
}
The Thymeleaf template is nothing but an html file with Thymeleaf commands that start with the th letters. For example, th:each="p : ${allPets}" can be read as "for each pet in pets". The allPets attribute was added to the Model in PetController. For nicer formatting, I added some Bootsrap classes to the template:
<!DOCTYPE HTML>
<html lang="en" xmlns:th="http://www.thymeleaf.org">
<head>
<title>Pets</title>
<meta http-equiv="Content-Type" content="text/html; charset=UTF-8" />
<link rel="stylesheet"
	href="https://cdn.jsdelivr.net/npm/bootstrap@4.3.1/dist/css/bootstrap.min.css"
	integrity="sha384-ggOyR0iXCbMQv3Xipma34MD+dH/1fQ784/j6cY/iJTQUOhcWr7x9JvoRxT2MZw1T"
	crossorigin="anonymous">
<link
	href="https://cdn.jsdelivr.net/npm/bootstrap@5.0.2/dist/css/bootstrap.min.css"
	rel="stylesheet">
</head>
<body>

	<div>
		<h3 class="mb-3">List of Pets in the database:</h3>
		<table class="table table-hover">
			<thead class="thead-dark">
				<tr>
					<th>Id</th>
					<th>Name</th>
					<th>Species</th>
				</tr>
			</thead>
			<tbody>
				<tr th:each="p : ${allPets}">
					<td th:text="${p.id}"></td>
					<td th:text="${p.name}"></td>
					<td th:text="${p.species}"></td>
				</tr>
			</tbody>
		</table>
	</div>
	<div class="m-4">
		<form action="#" th:action="@{/pets}" th:object="${pet}" method="post">
			<div class="row align-items-center g-3">
				<div class="col-auto">
					<label class="visually-hidden">Name</label> <input type="text"
						th:field="*{name}" class="form-control" placeholder="Name"
						required>
				</div>
				<div class="col-auto">
					<label class="visually-hidden">Species</label> <input type="text"
						th:field="*{species}" class="form-control" placeholder="Species"
						required>
				</div>

				<div class="col-auto">
					<button type="submit" class="btn btn-primary">Add Pet</button>
				</div>
			</div>
		</form>
	</div>
</body>
</html>
Just as simple and with a minimum of effort and time, we receive a working web application:
Spring Security with Spring Boot
Spring Security is a framework that provides authentication, authorization, and protection against common attacks. It is added to the Spring Boot app with the spring-boot-starter-security dependency in the pom.xml file. After adding this dependency and restarting the application user can see a default log-in screen, provided by Spring Boot. For now, the login is "user" and the password is autogenerated by the Spring Boot at the startup.

The greatest thing about Spring is that most of the Services and features for Security are already implemented, like different authorization roles (user, admin), support for multiple SecurityFilterChains for different parts of the application, OAuth 2 authentication, and different encrypting methods (Spring uses bcrypt by default). And these features can be customized by overriding methods and creating Spring Beans for configuration.
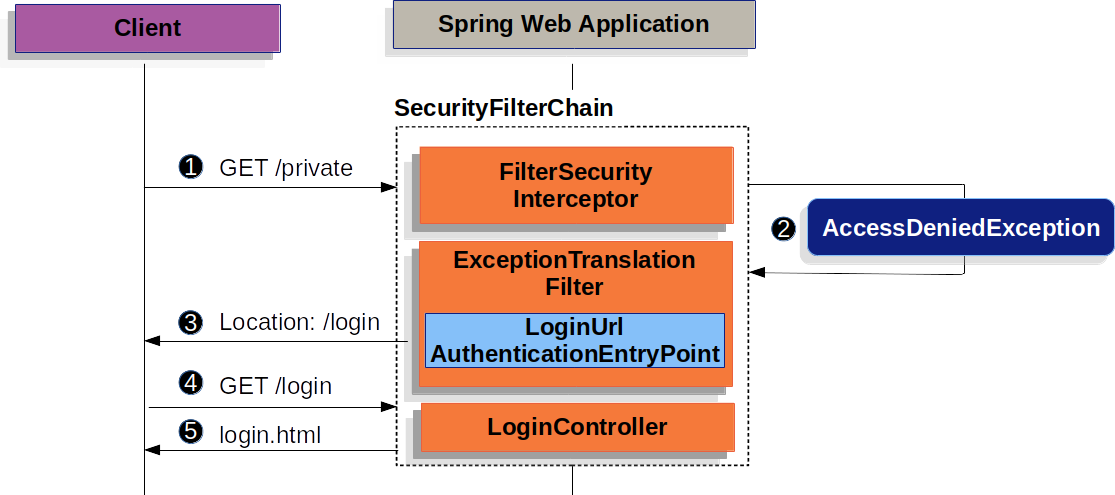
For example, in general, a form-based login, as used by the default form within Spring Security, works as follows: incoming client requests to private resources by unauthenticated users (who did not log in) trigger AccessDeniedException in FilterSecurityInterceptor, after which user is redirected to the login page at AuthenticationEntryPoint.
Now I will customize this workflow to store the logins and passwords in the database. By default, to store user information Spring Boot uses the following schema for the H2 database. I applied the same schema for the MySQL database, the only change is to use varchar instead of the varchar_ignorecase as MySQL is case insensitive by default:
create table users(
	username varchar_ignorecase(50) not null primary key,
	password varchar_ignorecase(500) not null,
	enabled boolean not null
);

create table authorities (
	username varchar_ignorecase(50) not null,
	authority varchar_ignorecase(50) not null,
	constraint fk_authorities_users foreign key(username) references users(username)
);
create unique index ix_auth_username on authorities (username,authority);
On the application side, the only required change is to customize the UserDetailsManager bean so it reads user information from the external database. I put this bean inside the new @EnableWebSecurity AppSecurityConfig Class, which is useful to store all security configurations in one place.
package org.opengenus.demo;

import javax.sql.DataSource;

import org.springframework.context.annotation.Bean;
import org.springframework.security.config.annotation.web.configuration.EnableWebSecurity;
import org.springframework.security.core.userdetails.User;
import org.springframework.security.core.userdetails.UserDetails;
import org.springframework.security.provisioning.JdbcUserDetailsManager;
import org.springframework.security.provisioning.UserDetailsManager;

@EnableWebSecurity
public class AppSecurityConfig{

	// This bean will supply information about users to the AuthenticationManager
	@Bean
	UserDetailsManager users(DataSource dataSource) { // dataSource is the external database
												      // set in application.properties (MySQL)

		// This service will establish a JDBC connection and read user info from the database
		JdbcUserDetailsManager users = new JdbcUserDetailsManager(dataSource);

		// Users can be added to the database manually, or inside the code as below
		UserDetails newUser = User.builder()
				.username("newUser")
				// Password value is hashed with bcrypt
				.password("{bcrypt}$2a$12$kC6MfvlJmFKg9BtR5RcWJejvHazfNbRujht0kcRB2vrtlu36.S9Ua")
				.roles("USER")
				.build();
		users.createUser(newUser);

		return users;
	}
}
After adding the AppSecurityConfig class the Spring Boot does not generate the default password anymore and instead reads values from the database.
Simplified deployment
Usual steps of application deployment (for example, launching a developed application on a web server) include installation and configuration of the application server, installation of the database drivers, creation of the database connection and connection pool, building and testing of the application, launching the application and its dependencies on the server.
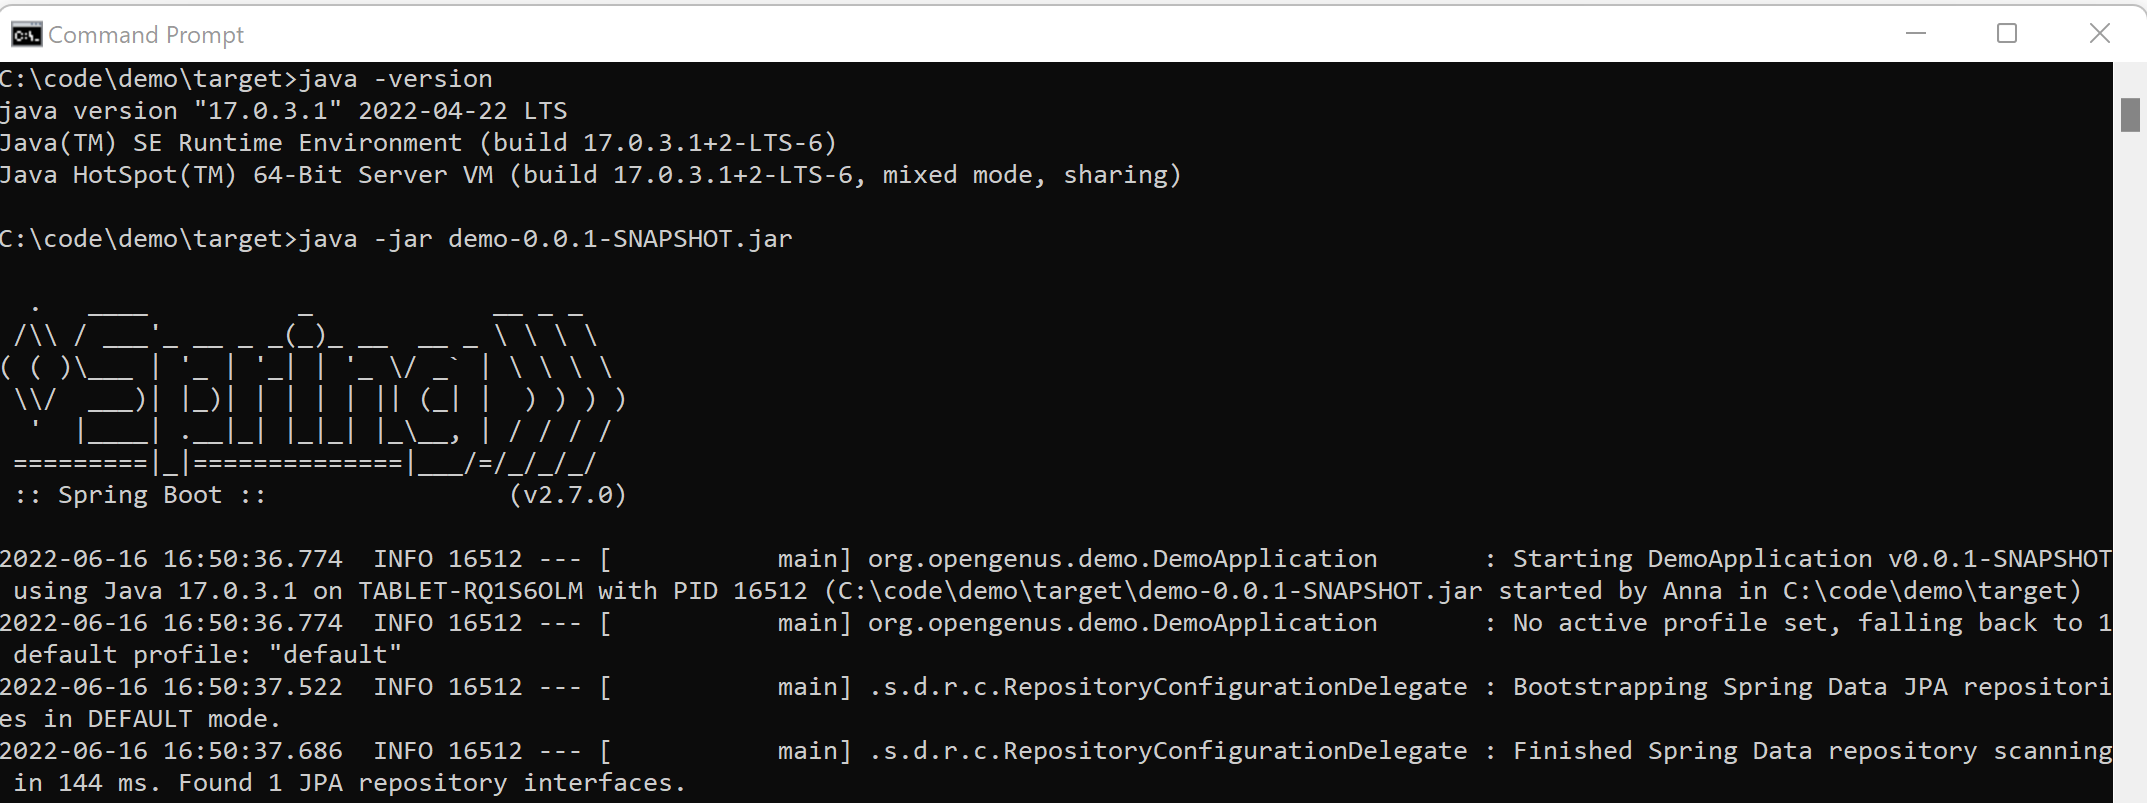
The Spring Boot allows building an application into a JAR file that includes and verifies all nested dependencies, thus allowing it to run in every environment that has a JVM (Java Virtual Machine).
In Eclipse IDE, for example, it is enough to right-click on the project and choose Run As -> Maven build... -> Goals: clean package -> Run to build a deployable jar. The Maven generates the <project name>-<version>.jar file in the target directory of the project. This file can be launched with a console command java -jar demo-0.0.1-SNAPSHOT.jar:
Conclusion
This article at OpenGenus presented an introduction to the Spring Boot and its capabilities in comparison with other Spring Frameworks. It is a good starting point to begin exploring Spring Boot and web application development.