Open-Source Internship opportunity by OpenGenus for programmers. Apply now.
Reading time: 35 minutes
In this article, we're going to visualize practically -
- How encoder and decoder part of autoencoder are reverse of each other?
- How can we remove noise from image, i.e. Image denoising, using autoencoder?
The basic idea of using Autoencoders for Image denoising is as follows:
-
Encoder part of autoencoder will learn how noise is added to original images. At this point, we know how noise is generated as stored it in a function F(X) = Y where X is the original clean image and Y is the noisy image.
-
Decoder part of autoencoder will try to reverse the noise from the images. At this point, we have Y in F(X)=Y and try to generate the input X for which we will get the output.
There may be multiple input images for which we may get same noisy image depending on the technique of adding noise. This gives rise to some loss in the process which we target to minimize and generate the perfect input image.

Now, it's time to put your fingers on the keyboard and start coding!!!
In this article, We are going to use -
- Dataset - MNIST Digit Dataset, here each image is of 28 X 28 pixels.
- Noise - Salt and Pepper Noise.
- Background - Python 3
Before, we start coding, let's revise once again -
Salt And Pepper Noise -
It is a fixed valued Impulse Noise. This has only two possible values(for 8-bit image), i.e. - 255(bright) for salt noise and 0(dark) for pepper noise.
Autoencoders -
Autoencoders are neural networks that aims to copy their inputs to outputs(not exact as input). It comprises of two parts - Encoder and Decoder.
Suppose data is represented as x.
- Encoder : - a function f that compresses the input into a latent-space representation. f(x) = h
- Decoder : - a function g that reconstruct the input from the latent space representation. g(h) ~ x.
Let's start step by step -
1). Importing dataset -
from keras.datasets import mnist
We will use the MNIST dataset for this study
2). Importing useful Libraries -
    import keras
    from keras.models import Model
    from keras.optimizers import Adadelta
    from keras.layers import Input, Conv2D, MaxPool2D, UpSampling2D
    from keras.callbacks import EarlyStopping
    import numpy as np
    import matplotlib.pyplot as plt
We import the following major libraries:
- Keras: As a machine learning library for utilities like convolution
- Numpy: As a library to handle data
- Matplotlib: As a library to save output data
3). Preprocessing of Dataset And Adding Salt and Pepper Noise to our dataset -
Here, in this section,
-
First we convert each pixel value from range(0, 255) to range (0, 1).
-
We add a random value to each pixel and then clip that particular pixel into the range 0 to 1.
Here, 0 means dark (Pepper Noise) and 1 (i.e. 255/255) means bright (Salt Noise).
Coding Section -
    (train_X, train_y), (test_X, test_y) = mnist.load_data()

    # to convert values from 0 to 255 into range 0 to 1.
    train_X = train_X.astype('float32') / 255.
    test_X = test_X.astype('float32') / 255.
    train_X = np.reshape(train_X, (len(train_X), 28, 28, 1))
    test_X = np.reshape(test_X, (len(test_X), 28, 28, 1))

    noise_factor = 0.5

    #np.random.normal => random means to obtain random samples
    #normal means normal or gaussian distribution,
    #i.e. random sample from gaussian distribution
    train_X_noisy = train_X + noise_factor * np.random.normal(loc=0.0, scale=1.0, size=train_X.shape)
    test_X_noisy = test_X + noise_factor * np.random.normal(loc=0.0, scale=1.0, size=test_X.shape)

    # to make values in the range of 0 to 1,
    #if values < 0 then they will be equal to 0 and
    #if values > 1 then they will be equal to 1.
    train_X_noisy = np.clip(train_X_noisy, 0., 1.)
    test_X_noisy = np.clip(test_X_noisy, 0., 1.)
4). Visualizing actual digits and noised digits -
Now, for our image denoising model, the input will be noisy images and output will be original images.
These are the original images:

There are the images with the salt and pepper noise:

5). Defining our Image denoising autoencoder using keras -
    Input_img = Input(shape=(28, 28, 1))

    #encoding architecture
    x1 = Conv2D(64, (3, 3), activation='relu', padding='same')(Input_img)
    x1 = MaxPool2D( (2, 2), padding='same')(x1)
    x2 = Conv2D(32, (3, 3), activation='relu', padding='same')(x1)
    x2 = MaxPool2D( (2, 2), padding='same')(x2)
    x3 = Conv2D(16, (3, 3), activation='relu', padding='same')(x2)
    encoded    = MaxPool2D( (2, 2), padding='same')(x3)

    # decoding architecture
    x3 = Conv2D(16, (3, 3), activation='relu', padding='same')(encoded)
    x3 = UpSampling2D((2, 2))(x3)
    x2 = Conv2D(32, (3, 3), activation='relu', padding='same')(x3)
    x2 = UpSampling2D((2, 2))(x2)
    x1 = Conv2D(64, (3, 3), activation='relu')(x2)
    x1 = UpSampling2D((2, 2))(x1)
    decoded   = Conv2D(1, (3, 3), padding='same')(x1)

    autoencoder = Model(Input_img, decoded)
    autoencoder.compile(optimizer='adadelta', loss='binary_crossentropy')
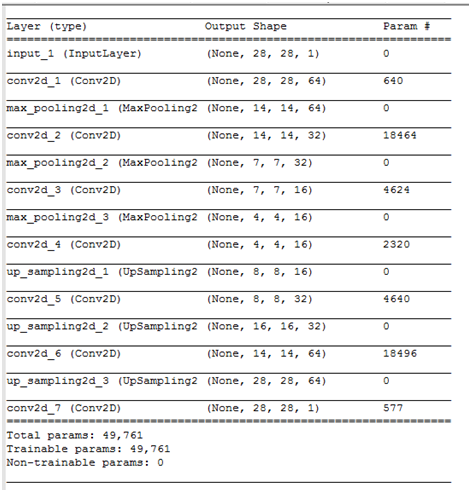
Here, in our autoencoder model, we can see clearly that encoder architecture and decoder architecture are just reverse of each other, i.e. Main Concept of Autoencoder.
Structure of our Autoencoder

6). Performing Early Stopping and Then fitting training and testing data to our autoencoder -
    early_stopper = EarlyStopping(monitor='val_loss', min_delta=0, patience=10, verbose=1, mode='auto')
    a_e = autoencoder.fit(train_X_noisy, train_X,
                epochs=100,
                batch_size=128,
                shuffle=True,
                validation_data=(test_X_noisy, test_X),
                callbacks=[early_stopper])

7). Making predictions using our trained autoencoder -
predictions = autoencoder.predict(test_X_noisy)
8). Visualizing actual images, noisy images and predicted images of testing data -
Following are the original images:

Following are the images with noise:

Following are the generated image (without noise):

Wow!!! We have done our image denoising practical successfully.
Here, I am also sharing python3 notebook of the complete Image Denoising Code.
