
Reading time: 35 minutes | Coding time: 15 minutes
In this article, we are going to see how a form is made and how the details entered by the user are stored in a database. As we code along, we are going to create a webpage which has a form and we will store the entries in a table in a database.
You will learn:
- basic ideas like database, table, primary key
- post API and insertion in a database table
- setting up a server, database, connecting your application and inserting data through a form
The technology stack used for backend in this article is PHP with a MySQL database. For front end, we will use easy and self-explanatory HTML.
Setup
You should have PHP server installed on your machine. I will be using XAMPP, which can be downloaded from here.
Also, having a text editor certainly helps. Even if you don't have one, don't worry, even Notepad will do.
Creating the database
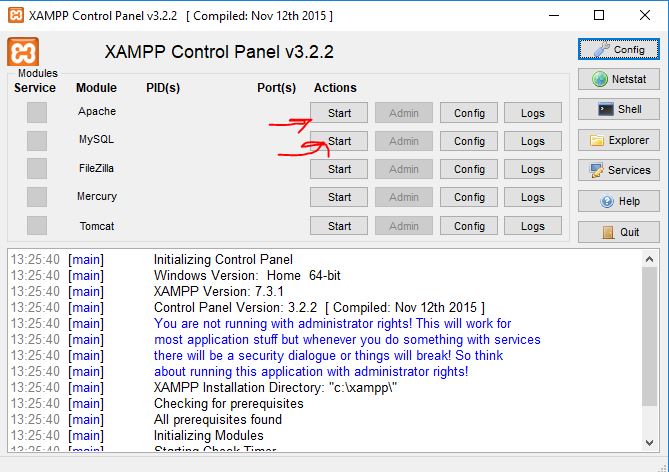
- Start the Apache and MySQL servers in XAMPP.
- Now, go to your browser and open http://localhost/phpmyadmin
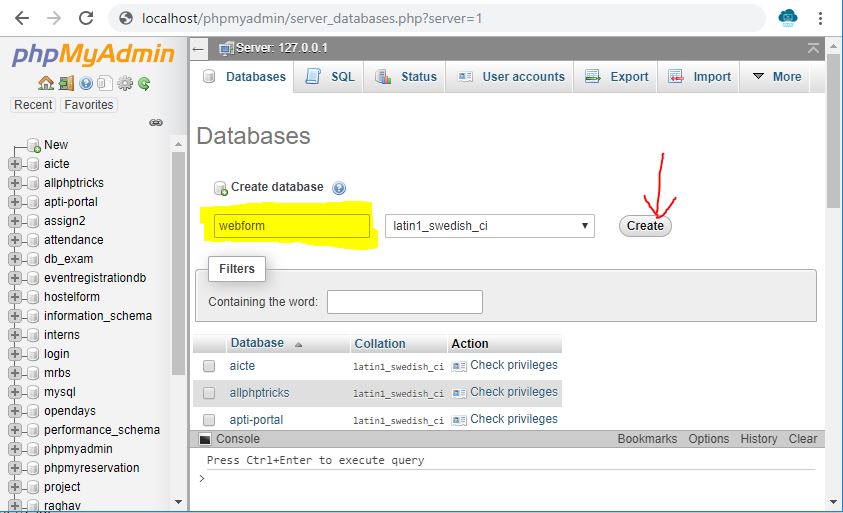
- In the left, go to New
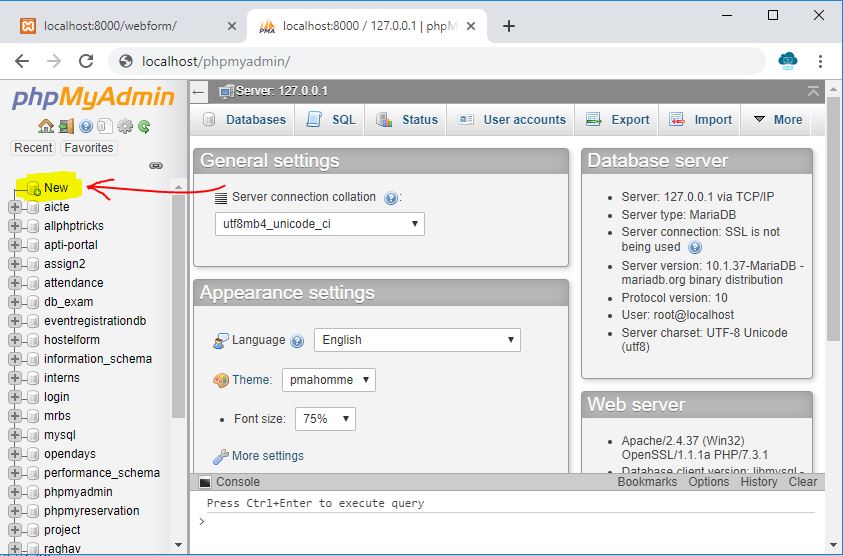
- Name the database webform
Each web application has a separate database and within each database, we can have multiple tables to organize the data for various features in our application.
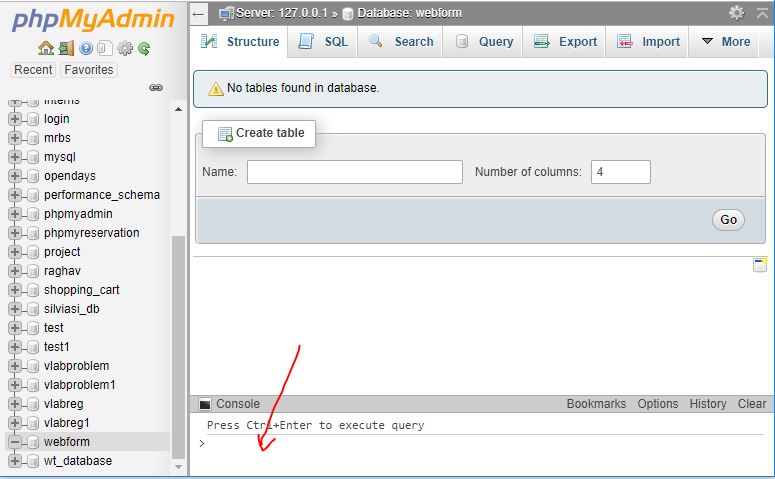
- Now copy the following code and run it in the SQL console in the bottom of the phpmyadmin page.
This will create a table in the MySQL database where our data from the form will be stored. We will create a table named entries with 5 fields namely id, name, email, city and gender. Note that we have set id is the primary key which means that each entry will be idenfied by id and it will be unique for all entry. If we try to enter a duplicate id, it will throw an error which we should avoid.
CREATE TABLE entries (
id int(11) NOT NULL AUTO_INCREMENT,
name varchar(255) NOT NULL,
email varchar(255) NOT NULL,
city varchar(255) NOT NULL,
gender varchar(255) NOT NULL,
PRIMARY KEY (id)
)
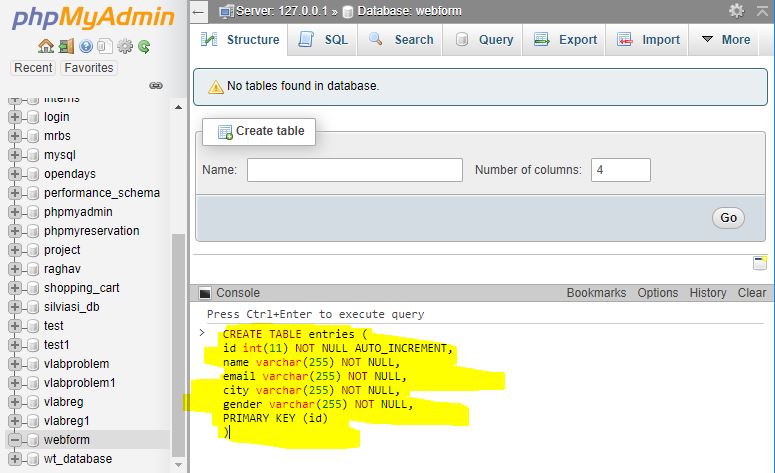
- By doing this, we have created the table entries in our database webform where we are going to store the entries by the users.
Writing the code
-
Navigate to the directory where XAMPP is installed (by default, it is C:/xampp), and then into the folder named htdocs. Inside this folder, create a new folder named webform.
-
Now open your text editor and copy the following code into it. Save the file by the filename: dbconfig.php
This will help our server to connect our database. Note that we have passed the credentials (username, password) and name of our database webform.
//Connecting to the database
<?php
$servername = "localhost";
$username = "root"; //edit if you have set a username for MySQL
$password = ""; // edit if you have set a password
$dbname = "webform";

// Create connection syntax
$conn = new mysqli($servername, $username, $password, $dbname);
// Check connection
if ($conn->connect_error) {
    die("Connection failed: " . $conn->connect_error);
}
?>
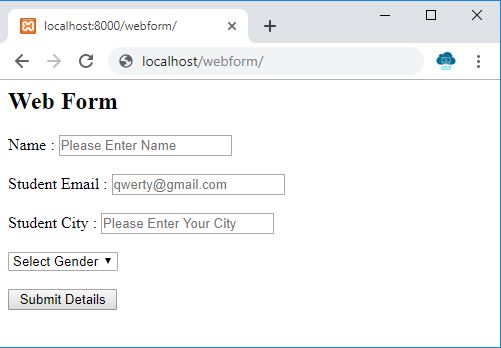
- Now open a new file in your text editor and copy the following code into it.
<div id="webform">
<h2>Web Form</h2>
<form action="" method="post">
<label>Name :</label>
<input type="text" name="name" required placeholder="Please Enter Name"/><br><br>
<label>Student Email :</label>
<input type="email" name="email" required placeholder="qwerty@gmail.com"/><br><br>
<label>Student City :</label>
<input type="text" name="city" required placeholder="Please Enter Your City"/><br><br>
<select name="gender" required>
    <option value=""> Select Gender </option>
    <option value="M"> Male </option>
	<option value="F"> Female </option>
</select>
<br><br>
<input type="submit" value=" Submit Details " name="submit"/><br />
</form>
</div>
-
Save the file as index.php.
-
Till now, we have written the code for the form. Now, we will come to the main part, which is handling the date entered into this form.
-
In the above code, we have set the method of the form to post and we have left the action attribute empty. By doing this, the form will post the data on the same page. If we had written the address to some other file/link in the action attribute, the form would have posted data to that particular address. I hope this makes sense.
-
Now take a close look at the following code
<?php
if(isset($_POST["submit"])){
include 'dbconfig.php';
$sql = "INSERT INTO entries (name, email, city, gender)
VALUES ('".$_POST["name"]."','".$_POST["email"]."','".$_POST["city"]."','".$_POST["gender"]."')";
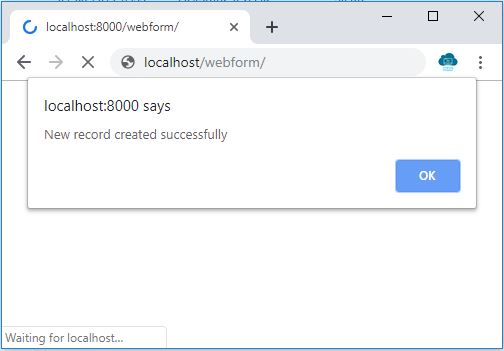
if ($conn->query($sql) === TRUE) {
echo "
<script type= 'text/javascript'>
alert('New record created successfully');
</script>";
}
else
{
echo
"<script type= 'text/javascript'>
alert('Error: " . $sql . "<br>" . $conn->error."');
</script>";
}
$conn->close();
}
?>
- The 'name' attribute of the submit type input field of our form was 'submit', therefore we check if the form has been submitted in the following syntax
if(isset($_POST["submit"]))
- Now, if the form has been submitted, we need to connect to the database, therefore we need the code in the dbconfig.php here. Therefore we write:
include 'dbconfig.php';
- The next thing to do is to execute the INSERT query on our database.
$sql = "INSERT INTO entries (name, email, city, gender)
VALUES ('".$_POST["name"]."','".$_POST["email"]."','".$_POST["city"]."','".$_POST["gender"]."')";
- In order to check if the query has been succesfully executed, we write:
if ($conn->query($sql) === TRUE)
- Append the above code to index.php such that the file looks like this:
<div id="webform">
<h2>Web Form</h2>
<form action="" method="post">
<label>Name :</label>
<input type="text" name="name" required placeholder="Please Enter Name"/><br><br>
<label>Student Email :</label>
<input type="email" name="email" required placeholder="qwerty@gmail.com"/><br><br>
<label>Student City :</label>
<input type="text" name="city" required placeholder="Please Enter Your City"/><br><br>
<select name="gender" required>
    <option value=""> Select Gender </option>
    <option value="M"> Male </option>
    <option value="F"> Female </option>
</select>
<br><br>
<input type="submit" value=" Submit Details " name="submit"/><br />
</form>
</div>
<?php
if(isset($_POST["submit"])){
include 'dbconfig.php';

$sql = "INSERT INTO entries (name, email, city, gender)
VALUES ('".$_POST["name"]."','".$_POST["email"]."','".$_POST["city"]."','".$_POST["gender"]."')";

if ($conn->query($sql) === TRUE) {
echo "
    <script type= 'text/javascript'>
        alert('New record created successfully');
    </script>";
}
else
{
    echo
    "<script type= 'text/javascript'>
        alert('Error: " . $sql . "<br>" . $conn->error."');
    </script>";
}

$conn->close();
}
?>
- So now we have 2 files, namely dbconfig.php and index.php. Now let's test if everything works fine.
- Go to http://localhost/webform in your browser. It should look like this.
- Fill some arbitrary details and hit 'Submit Details'.

- Click 'Ok' on the dialog box that appears.
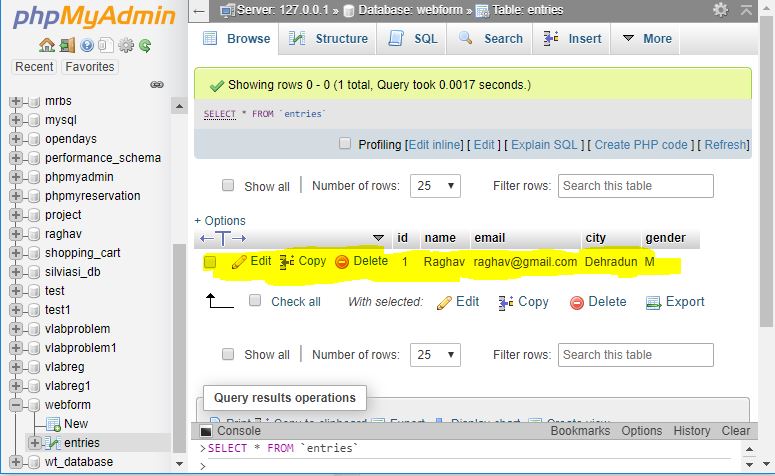
- To check if the entry has been added to the database successfully, go to http://localhost/phpmyadmin and select the database 'webform' from the left panel.
- You will see the table 'entries'. Open it and you should be able to see the entry with the details you just entered !
We hope you enjoyed building this simple application and got the ideas of basic web development.