
In this article at OpenGenus.org, we will learn about generating a password using React, JavaScript and Vite. To people who are new to Vite, it's a build tool that aims to provide faster and leaner web development experiences.
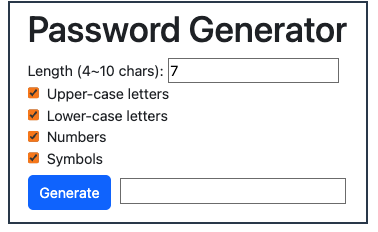
Table of contents:
- Setting up the environment
- Project Structure
- Creating the Password Generator Component
- Creating the Checkbox Component
- Utility to Generate a Password
- Running the App
- Code Repository
Setting up the environment with Vite
Vite is popular for the following 2 reasons.
-
Vite has a development server that provides rich feature enhancements over native ES modules, i.e. extremely fast Hot Module Replacement (HMR).
-
The build command in Vite enables developers to bundle their code using Rollup. It's a powerful and efficient bundling tool, pre-configured to output highly optimized static assets for production. It results in faster page loading times and improved overall performance.
Now, let's follow the steps to to setup our environment:
Part 1. Setting Up Vite
You can follow the following steps. If you need more info, visit here.
-
Vite requires Node.js version 14.18+, 16+. Upgrade if you need to.
-
Open your terminal and runs:
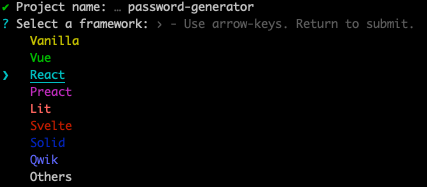
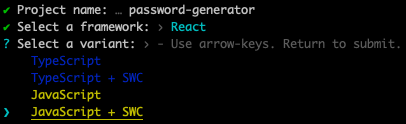
$ npm create vite@latest
-
Follow the prompts to specify your project name and template.
- Now run:
cd password-generator
npm install
npm run dev
Part 2.Setting up Bootstrap
Feel free to follow the steps below.
- Add the next line in the header of your index.html file.
<link rel="stylesheet" href="https://cdn.jsdelivr.net/npm/bootstrap@5.3.1/dist/css/bootstrap.min.css" integrity="sha256-2TnSHycBDAm2wpZmgdi0z81kykGPJAkiUY+Wf97RbvY=" crossorigin="anonymous">
- Add the line below in the body of your index.html.
<script src="https://cdn.jsdelivr.net/npm/bootstrap@5.1.3/dist/js/bootstrap.bundle.min.js"
 integrity="sha384-ka7Sk0Gln4gmtz2MlQnikT1wXgYsOg+OMhuP+IlRH9sENBO0LRn5q+8nbTov4+1p"
 crossorigin="anonymous"
></script>
After linking the Bootstrap CSS and bundled Javascript CDNs, the complete code for our public/index.html file will look like this:
<!doctype html>
<html lang="en">
  <head>
    <link rel="stylesheet" href="https://cdn.jsdelivr.net/npm/bootstrap@5.3.1/dist/css/bootstrap.min.css" integrity="sha256-2TnSHycBDAm2wpZmgdi0z81kykGPJAkiUY+Wf97RbvY=" crossorigin="anonymous">

    <title>Password Generator using React and Vite</title>
  </head>
  <body>
    <div id="root"></div>
    <script type="module" src="/src/main.jsx"></script>
    <script
      src="https://cdn.jsdelivr.net/npm/bootstrap@5.1.3/dist/js/bootstrap.bundle.min.js"
      integrity="sha384-ka7Sk0Gln4gmtz2MlQnikT1wXgYsOg+OMhuP+IlRH9sENBO0LRn5q+8nbTov4+1p"
      crossorigin="anonymous"
    ></script>
  </body>
</html>
Part 3. Clean up unnecessary code from Vite Setup
-
Remove src/App.css
-
Delete the contents in src/index.css
-
Remove the line in main.jsx
import './index.css' -
Remove the following lines in App.jsx
import reactLogo from './assets/react.svg'
import viteLogo from '/vite.svg'
import './App.css'
Project Structure
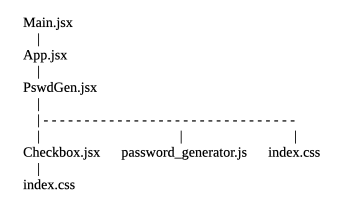
Creating the Password Generator Component - PswdGen.jsx
There are 3 files used in PswdGen component
import React, {useState} from 'react'
import Checkbox from "./Checkbox"
import {createPassword} from './password_generator'
import './index.css'
(1) Checkbox component will create each checkbox in the checkbox group
(2) PswdGen component will use password.generator.js to generate a password based on a user's preference.
(3) index.css is to format the layout of PswdGen component
There are 3 sub-components in the form in PswdGen.jsx
- Input tag to set password length
- Checkbox group
- Submit button
We create a form that allows a user to set criteria of a password when it's generated. The criteria include number of characters, and what types of characters will be used.
Here is a glance of the form:
return (
    <div className="container-sm" id="pswd_gen_container">
      <h1>Password Generator</h1>
      <form id="criteria_tbl" onSubmit={handleSubmit}>
        <label>Length (4~10 chars):</label>
        <input type="number" name="pswd_len" value={len} onChange={handleLen} />

        {criteria.map((elem, ndx) =>
          <Checkbox
            criterion={elem}
            key={ndx}
            handleCheckbox={(evt) => handleCheckbox(evt, ndx, elem)}
          />
        )}

        <input type="submit" value="Generate"/>
        <input id="result_box" name="pswd" value={pswd ?? ''} readOnly={true} />
      </form>
    </div>
  )
Here is how to make the form works and the breakdown of the form:
- Input tag to set password length
const [len, setLen] = useState(7)
Initialize password length to 7 in the useState hook.
<label>Length (4~10 chars):</label>
<input type='number' name='pswd_len' value={len} onChange={handleLen} />
The above is the top most inuput tag in the app, we use onChange, an event handler to control the input length of the password. onChange fires immediately when the input's value is changed by the user.
const handleLen = evt => {
    const val = evt.target.value
    if (val >= min_len && val <= max_len) setLen(val)
  }
handleLen function is called when the event handler is triggered.
- Checkbox group
const initCriteria = [
  {id: 0, name: "Upper-case letters", checked: true},
  {id: 1, name: "Lower-case letters", checked: true},
  {id: 2, name: "Numbers", checked: true},
  {id: 3, name: "Symbols", checked: true},
]
const [criteria, setCriteria] = useState(initCriteria)
Initialize a const variable, initCriteria. It's for users to set password preference. We use the keyword const to make it a block-scoped local variable.
Note for JavaScript keyword, const:
A const variable can't be reassigned a new value. However, if a constant is an object, its properties can be added, updated, or removed.
Next, we create a state variable, criteria, using React's useState function.
Why do we need to create a state variable?
It's because Local vaiables value don't change on render, while state variables hold the value between re-renders. Updating state will make a component re-render again, but local variables won't.
Thus when the value of criteria is changed by setCriteria function, the component re-renders to display the updated value.
        {criteria.map((elem, ndx) =>
          <Checkbox
            criterion={elem}
            key={ndx}
            handleCheckbox={(evt) => handleCheckbox(evt, ndx, elem)}
          />
        )}
Next, we use map function to create to 4 checkboxes using the Checkbox component (will be mentioned later).
The actual handleCheckbox function has to be created in PswdGen component and pass to its child component, Checkbox. The reason for it is that the const variable criterion belongs to PswdGen component.
const handleCheckbox = (evt, ndx, elem) => {
    const new_criteria = criteria.map((c, i) => {
      if (ndx === i) {
        console.log('elem:', elem)
        // Old values of this elem bc setCriteria() is not called yet
        if (c['checked'] === true) {
          if (check_count - 1 === 0) {
            alert('Please select at least 1 criterionon.')
            return c
          } else {
            check_count -= 1
            return { ...c, checked: !c['checked'] }
          }
        } else {
          // elem['checked'] === false
          check_count += 1
          return { ...c, checked: !c['checked'] }
        }
      } else {
        return c
      }
    })
    setCriteria(new_criteria)
  }
There are 4 choices for the password criteria - upper-case letters, lower-case letters, numbers and symbols. At lease one of the checkboxes has to be checked.
- Submit button
<input className='btn btn-primary' type='submit' value='Generate' />
const handleSubmit = evt => {
    evt.preventDefault()
    setPswd(createPassword(len, criteria))
  }
When the form is submit, onSubmit event handler is fired, then handleSubmit function is called.
Always! Always! Always! Remember to call evt.preventDefault() Otherwise, the newly generated password will disappear right after it's displayed!
Display the Password
It is simply used to display the password generated.
<input id='result_box' name='pswd' value={pswd ?? ''} readOnly />
We set value={pswd ?? ''} so the display space is empty when a user initially enters the browser page. We also set readOnly={true} to display content without editing capabilities.
Doing them will avoid the **Warning, a component is changing an uncontrolled input to be controlled. **
Creating the Checkbox Component - Checkbox.jsx
This is the Checkbox component used in PawdGen.jsx.
import React from 'react'
const Checkbox = ({criterion, handleCheckbox}) => {
return (
<div>
<input
type="checkbox"
name={criterion['name']}
checked={criterion['checked']}
onChange={handleCheckbox}
/>
<label htmlFor="criterion">{criterion['name']}</label>
</div>
)
}
export default Checkbox
We pass 2 properties from the Checkbox's parent - criterion and the event handler called, handleCheckbox. The properties are passed down from parent to child, so the child can utilize its parent's variables and functions.
Utility to Generate a Password - password_generator.js
This util file generates the actual password. createPassword function is exported to the PswdGen component. Length of a password can be set and upper-case, lower-case, number or symbols can be choices to generate a password.
const keys = {
  upper: 'ABCDEFGHIJKLMNOPQRSTUVWXYZ',
  lower: 'abcdefghijklmnopqrstuvwxyz',
  number: '0123456789',
  symbol: '~!@#$%^&*()-_=+\\|{}[]:;?/<>,.'
}

const getKey = [
  function upperCase () {
    return keys.upper[Math.floor(Math.random() * keys.upper.length)]
  },
  function lowerCase () {
    return keys.lower[Math.floor(Math.random() * keys.lower.length)]
  },
  function number () {
    return keys.number[Math.floor(Math.random() * keys.number.length)]
  },
  function symbol () {
    return keys.symbol[Math.floor(Math.random() * keys.symbol.length)]
  }
]

export function createPassword (len, criteria) {
  let pswd = ''

  while (pswd.length < len) {
    let ndx = Math.floor(Math.random() * getKey.length)

    if (criteria[ndx].checked) {
      let keyToAdd = getKey[ndx]
      pswd += keyToAdd()
    }
  }
  return pswd
}
CSS File for Simple Formating
Here is the CSS file for simple formating.
#pswd_gen_container {
  width: 400px;
  margin: 2px;
  border: 3px solid #2E4053;
  padding-top: 5px;
  padding-bottom: 10px;
  padding-left: 20px;
}

#criteria_tbl {
  width: 375px;
}

#result_box {
  width: 67%;
  margin: 10px;
}
Running the App
- Open your terminal, go to your project root directory, and then run
npm run dev
- Open your browser, enter the address below
http://localhost:5173/
- Now play with your newly learned app!