
In this article at OpenGenus, we are going to develop a really simple application with react, node and sharp. The application is going to have a minimal logic and will help you understand better how basic react can make your life simpler when developing something on the web.
Table of contents:
- Overall Idea and structure of the project
- Starting the development
- Basic app structure
- Styling the file
- Jsx basic structure
- Handling file drag
- Handling file drop
- Changes checker
- InputRef functionality
- Download function
- Conversion functionality
- Adding conversion and dowload
- Basic html structure of the application
Overall Idea and structure of the project
The main point of the project is making an application for converting the types of images you have (from jpg to png), sharp will make the conversion of the images for us.
As for the structure of the project it’s really simple, the application is based on create react app, I deleted everything that was useless and rendered only the app file. So when you want to start the app, just run react start.
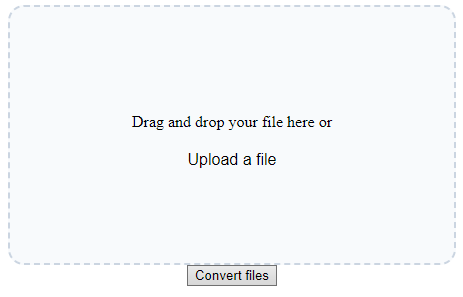
The application in the end will be like this:
Starting the development
Basic app structure
first we are going to start with the base of a react app, run create-react-app, after that delete all the files that aren’t going to be used, just keep app.css, app.js and index.js in the src folder and don’t delete the public file.
Let’s list the dependencies we are going to use on the application besides what was already installed with create-react-app:
yarn add sharp os-browserify path-browserify stream-browserify util web-vital
npm install sharp os-browserify path-browserify stream-browserify util web-vital
The code In the index.jsx is going to be:
import React from 'react';
import ReactDOM from 'react-dom/client';
import DragDropFile from './App'

const root = ReactDOM.createRoot(document.getElementById('root'));
root.render(
    <DragDropFile/>
);
Styling the file
This is the css code I’m using on App.css, but of course you can style the way you prefer:
#form-file-upload {
  height: 16rem;
  width: 28rem;
  max-width: 100%;
  text-align: center;
  position: absolute;
}

#input-file-upload {
  display: none;
}

#label-file-upload {
  height: 100%;
  display: flex;
  align-items: center;
  justify-content: center;
  border-width: 2px;
  border-radius: 1rem;
  border-style: dashed;
  border-color: #cbd5e1;
  background-color: #f8fafc;
}

.upload-button {
  cursor: pointer;
  padding: 0.25rem;
  font-size: 1rem;
  border: none;
  font-family: 'Oswald', sans-serif;
  background-color: transparent;
}

.upload-button:hover {
  text-decoration-line: underline;
}
Jsx basic structure
Now the logical part is going to be developed, I’m going to break things apart so it is easier for you to understand.
Let’s import everything that is needed
import React from "react";
import './App.css'

const fs = require('fs');
const sharp = require('sharp');
Here you can see we are using useState so the states of the drag or quantity of files can be saved,the uploadedFiles are used for making a list of each uploadedFile so they can be converted after and a null useRef to input the files later.
function Converter() {
  const [dragActive, setDragActive] = React.useState(false);
  const [QntFiles, setQntFiles] = React.useState(0)
  const [uploadedFiles, setUploadedFiles] = React.useState([])

  const inputRef = React.useRef(null);
Handling file drag
In this function we are going to check if a archive is being dragged into our page, using the setDragActive to update the state of the “dragging” on our page
const handleDrag = function(e) {
    e.preventDefault();
    e.stopPropagation();
    if (e.type === "dragenter" || e.type === "dragover") {
      setDragActive(true);
    } else if (e.type === "dragleave") {
      setDragActive(false);
    }
  };
Handling file drop
You can see in this function we are handling the the drop of files in our page and after it is dropped it will be handled using the state we createad before, setUploadedFiles will be a list that is updated everytime a file is droped.
const handleDrop = function(e) {
    e.preventDefault();
    e.stopPropagation();
    setDragActive(false);
    if (e.dataTransfer.files && e.dataTransfer.files[0]) {
      const filesArray = Array.from(e.dataTransfer.files);
      setUploadedFiles(prevUploadedFiles => [...prevUploadedFiles, ...filesArray])
    }
  };
Changes checker
On handleChange the quantity of files will be updated based on the state that it was before
const handleChange = function(e) {
    e.preventDefault();
    if (e.target.files && e.target.files[0]) {
      setQntFiles(QntFiles + 1)
    }
  };
InputRef functionality
onButtonClick the input reference will be updated and then the ref of input html attribute will use the const.
const onButtonClick = () => {
    inputRef.current.click();
  };
Download function
The downloadFile function will be called on later functions, so the converted files will be downloaded by the users, this will basically get the information of the desired file and use it to make the download.
const downloadFile = (filePath, fileName) => {
    const fileUrl = URL.createObjectURL(new Blob([filePath]));
    const downloadLink = document.createElement('a');
    downloadLink.href = fileUrl;
    downloadLink.setAttribute('download', fileName);
    document.body.appendChild(downloadLink);
    downloadLink.click();
    document.body.removeChild(downloadLink);
  };
Conversion functionality
This function is the main reason why we are developing this application, here we get the path of the file and image that were converted, after that fs.readFile will read the content of the input and pass the image into a buffer, so sharp can use this data.
Sharp with the data of the jpg image will convert to png and make this converted image into a buffer path that fs will use to write the data into a file, after all this process a callback function will be called with pngData as a parameter.
function convertJpgToPng(inputPath, outputPath, callback) {
    fs.readFile(inputPath, (err, data) => {
      if (err) throw err;

      sharp(data)
        .png()
        .toBuffer((err, pngData) => {
          if (err) throw err;

          fs.writeFile(outputPath, pngData, (err) => {
            if (err) throw err;
            callback(pngData);
          });
        });
    });
  }
Adding conversion and dowload
This function will basically make a for loop the array of files we created, the file will be read, and after it is loaded this file will be in a buffer, then it will replace the format of the path to png and call converJpgToPng to actively convert the file, after that the downloadFile function will be called as the callback function. That way making the user download everything.
const convertFiles = (filesArray) => {
    filesArray.forEach(file => {
      const reader = new FileReader();
      reader.onload = (event) => {
        const inputBuffer = Buffer.from(event.target.result);
        const outputFilePath = file.path.replace('.jpg', '.png');
        convertJpgToPng(inputBuffer, outputFilePath, (pngData) => {
          downloadFile(pngData, outputFilePath.split('/').pop());
        });
      };
      reader.readAsArrayBuffer(file);
    });
  }
Basic html structure of the application
Now let’s see the return of our converter function:
return (
    <form id="form-file-upload" onDragEnter={handleDrag} onSubmit={(e) => e.preventDefault()}>
      <input ref={inputRef} type="file" id="input-file-upload" accept="image/jpeg, image/jpg" multiple={true} onChange={handleChange} />
      <label id="label-file-upload" htmlFor="input-file-upload" className={dragActive ? "drag-active" : "" }>
        <div>
          <p>Drag and drop your file here or</p>
          <button className="upload-button" onClick={onButtonClick}>Upload a file</button>
          <p>Quantity of files: {QntFiles}</p>
        </div>
      </label>
      { dragActive && <div id="drag-file-element" onDragEnter={handleDrag} onDragLeave={handleDrag} onDragOver={handleDrag} onDrop={handleDrop}></div> }
      <button className="convert-button" onClick={convertFiles(uploadedFiles)}>Convert files</button>
    </form>
  );
};

export default Converter;
With this article at OpenGenus, you must have the complete idea of developing an Online File Converter in React.