
Table of Contents
- Introduction
- Authentication and Authorization
2.1 Project Structure - Prerequisites
- Step 1 - Create a directory and initialize npm
- Step 2 - Create files and directories
- Step 3 - Install Dependencies
- Step 4 - Set Up Express App
- Step 5 - Create Model
- Step 6 - Implement Authentication Logic
- Step 7 - Implement Authorization Logic
- Step 8 - Implement Authorization Logic
- Step 9 - Public Files Completion, Testing, and Conclusion
Introduction
In the ever-evolving landscape of web development, securing user data is paramount. This OpenGenus guide walks you through the fundamental concepts of authentication and authorization in Node.js, providing practical examples and a basic frontend setup.
Authentication and Authorization
Authentication and authorization are two fundamental concepts in computer security and access control. Authentication verifies the identity of a user, system, or application, while authorization determines the actions or resources a user is allowed to access after authentication.
Authentication:
- Methods include Username and Password, Biometric Authentication, Two-Factor Authentication (2FA), or Multi-Factor Authentication (MFA).
- Goal: Prevent unauthorized access to sensitive information or resources.
Authorization:
- Methods include Access Control Lists (ACLs), Role-Based Access Control (RBAC), and Attribute-Based Access Control (ABAC).
- Goal: Ensure authenticated users can only perform actions appropriate for their privilege or role.
Application Overview
The application being developed is a Node.js web application that focuses on user authentication and authorization. These security mechanisms are crucial for ensuring that users can access only the resources and perform only the actions appropriate for their roles.
Prerequisites
To follow along with this tutorial, you will need:
- A working knowledge of JavaScript.
- A good understanding of Node.js.
- Postman and command-line tools.
Step 1 - Create a directory and initialize npm
To get started, set up your project directory and initialize npm:
mkdir authentication_and_authorization
cd authentication_and_authorization
npm init -y
Step 2 - Create files and directories
Create the necessary project structure using the following commands:
mkdir controllers model middleware routes public
touch controllers/authController.js Middleware/authenticationMiddleware.js Middleware/authorizationMiddleware.js model/user.js routes/authRoutes.js public/index.html public/styles.css public/app.js .gitignore README.md
touch app.js
Step 2.1 - Project Structure
Organize your project by creating a structured directory layout. Place the following structure in your authentication_and_authorization directory:
/authentication_and_authorization
├── controllers
│ ├── authController.js
├── Middleware
│ ├── authenticationMiddleware.js
│ ├── authorizationMiddleware.js
├── model
│ ├── user.js
├── routes
│ ├── authRoutes.js
├── public
│ ├── index.html
│ ├── styles.css
│ ├── app.js
├── app.js
Explanation:
- controllers: Handles route logic.
- middleware: Contains authentication and authorization logic.
- model: Defines data structures.
- routes: Manages endpoints.
- public: Stores frontend files such as HTML, CSS, and client-side JavaScript.
- app.js: Main entry point for the application.
Step 3 - Install Dependencies
Install Express, a minimal web framework for Node.js:
npm install express
Explanation:
npm install express: Installs the Express framework, a fast and minimalist web framework for Node.js. Express will be used to build the server and handle HTTP requests.
Step 4 - Set Up Express App (app.js)
// app.js
const express = require('express');
const path = require('path');
const authRoutes = require('./routes/authRoutes');

const app = express();

// Serve static files from the 'public' directory
app.use(express.static(path.join(__dirname, 'public')));

// Parse JSON request bodies
app.use(express.json());

// API routes
app.use('/api', authRoutes);

const PORT = process.env.PORT || 3000;
app.listen(PORT, () => {
  console.log(`Server is running on port ${PORT}`);
});
Explanation:
-
const express = require('express');: Imports the Express framework. -
const path = require('path');: Imports thepathmodule for working with file and directory paths. -
const authRoutes = require('./routes/authRoutes');: Imports the authentication routes defined inauthRoutes.js. -
const app = express();: Creates an instance of the Express application. -
app.use(express.static(path.join(__dirname, 'public')));: Serves static files (like HTML, CSS, and client-side JavaScript) from the 'public' directory using Express's static middleware. -
app.use(express.json());: Middleware to parse incoming JSON data in requests. It makes the parsed JSON data available in therequest.bodyobject. -
app.use('/api', authRoutes);: Mounts the authentication routes under the '/api' path. -
const PORT = process.env.PORT || 3000;: Defines the port on which the server will listen. It uses thePORTenvironment variable if available; otherwise, it defaults to port 3000. -
app.listen(PORT, () => { console.log(Server is running on port ${PORT}); });: Starts the server and listens for incoming requests on the specified port. Upon successful start, it logs a message to the console.
Step 5 - Create Model (model/user.js)
// model/user.js
class User {
  constructor(username, password, role = 'user') {
    this.username = username;
    this.password = password;
    this.role = role;
  }
}

// Sample users for testing
const users = [
  new User('admin', 'adminPassword', 'admin'),
  new User('user1', 'user1Password'),
  new User('user2', 'user2Password'),
];

module.exports = { User, users };
Explanation:
-
class User { ... }: Defines aUserclass with a constructor for creating user objects. It takesusername,password, and an optionalrolewith a default value of 'user'. -
const users = [...];: Creates an array of sample users for testing purposes. -
module.exports = { User, users };: Exports theUserclass and theusersarray, making them available for other parts of the application.
Step 6 - Implement Authentication Logic (controllers/authController.js and Middleware/authenticationMiddleware.js)
controllers/authController.js
// controllers/authController.js
const { users } = require('../model/user');

exports.login = (req, res) => {
  res.json({ message: 'Login successful', user: req.user });
};

exports.adminContent = (req, res) => {
  res.json({ message: 'Admin access granted' });
};
Explanation:
-
const { users } = require('../models/user');: Imports theusersarray from theuser.jsmodel. -
exports.login = (req, res) => { ... };: Defines a controller function for handling login. It sends a JSON response with a message and the authenticated user details. -
exports.adminContent = (req, res) => { ... };: Defines a controller function for handling admin content access. It sends a JSON response indicating admin access.
Middleware/authenticationMiddleware.js
// Middleware/authenticationMiddleware.js
const users = require('../model/user').users;

exports.authenticateUser = (req, res, next) => {
  const { username, password } = req.body;
  const user = users.find((u) => u.username === username && u.password === password);

  if (user) {
    req.user = user;
    next();
  } else {
    res.status(401).json({ message: 'Invalid credentials' });
  }
};
Explanation:
-
const users = require('../models/user').users;: Imports theusersarray from theuser.jsmodel. -
exports.authenticateUser = (req, res, next) => { ... };: Defines middleware for authenticating users. It checks if the providedusernameandpasswordmatch any user in theusersarray. -
If credentials are valid, it sets the authenticated user on the
req.userproperty and calls thenext()function to move to the next middleware or route. -
If credentials are invalid, it sends a 401 (Unauthorized) response with a JSON message indicating invalid credentials.
Step 7 - Implement Authorization Logic (Middleware/authorizationMiddleware.js and Updated routes/authRoutes.js)
Middleware/authorizationMiddleware.js
// Middleware/authorizationMiddleware.js
exports.checkRole = (role) => {
  return (req, res, next) => {
    if (req.user && req.user.role === role) {
      next();
    } else {
      res.status(403).json({ message: 'Access forbidden' });
    }
  };
};
Explanation:
exports.checkRole = (role) => { ... };:
Defines a middleware function generator that checks if the authenticated user has the specified role.
-
If the user has the required role, it calls the
next()function to proceed to the next middleware or route. -
If the user lacks the required role, it sends a 403 (Forbidden) response with a JSON message indicating access forbidden.
Updated routes/authRoutes.js
// routes/authRoutes.js
const express = require('express');
const router = express.Router();
const authenticationMiddleware = require('../Middleware/authenticationMiddleware');
const authorizationMiddleware = require('../Middleware/authorizationMiddleware');
const authController = require('../controllers/authController');

router.post('/login', authenticationMiddleware.authenticateUser, authController.login);

router.get('/admin', authorizationMiddleware.checkRole('admin'), authController.adminContent);

module.exports = router;
Explanation:
-
router.post('/login', authenticationMiddleware.authenticateUser, authController.login);: Defines a route for handling POST requests to the '/api/login' endpoint. It uses theauthenticateUsermiddleware to authenticate users and calls thelogincontroller function. -
router.get('/admin', authorizationMiddleware.checkRole('admin'), authController.adminContent);: Defines a route for handling GET requests to the '/api/admin' endpoint. It uses thecheckRole('admin')middleware to check if the user has the 'admin' role and calls theadminContentcontroller function.
Step 8 - Implement Authorization Logic (Continued)
Middleware/authorizationMiddleware.js
// Middleware/authorizationMiddleware.js
exports.checkRole = (role) => {
  return (req, res, next) => {
    if (req.user && req.user.role === role) {
      next();
    } else {
      res.status(403).json({ message: 'Access forbidden' });
    }
  };
};
Explanation:
exports.checkRole = (role) => { ... };: This is the same as in Step 7.
Updated routes/authRoutes.js
// routes/authRoutes.js
const express = require('express');
const router = express.Router();
const authenticationMiddleware = require('../Middleware/authenticationMiddleware');
const authorizationMiddleware = require('../Middleware/authorizationMiddleware');
const authController = require('../controllers/authController');

router.post('/login', authenticationMiddleware.authenticateUser, authController.login);

router.get('/admin', authorizationMiddleware.checkRole('admin'), authController.adminContent);

module.exports = router;
Explanation:
-
router.post('/login', authenticationMiddleware.authenticateUser, authController.login);: This is the same as in Step 7. -
router.get('/admin', authorizationMiddleware.checkRole('admin'), authController.adminContent);: This is the same as in Step 7.
Step 9 - Public Files Completion, Testing, and Conclusion
Complete public files (public/index.html, public/app.js, public/styles### public/styles.css`
Absolutely! Let's walk through each step with detailed explanations.
<!-- public/index.html -->
<!DOCTYPE html>
<html lang="en">
<head>
  <meta charset="UTF-8">
  <meta name="viewport" content="width=device-width, initial-scale=1.0">
  <title>Node.js Authentication and Authorization Demo</title>
  <link rel="stylesheet" href="styles.css">
</head>
<body>
  <h1>Node.js Authentication and Authorization Demo</h1>

  <div id="login-form">
    <h2>Login</h2>
    <label for="username">Username:</label>
    <input type="text" id="username" required>
    <br>
    <label for="password">Password:</label>
    <input type="password" id="password" required>
    <br>
    <button onclick="login()">Login</button>
    <p id="login-message"></p>
  </div>

  <div id="admin-content" style="display:none;">
    <h2>Welcome, Admin!</h2>
    <p>This content is only visible to users with the 'admin' role.</p>
  </div>

  <script src="app.js"></script>
</body>
</html>
Explanation:
- The HTML file (
public/index.html) provides the structure for the login form and admin content. - It includes references to the external stylesheet (
styles.css) and the JavaScript file (app.js).
public/app.js
// public/app.js
document.addEventListener('DOMContentLoaded', () => {
    const loginForm = document.getElementById('login-form');
    const adminContent = document.getElementById('admin-content');
    const loginMessage = document.getElementById('login-message');

    // Define the login function
    async function login() {
      const username = document.getElementById('username').value;
      const password = document.getElementById('password').value;

      try {
        const response = await fetch('/api/login', {
          method: 'POST',
          headers: {
            'Content-Type': 'application/json',
          },
          body: JSON.stringify({ username, password }),
        });

        const data = await response.json();

        if (response.ok) {
          loginMessage.textContent = `Login successful. Welcome, ${data.user.username}!`;

          if (data.user.role === 'admin') {
            loginForm.style.display = 'none';
            adminContent.style.display = 'block';
          }
        } else {
          loginMessage.textContent = `Login failed: ${data.message}`;
        }
      } catch (error) {
        console.error('Error during login:', error);
      }
    }
    // Attach the login function to the window object to make it accessible in the HTML
    window.login = login;
  });
Explanation:
- The JavaScript file (
public/app.js) handles the logic for user login using the Fetch API. - It listens for the
DOMContentLoadedevent to ensure the DOM is fully loaded before interacting with elements. - The
loginfunction captures the input values, sends a POST request to the/api/loginendpoint, and updates the UI based on the server response.
public/styles.css
/* public/styles.css */
body {
    font-family: Arial, sans-serif;
    background-color: #f4f4f4;
    margin: 0;
    display: flex;
    align-items: center;
    justify-content: center;
    height: 100vh;
  }


  form {
    display: flex;
    flex-direction: column;
  }

  label {
    margin-bottom: 5px;
  }

  input {
    margin-bottom: 10px;
    padding: 8px;
    border: 1px solid #ccc;
    border-radius: 3px;
  }

  button {
    background-color: #007bff;
    color: #fff;
    padding: 10px;
    border: none;
    border-radius: 3px;
    cursor: pointer;
  }


  h1 {
    color: #333;
    margin-left: 60px;
  }

  #login-form {
        background-color: #fff;
        padding: 20px;
        border-radius: 5px;
        box-shadow: 0 0 10px rgba(0, 0, 0, 0.1);
  }

  label {
    display: block;
    margin-bottom: 8px;
  }

  input {
    width: 100%;
    padding: 8px;
    margin-bottom: 16px;
  }


  button:hover {
    background-color: #45a049;
  }

  #admin-content {
    margin-top: 20px;
  }
Explanation:
- The CSS file (
public/styles.css) provides basic styling for HTML elements. - It defines styles for the body, headings, form elements, buttons, and admin content.
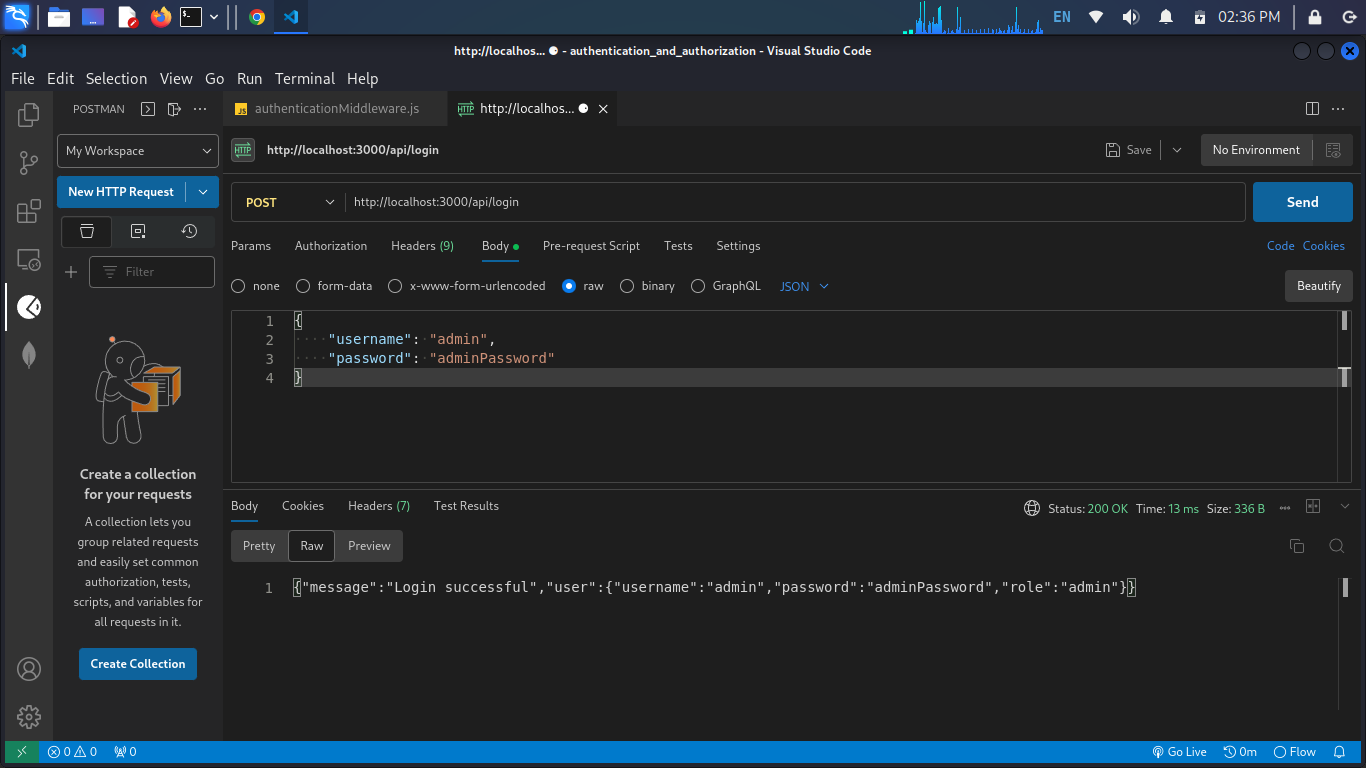
Postman Testing
Now, let's test the authentication process using Postman:
-
Open Postman.
-
Create a new request with the following details:
-
Method: POST
-
URL:
http://localhost:3000/api/login -
Body: Select
rawand chooseJSON (application/json). Enter the following JSON data:{ "username": "admin", "password": "adminPassword" }
-
-
Send the request.
-
You should receive a JSON response indicating a successful login with the admin user.
The output of the response:
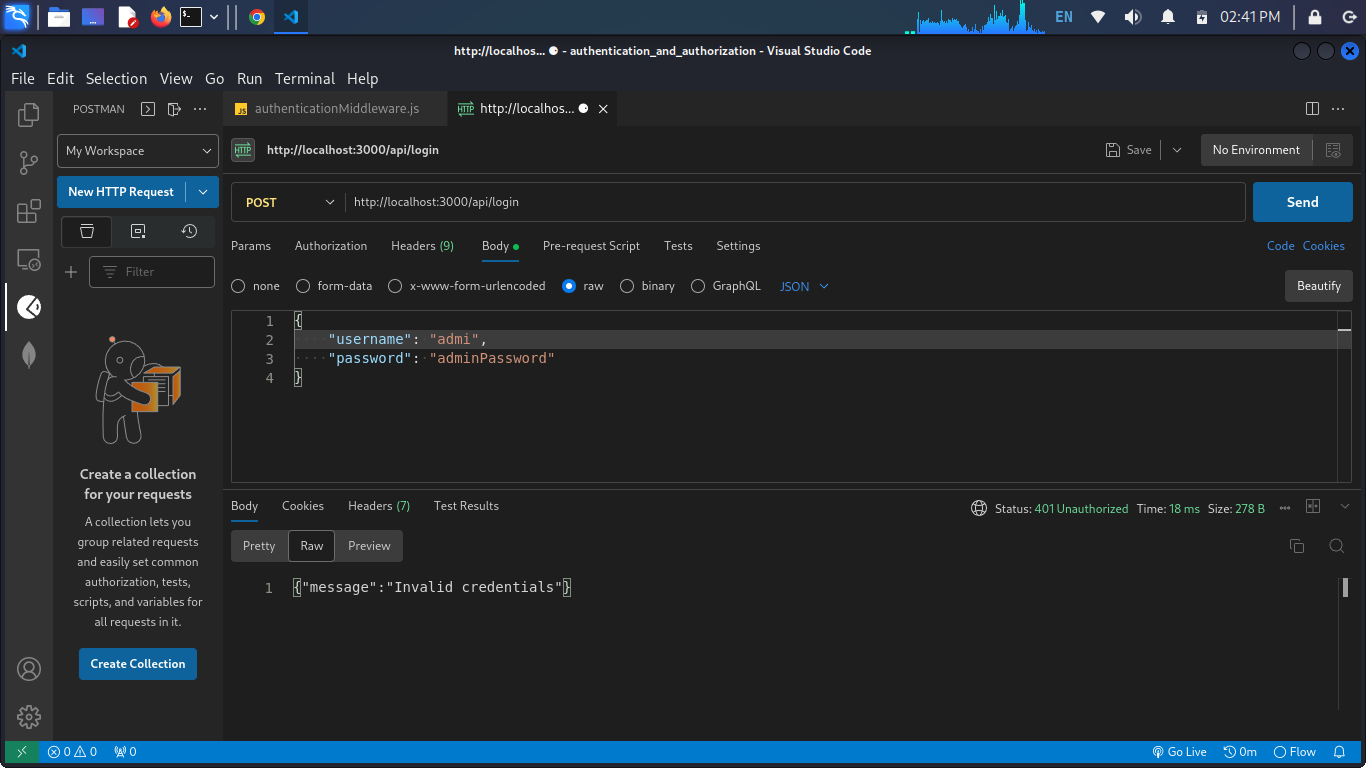
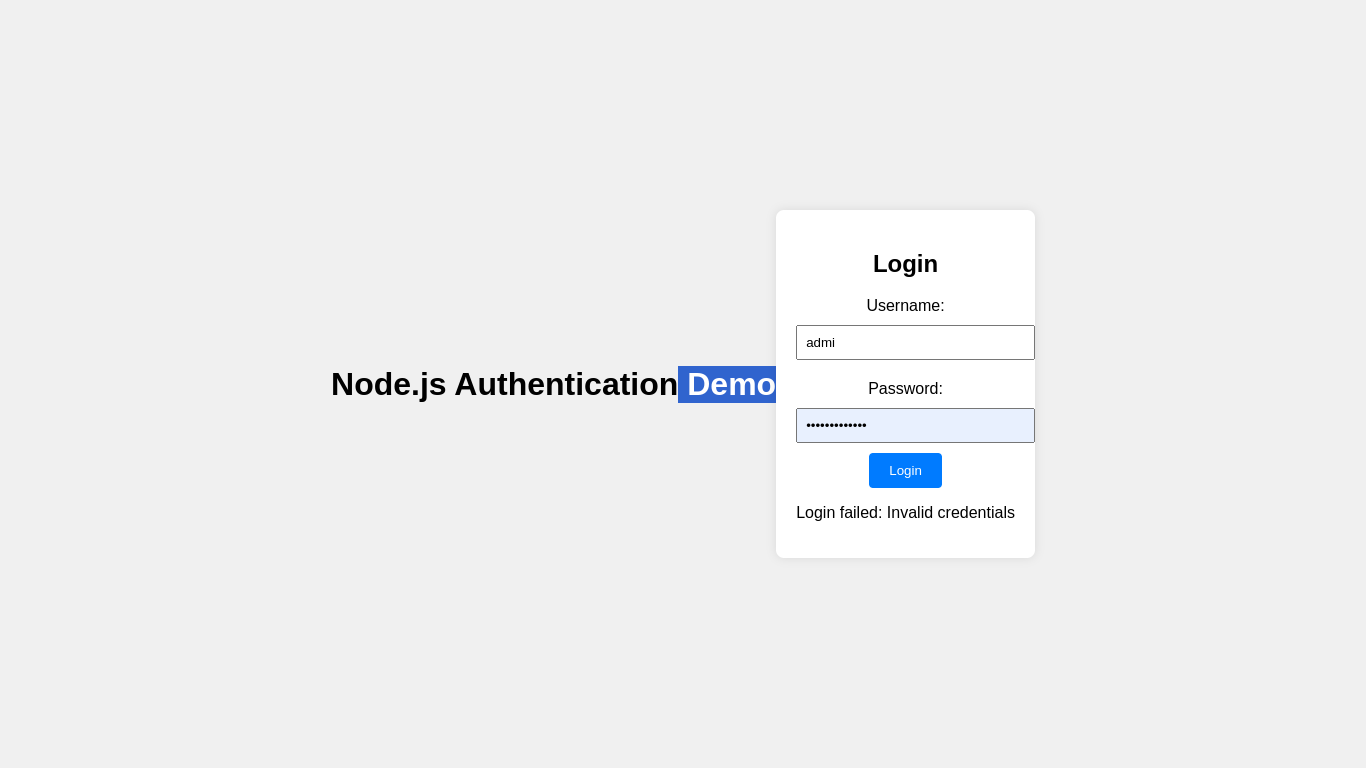
Let's input an invalid text in the username field, and the response we receive for this invalid text input in the username field is the same response we would get for an invalid text input in the password field.
The output of the response:
Conclusion
Through this OpenGenus tutorial, you've gained insights into how to structure a Node.js project for authentication and how to test it using Postman. Feel free to expand on this foundation to add more features and enhance the security of your application.