Open-Source Internship opportunity by OpenGenus for programmers. Apply now.
Reading time: 30 minutes | Coding time: 15 minutes
The applications of deep learning are very diverse, even in creative fields like arts and graphic design. And there are many philosophical questions about creativity, can we make computers draw? can they be creative like humans? and so on. In this article, we will talk about one of the most coolest applications of machine learning which is Neural Style Transfer.
We will demonstrate one of the most common techniques of performing Neural Style Transfer using Convolutional Neural Networks (CNN).
Style Transfer
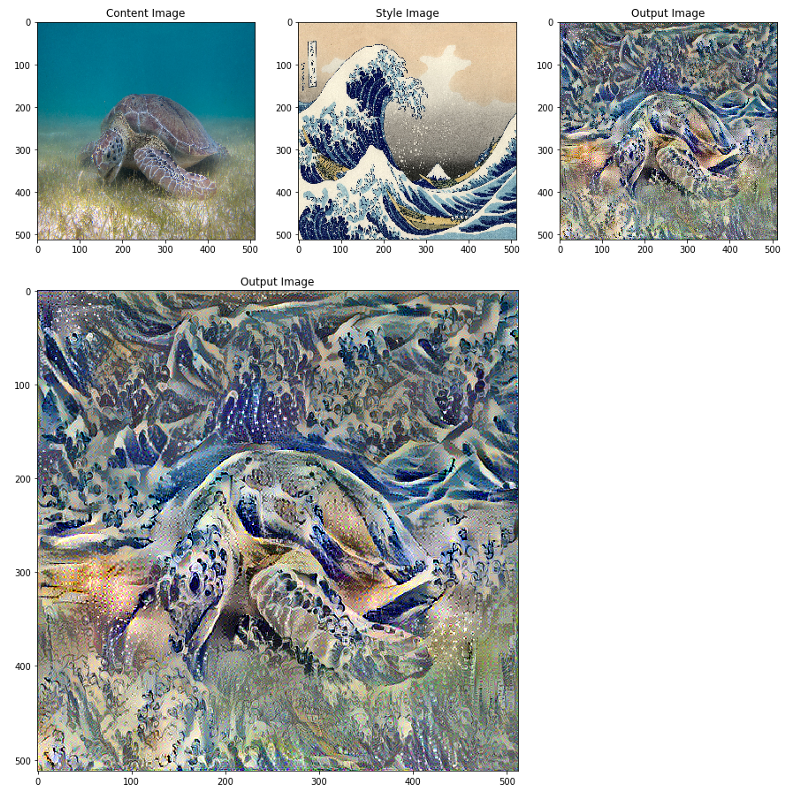
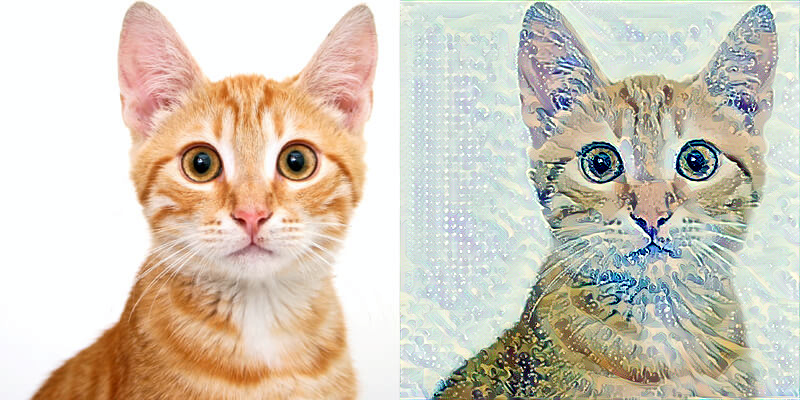
Style transfer is a technique in which we compose two images together, a content image, a style image, and produce a third image that will look like the content image and the style of it will be like the style image.

Style transfer using CNN
We know that Convolutional Neural Networks achieve great results in the image classification problem. Scientists have studied several approaches for understanding and visualizing Convolutional Networks.
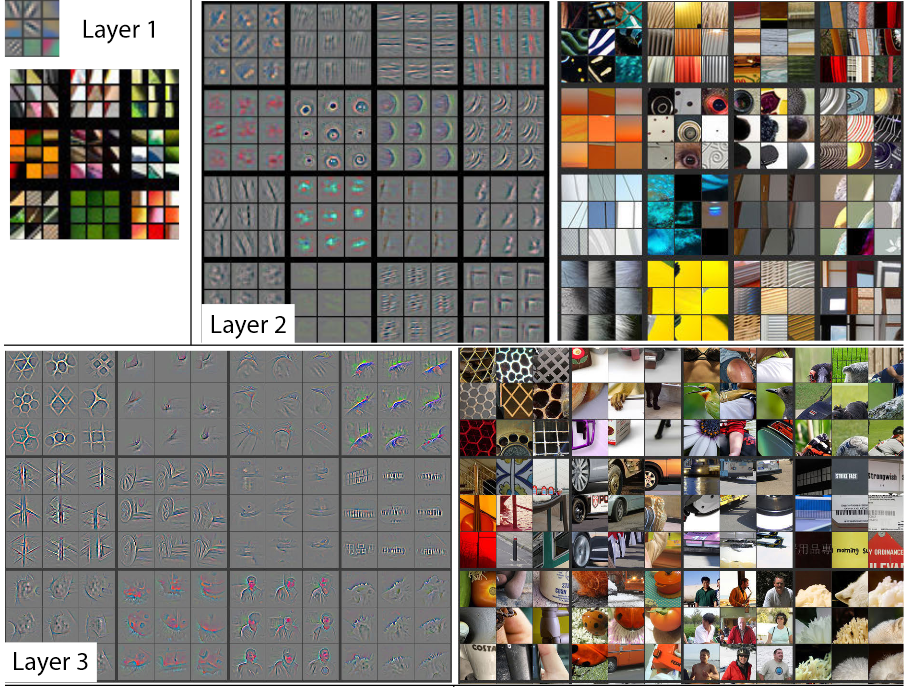
If we analyse a pre-trained CNN model, we will find that the first layers of the model are capable of detecting simple features like colours and vertical lines. And as we go deeper in the model the layers detect more complex features. So a CNN is capable of extracting both high-level content and complex texture representations. These representations can be used to transfer style from an image to another. In this article, we will discuss the first published method to do style transfer using CNNs.

Neural Style transfer
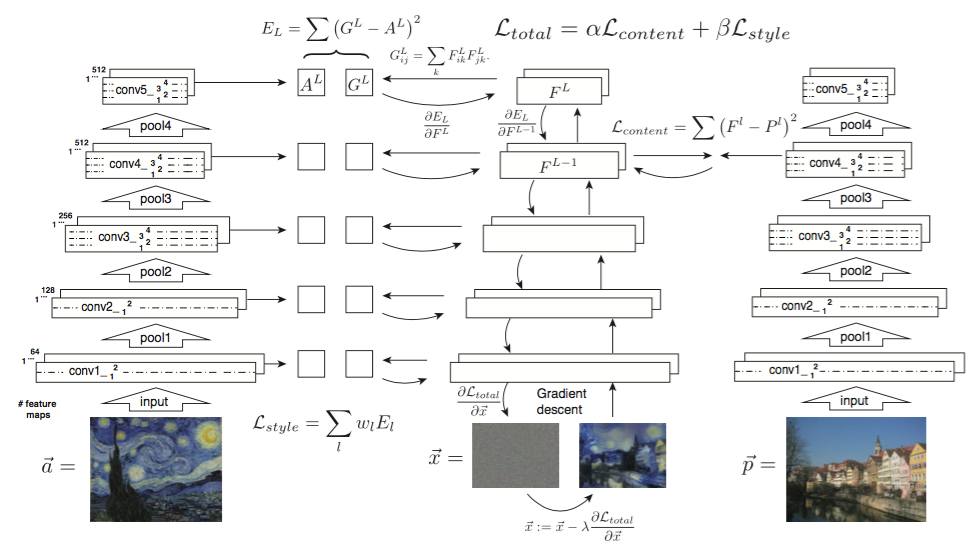
Neural style transfer relies on two losses:
- content loss
- style loss
We first create a third image (target image). We can initialize this image with random values, but here we will initialize it with a copy from our content image. These losses are calculated using these three images the content image, the style image and the target image.
Content loss
The content loss is calculated using the target and content images. First, we select one of the layers of our model. Then we feedforward the content image through the pre-trained model and get the feature maps produced by the selected layer. After that, we feedforward the target image and get the feature maps produced by the selected layer. Then we calculate the loss using these feature maps (content feature maps and target feature maps). For example, we can use the mean squared distance between the content feature maps and the target feature maps as a loss function.
Style loss
In order to calculate the style loss, we need to define a style representation for the images. In the paper, the style representation is defined as the Gram matrix of the feature maps.
The Gram matrix is a measure of a statistic in the features. It measures the correlation between the feature maps.
The content representation is calculated using the feature maps produced by one layer. But the style representation is calculated using the feature maps produced by many layers. So first we choose some layers in different locations in the model. We feedforward the image through the pre-trained model. Then we calculate the Gram matrix for the feature maps produced by these layers. This Gram matrix will be our style representation.
The style loss is calculated using the style representations (Gram matrix) for the style and target images. In the paper, the mean squared distance is used as a style loss. So the style loss will be the mean squared distance between the two Gram matrices.
Total loss
The total loss is defined as the weighted sum of the style and content losses. We define two weights the style weight, and the content weight. If our style weight is larger than our content weight then the final result will be more similar to the style image and vice versa.
The total loss will be equal to:
Total loss = content weight * content loss + style weight * style loss
So style transfer will be an optimization problem. We will minimize the total loss and then we change our target image by backpropagating this loss. We repeat these steps until we reach a good loss.
Implementation using PyTorch
We are going to implement style transfer using PyTorch. You must download python 3 and install PyTorch, torchvision and Pillow libraries.
We’ll recreate a style transfer method that is outlined in the paper, Image Style Transfer Using Convolutional Neural Networks, by Gates in PyTorch
In this paper, style transfer uses the features found in the 19-layer VGG Network, which is comprised of a series of convolutional and pooling layers, and a few fully-connected layers. In the image below, the convolutional layers are named by stack and their order in the stack. Conv_1_1 is the first convolutional layer that an image is passed through, in the first stack. Conv_2_1 is the first convolutional layer in the second stack. The deepest convolutional layer in the network is conv_5_4.

Necessary imports
Here we will import necessary resources.
from PIL import Image
import matplotlib.pyplot as plt
import numpy as np

import torch
import torch.optim as optim
from torchvision import transforms, models
Loading the model
VGG19 has two parts. The first part consists of convolutional layers and the second part is two fully connected layers and it acts as a classifier. Here we just want to get the feature maps produced by the convolutional layers so we will load the first part only.
The model will be loaded from torchvision pre-trained models. Also, we will freeze the parameters of the convolutional layers because we don't want them to be changed and we are only changing the target image.
Finally, we will move the model to the GPU if it is available.
# loading the first part
vgg = models.vgg19(pretrained=True).features

# freezing the parameters
for param in vgg.parameters():
    param.requires_grad_(False)

# move the model to GPU, if available
device = torch.device("cuda" if torch.cuda.is_available() else "cpu")

vgg.to(device)
Loading content and style images
load_image is a helper function. It will load the image from img_path path and then preprocess the image. We process the image because the model accepts a specific format for its input.
This function will do certain steps:
1- Load the image from img_path path. We will use Image.open from pillow library. After that, we convert it to RGB photo using convert.
2- We put a threshold for the size of the image using max_size function argument. Big images will slow processing. So if our image size is bigger than the max_size then we will crop it.
3- We will use transform object to preprocess the image. it will do three operations. First, it will resize the image size to size. Then, it will convert this image into a tensor. Finally, it will normalize the produced tensor (The first parameter is a tuple of means for every channel and the second parameter is the corresponding standard deviations).
4- Finally, we will discard the alpha channel and add one dimension for the batch number.
def load_image(img_path, max_size=400, shape=None):

    image = Image.open(img_path).convert('RGB')

    # large images will slow down processing
    if max(image.size) > max_size:
        size = max_size
    else:
        size = max(image.size)

    if shape is not None:
        size = shape

    in_transform = transforms.Compose([
                        transforms.Resize(size),
                        transforms.ToTensor(),
                        transforms.Normalize((0.485, 0.456, 0.406),
                                             (0.229, 0.224, 0.225))])

    # discard the transparent, alpha channel (that's the :3) and add the batch dimension
    image = in_transform(image)[:3,:,:].unsqueeze(0)

    return image
Then we will load content and style images. Make sure to pass a correct path for your image. Because the two images can be different in their size, we will resize the style image to match the content image.
# Here you must write the path of your content image
content_image_path = 'content.jpg'

content = load_image(content_image_path).to(device)

# Here you must write the path of your style image
style_image_path = 'style.jpg'

# Resize style to match content.
style = load_image(style_image_path, shape=content.shape[-2:]).to(device)

content image

style image
Getting features
The function get_feature will return the features maps produced by the layers in layers dictionary. These feature maps are used to calculate the losses. The layers of the model are indexed using numbers. layers is a dictionary that maps between the index of a given layer and its name. Here we will use the layers that are mentioned in the paper. Then we feedforward the image through the layers. We store the feature maps of every layer in layers dictionary in a new dictionary features. Then we return this dictionary.
You can see the structure of the VGG19 model by running:
print(vgg)
def get_features(image, model, layers=None):

    # The layers that are mentioned in Gatys et al (2016) paper
    if layers is None:
        layers = {'0': 'conv1_1',
                  '5': 'conv2_1',
                 '10': 'conv3_1',
                 '19': 'conv4_1',
                 '21': 'conv4_2',
                 '28' : 'conv5_1'}

    features = {}
    x = image
    # model._modules is a dictionary holding each module in the model
    for name, layer in model._modules.items():
        x = layer(x)
        if name in layers:
            features[layers[name]] = x

    return features
The Gram matrix
The output of every convolutional layer is a Tensor with dimensions associated with the batch_size, a depth, d and some height and width (h, w). The Gram matrix of a convolutional layer can be calculated as follows:
1- Get the depth, height, and width of a tensor using tensor.shape.
2- Reshape that tensor so that the spatial dimensions are flattened. We wil use view function to reshape the Tensor.
3- Calculate the Gram matrix by multiplying the reshaped tensor by it's transpose. torch.mm is used to multiply the two tensors.
def gram_matrix(tensor):

    ## reshape it, so we are multiplying the features for each channel
    tensor = tensor.view(tensor.shape[1], tensor.shape[2]*tensor.shape[3])

    ## calculate the gram matrix
    gram = torch.mm(tensor,tensor.t())

    return gram
Getting features for style and content images
Now we will extract features from our images and calculate the Gram matrix for each layer in our style representation. Also, we create a copy from our content image and assign it to our target image.
# get content and style features
content_features = get_features(content, vgg)
style_features = get_features(style, vgg)

# calculate the gram matrices for each layer of our style representation
style_grams = {layer: gram_matrix(style_features[layer]) for layer in style_features}

# Initalizing our target image
target = content.clone().requires_grad_(True).to(device)
Display an image
This is a helper function. It will un-normalize an image and convert it from a Tensor image to a NumPy image for displaying it.
def im_convert(tensor):

    image = tensor.to("cpu").clone().detach()
    image = image.numpy().squeeze()
    image = image.transpose(1,2,0)
    image = image * np.array((0.229, 0.224, 0.225)) + np.array((0.485, 0.456, 0.406))
    image = image.clip(0, 1)

    return imag
Weights
We have two kinds of weights:
1- Style representation weights. You can put weights for the layers that are used to calculate the Gram matrix.
2- Style and content loss weights. We use the value that are mentioned in the paper. This ratio will affect the stylization of the final image. It's recommended that you leave the content_weight = 1 and set the style_weight to achieve the ratio you want.
# weights for each style layer
# weighting earlier layers more will result in *larger* style artifacts
# notice we are excluding `conv4_2` our content representation
style_weights = {'conv1_1': 1.,
                 'conv2_1': 0.8,
                 'conv3_1': 0.5,
                 'conv4_1': 0.3,
                 'conv5_1': 0.1}

content_weight = 1  # alpha
style_weight = 1e6  # beta
Updating the Target image
Now it is time to change the target image. Using content and style features that we generated we will change the target image. The steps of doing that are:
1- Determine our hyperparameters. Our optimizer will be Adam. Then we will determine the number of steps (how many iterations we update the target image).
2- Getting the target features using get_features.
3- Calculate the content loss. which is defined as the mean square difference between the target and content features at layer conv4_2.
4- Calculate the style loss. We iterate through each style layer. Then, we get the corresponding target features from target features. After that, we calculate the Gram matrix for the target features. The style loss for one layer is the mean square difference between the Gram matrices. Finally, we add the loss of the current layer to the total loss. We normalize the loss by dividing by (d * w * h).
5- Calculate the total loss. The total loss will be the weighted sum of the content and style losses.
6- Update the target image by back-propagating the loss total_loss.backward() and doing one optimizer step.
7- Display the loss and the intermediate images every show_every steps.
# for displaying the target image, intermittently
show_every = 400

# iteration hyperparameters
optimizer = optim.Adam([target], lr=0.003)
steps = 2000  # decide how many iterations to update your image (5000)

for ii in range(1, steps+1):

    # get the features from your target image
    target_features = get_features(target, vgg)

    # calculate the content loss
    content_loss = torch.mean((target_features['conv4_2'] - content_features['conv4_2'])**2)

    # initialize the style loss to 0
    style_loss = 0
    # iterate through each style layer and add to the style loss
    for layer in style_weights:

        # get the "target" style representation for the layer
        target_feature = target_features[layer]
        _, d, h, w = target_feature.shape

        # Calculate the target gram matrix
        target_gram = gram_matrix(target_feature)

        # get the "style" style representation
        style_gram = style_grams[layer]

        # Calculate the style loss for one layer, weighted appropriately
        layer_style_loss = style_weights[layer]* torch.mean((target_gram - style_gram)**2)

        # add to the style loss
        style_loss += layer_style_loss / (d * h * w)


    # calculate the *total* loss
    total_loss = content_weight*content_loss + style_weight*style_loss

    # update your target image
    optimizer.zero_grad()
    total_loss.backward()
    optimizer.step()

    # display intermediate images and print the loss
    if  ii % show_every == 0:
        print('Total loss: ', total_loss.item())
        plt.imshow(im_convert(target))
        plt.show()
Displaying the final result
# display content and final, target image
fig, (ax1, ax2) = plt.subplots(1, 2, figsize=(20, 10))
ax1.imshow(im_convert(content))
ax2.imshow(im_convert(target))

