
Open-Source Internship opportunity by OpenGenus for programmers. Apply now.
In this article, we have explained Conv2D operation in TensorFlow along with API definition and Python implementation.
Table of contents:
- Introduction to Convolution
- Conv2D operation in TensorFlow
- Demo of Conv2D in TF
- Conclusion
Before we dive into Conv2D operation in TensorFlow let us understand briefly what convolution actually means.
Introduction to Convolution
Convolution is one of the most fundamental blocks of computer vision and image processing. When we are blurring or sharpening an image, detecting the edges, or reducing noise in an image, all these processes are convolutions. Convolution is simply the multiplication of two matrices and then adding the values.
An image has width, height, and depth(channels). So it can be represented as a matrix of pixel values having three planes. The smaller matrix slides over the image matrix from left to right and top to bottom and applies convolution at each coordinate of the image. The smaller matrix is called the kernel or mask or convolution matrix. Kernels can be of the dimension M x N provided M and N are odd integers. Odd kernel size is required to find out the center of the image.
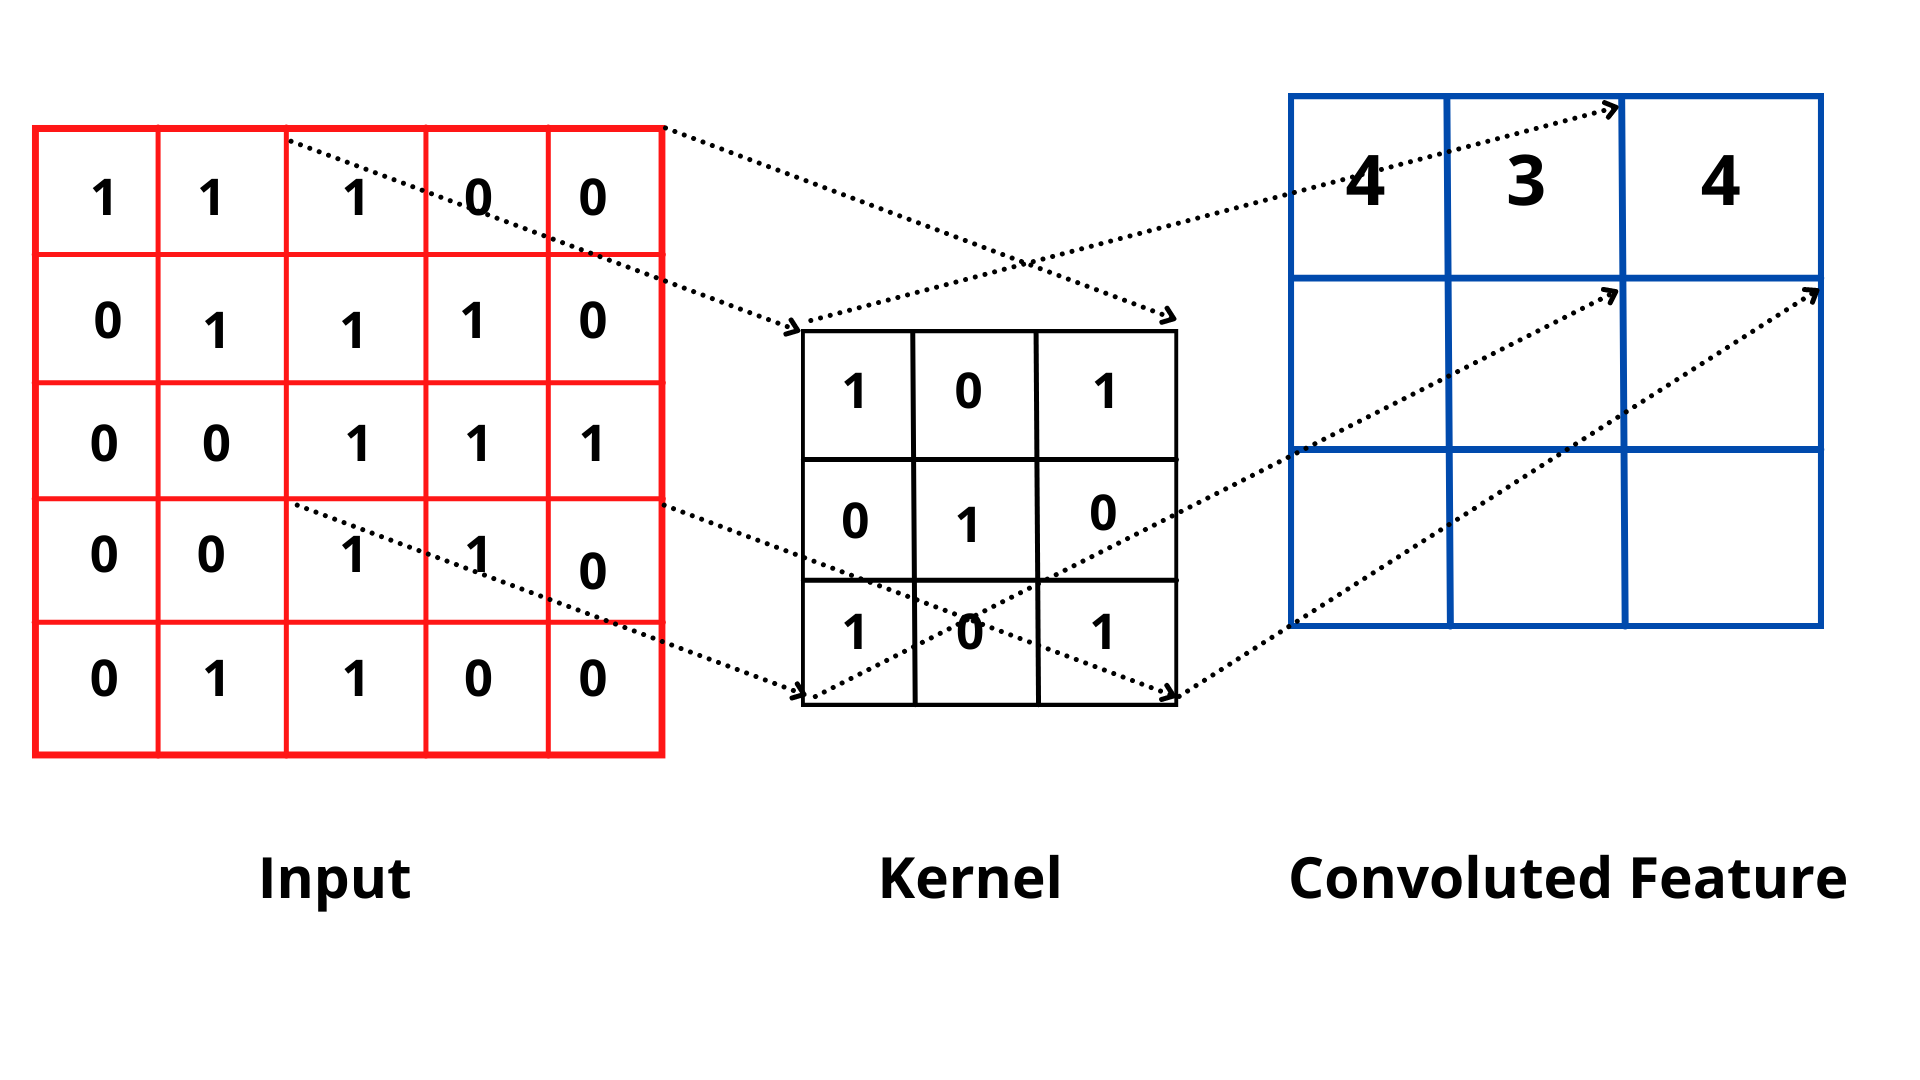
Here, (1*1)+(0*0)+(0*1)+(1*0)+(1*1)+(0*0)+(1*1)+(1*0)+(1*1) = 4
Conv2D operation in TensorFlow
Tensorflow and Keras provide us with the Conv2D class to implement the convolution function to two-dimensional inputs, such as images.
The Conv2D class constructor has the following parameters:
tensorflow.keras.layers.Conv2D(
                        filters,
                        kernel_size,
                        strides=(1, 1),
                        padding="valid",
                        data_format=None,
                        dilation_rate=(1, 1),
                        groups=1,
                        activation=None,
                        use_bias=True,
                        kernel_initializer="glorot_uniform",
                        bias_initializer="zeros",
                        kernel_regularizer=None,
                        bias_regularizer=None,
                        activity_regularizer=None,
                        kernel_constraint=None,
                        bias_constraint=None,
                      )
Let's look at the function of each of these arguments.
-
filters - It represents the number of filters that the convolutional layer learns from. Filters determine how many kernels to convolve with the input volume.
Let's take an example :model.add(Conv2D(32, kernel_size=(3, 3), activation='relu'))Here the model learns from 32 filters. It is usually recommended to use powers of 2 as values for filters. It might be required to tune the exact value based on the complexity of the dataset and the depth of the neural network.
-
kernel_size - It determines the dimension of the convolution window or the kernel. Kernel_size is always an odd integer like
(1,1), (3,3), (5,5), (7,7)so that the middle of the kernel can be found.
If the dimension of the input image is greater than128 × 128then a5 × 5or7 × 7kernel may be used. If the images are smaller than128 × 128then it is better to strictly stick to1 × 1or3 × 3kernel. -
strides - It specifies the number of 'steps' a convolution takes towards the x and y-axis of the input.
The strides value of(2,2)means that the filter takes a 2-pixel step towards the right and the filter is again applied to the input.
The default parameter value is(1,1)but sometimes it can be increased to(2,2)to decrease the size of the input volume. -
padding - It is the number of pixels added to the side of the input before applying convolution. This parameter can either take the value
validorsame.
If padding = valid, it means that the input image does not have any padding. In such a case the dimensions of the image are allowed to reduce due to the application of convolution.
If padding = same, it means that the spatial dimensions of the volume are not reduced and the output volume size = input volume size. -
data_format - It can take either of two values -
channels_firstorchannels_last. The tensorflow backend useschannels_lastordering and the theano backend useschannels_firstordering.channels_lastaccepts inputs which have the shape (batch_size, height, width, channels) andchannels_firsttakes inputs with the shape (batch_size, channels, height, width). The default data_format ischannels_last. -
dilation_rate - Dilated convolution is a convolution that is only applied to inputs with defined gaps. To control this dilated convolution dilation_rate parameter is used. Dilated convolution can be used when we require fine-grain details even when working with high-resolution images and our neural network has less number of parameters.
-
activation - It is used to specify the activation function that we want to apply. It can takes values like
relu,sigmoid,softmax,tanh,softplus,softsign,selu,eluandexponential. -
use-bias - bias value helps in scaling the learnt function vertically. The use_bias parameter controls this bias vector. By default the use_bias is set to
True. -
kernel_initializer - It sets the initialization method to be used to initialize all values of the Conv2D class before training the network. The default value is set to
glorot_uniformwhich is also called Xavier uniform initializer. -
bias_initializer - It determines how to initialize the bias value before training starts. The default is
zerosi.e the tensors are initialized to0.
More about the initializers can be learned from this documentation. -
kernel_regularizer - Regularization helps in reducing overfitting and increasing the generalizing ability of a model. kernel_regularizer sets the regularization function to be applied to the layer's kernel.
-
bias_regularizer - It sets the regularizer function to be applied to the bias vector.
-
activity_regularizer - It sets the type and amount of regularization to be applied to the outputs of a layer.
The available regularizer options arel1,l2orl1_l2.
More about the regularizers can be learned from this documentation. -
kernel_constraint - It sets the constraint function to be applied to the main weights matrix.
-
bias_constraint - Its sets the constraint function for the bias.
The available weight constraints areMaxNorm,MinMaxNorm,NonNeg,UnitNormandRadialConstraint.
More about the constraints can be learned from this documentation.
Demo of Conv2D in TF
Example
The following is an implementation of Conv2D operation in python. Here we have used the fashion_mnist dataset.
    import tensorflow as tf
    from tensorflow import keras
    from tensorflow.keras import Sequential
    from tensorflow.keras.layers import Conv2D
    from tensorflow.keras.layers import MaxPooling2D,Flatten,Dense

    fashion = keras.datasets.fashion_mnist

    (train_images, train_labels), (test_images, test_labels) = fashion.load_data()
    class_names = ['T-shirt/top', 'Trouser', 'Pullover', 'Dress', 'Coat', 'Sandal', 'Shirt', 'Sneaker', 'Bag', 'Ankle boot']
    train_images = train_images.reshape((60000, 28, 28, 1))
    train_images = train_images.astype('float32') / 255

    test_images = test_images.reshape((10000, 28, 28, 1))
    test_images = test_images.astype('float32') / 255
    model = Sequential()
    model.add(Conv2D(32, (5, 5), activation='relu',
              input_shape=(28, 28, 1)))
    model.add(MaxPooling2D((2, 2)))
    model.add(Conv2D(64, (5, 5), activation='relu'))
    model.add(MaxPooling2D((2, 2)))
    model.add(Flatten())
    model.add(Dense(10, activation='softmax'))
    model.compile(optimizer='adam',
                  loss='sparse_categorical_crossentropy',
                  metrics=['accuracy'])

    model.fit(train_images, train_labels, epochs=10)
    test_loss, test_acc = model.evaluate(test_images,  test_labels)
    print('Test accuracy:', test_acc)
The dataset contains 60,000 examples in the training set and 10,000 examples in the testing set. Each image is a 28 x 28 grayscale image and is associated with a label from 10 classes.
For the convolutional layer we have used 32 filters with a kernel size of 5 x 5. The activation function used is Relu activation function.The input tensor is of size (28, 28, 1) (the third parameter is the color channel). A 5 x 5 size window will slide along the 28 x 28 size input image. Here the padding and stride parameters are not mentioned so the default values of stride of 1 and padding of 0 will be applied. After the convolution layer a max-pooling of 2 x 2 window is applied. A second group of layers has been stacked with 64 filters and 5 x 5 kernel in the convolutional layer and 2 x 2 window in the max-pooling layer.
The output of the convolutional and max-pooling layer is a 3D tensor. But the dense layer takes 1D tensor as input. So the 3D tensor has to be flattened to 1D tensor.
The above code gives an accuracy of 90.5%.
Following is the output of the above code.
    Epoch 1/10
    1875/1875 [==============================] - 25s 8ms/step - loss: 0.4785 - accuracy: 0.8280
    Epoch 2/10
    1875/1875 [==============================] - 11s 6ms/step - loss: 0.3219 - accuracy: 0.8838
    Epoch 3/10
    1875/1875 [==============================] - 10s 5ms/step - loss: 0.2775 - accuracy: 0.8994
    Epoch 4/10
    1875/1875 [==============================] - 10s 5ms/step - loss: 0.2495 - accuracy: 0.9104
    Epoch 5/10
    1875/1875 [==============================] - 10s 5ms/step - loss: 0.2245 - accuracy: 0.9193
    Epoch 6/10
    1875/1875 [==============================] - 10s 5ms/step - loss: 0.2068 - accuracy: 0.9241
    Epoch 7/10
    1875/1875 [==============================] - 10s 5ms/step - loss: 0.1894 - accuracy: 0.9329
    Epoch 8/10
    1875/1875 [==============================] - 11s 6ms/step - loss: 0.1750 - accuracy: 0.9365
    Epoch 9/10
    1875/1875 [==============================] - 10s 5ms/step - loss: 0.1623 - accuracy: 0.9413
    Epoch 10/10
    1875/1875 [==============================] - 10s 5ms/step - loss: 0.1508 - accuracy: 0.9446
    313/313 [==============================] - 1s 4ms/step - loss: 0.2744 - accuracy: 0.9050
    Test accuracy: 0.9049999713897705
Conclusion
In this article at OpenGenus, we have learnt about the Conv2D operation in tensorflow and keras and how to implement it.