
In this article, we have explored EfficientDet model architecture which is a modification of EfficientNet model and is used for Object Detection application.
Table of contents:
- Introduction to EfficientDet
- Components of Object Detection Models
- Componets of EfficientDet
- Implementation: Inference, Evaluation and Training
Pre-requisite:
Introduction to EfficientDet
The advancement in technology has proved the need for computer vision and hence more efforts have been made for academic development in the field. Because of the resource constraints in industries like robotics and self-driving cars,object detection models need to be more efficient. Although much progress was made towards developing more accurate and efficient object detection models, all efforts proved too expensive for real-world deployment.
Google Brain recently released their findings on the research and development of their model, which is a family of detectors, that arranges neural network architecture choices based on a scalable framework that can be applied in multiple other use cases in object detection. They called it EfficientDet. The scale is chosen based on the resources needed for the detection model. Their work acknowledged the incresing need for model efficiency in computer vision, and so, as part of their model, they proposed several key optimizations to further improve the efficiency of the model. The publishing concludes that, "the scaled EfficientDet achieves state-of-the-art accuracy with much fewer parameters and FLOPs than previous object detection and semantic segmentation models."
Components of Object Detection Models
Object dectection models have 3 components, namely:
- the backbone
- feature network
- box/class network
The backbone is used by object detector to extract unique features from the image. Backbones are specialized CNN models typically ResNet, Inception, Inception-ResNet, etc.
These features are outputed into the feature network, which takes the multiple levels of features from the backbone as inputs and outputs a list of compressed/combined features that represent salient characteristics of the image with the use of FPNs(Feature Pyramid Networks). FPNs are used to improve the quality of features. They do that by merging the high resolution features with the low resolution features.
The high-resolution maps have low-level features and the low-resolution maps have high-level features.
Finally, the box/class network(or detection head), takes the compressed/combined features from the feature network as inputs and uses classifiers and regressors to predict the class and location of each object.
Componets of EfficientDet
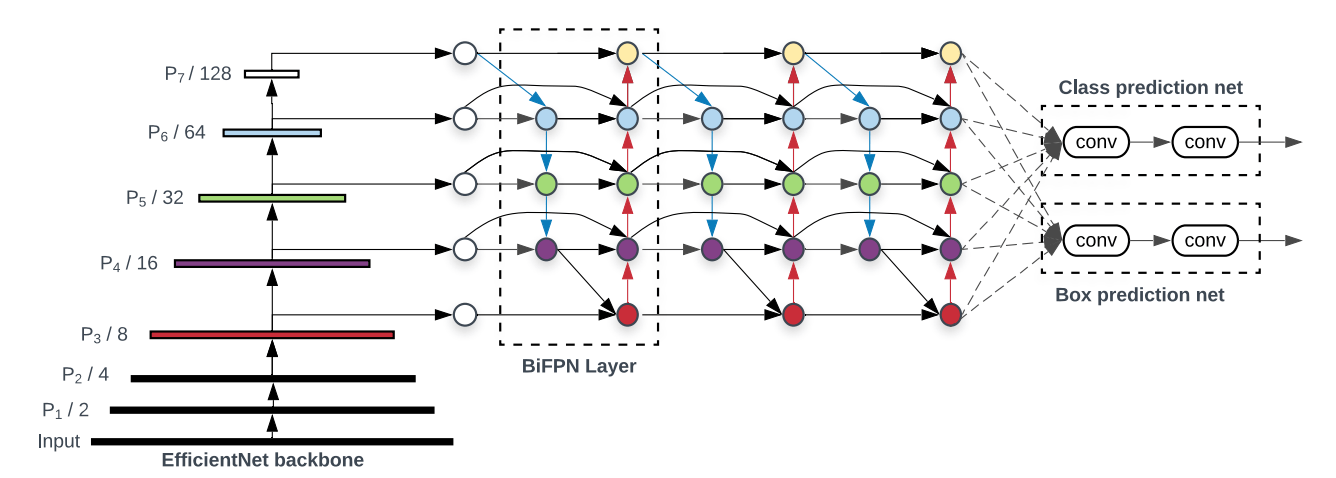
EfficientDet, being a family of Object Detector Models, has these 3 componets. The backbone Google Brain used for feature extraction is EfficientNet. It reuses the same width/depth scaling coefficients of EfficientNet-B0 to B6, hence also reusing ImageNet-pretrained checkpoints.
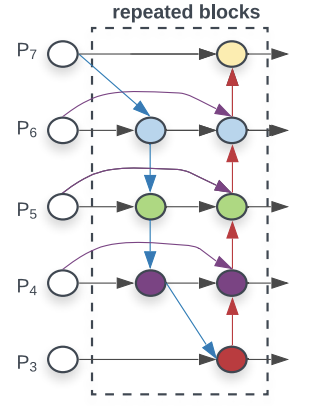
EfficentDet uses BiFPN as the feature network. BiFPN(bi-directional Feature Pyramid Network) is a weighted bi-directional feature network for easy and fast multiscale feature fusion. BiFPN takes scales from level 3 to level 7 and repeated the fusion process for a number of iterations. The scale levels detect objects of different sizes and resolutions in the image. The higher the scaling number the larger the objects detected and the lower the resolution. Hence for size of objects detected, p3<p4<p5<p6<p7, and for resolution of objects detected, p3>p4>p5>p6>p7. See below, the network for biFPN. Note the direction of flow of data, there is a top down approach and a bottom down approach whcih illustrates the bi-directional attribute of the algorithm.
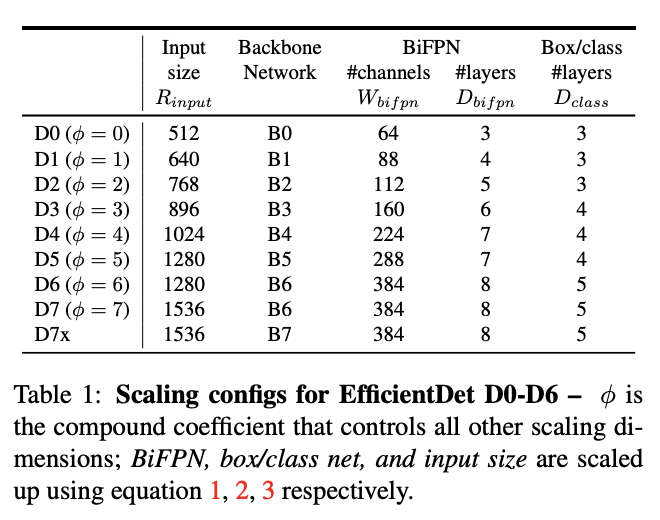
For EfficientDet, Google Brain linearly increased BiFPN depth(#layers) so that depth can be rounded to small whole integers. Then the width(#channels) of the model are exponentially grown by performing a grid search on a list of potential scaling values {1.2, 1.25, 1.3, 1.35, 1.4, 1.45}, and picking the best value as the BiFPN width scaling factor. Also since feature level 3-7 are used in BiFPN, the input resolution must be dividable by 128(2 to the power 7). Hence, the input image resolution is initially scaled by the equation below: 
See the image below for the equations used for width and depth scaling.

In the box/class network, EfficientDet uses softmax classifier to identify the object and regressors create a bounding box. When it comes to it's scaling, their width is set to always be the same as BiFP, but the depth (#layers) is increased using equation below: 
See below, an image for the full topology of an EfficientDet Model.
For all the scaling equations with different φ, we have developed EfficientDet-D0 (φ = 0) to D7 (φ = 7), where D7 and D7x have the same BiFPN and head, but D7 uses higher resolution and D7x uses larger backbone network and one more feature level (from P3 to P8). See the table below for the summary of the features and paramenters of each EfficientDet model with parametized φ.
Implementation: Inference, Evaluation and Training
Refer to https://github.com/google/automl, this is the github repository with all the code from Google related to EfficientDet. We will need these for our model, hence the first order of action is to clone the repository using the gitpython library.
try:
    from git.repo.base import Repo
except:
    import pip
    pip.main(['install', 'gitpython'])
    from git.repo.base import Repo
# These lines of code will check if git is installed and pip install it if it is not

Repo.clone_from("https://github.com/google/automl", "EfficientDet Repository")
# Repo.clone_from("github url","name of folder you want to clone")
After clonning we need to enter the efficientdet folder and download an EfficientDet-Dn detector into it. We will now define a function to return the files we will need for an EfficientDet-D1 detector, and another function to download an image and prepare visualization settings.
import os
import wget
import tarfile
import PIL


os.chdir('specified path for current working directory here')
# To change the current working directory to the specified path in parenthesis


def download_model(model='efficientdet_d0'):
    files = os.listdir()  # return the list of all the files in the current directory
    if model not in files:
        # If there is no file named "*whatever model name you use(default is efficientdet-d0*", then...
        wget.download(f'https://storage.googleapis.com/cloud-tpu-checkpoints/efficientdet/coco2/{model}.tar.gz')
        # go to the specified website and download the model we want as a tar.gz file
        file = tarfile.open(f'{model}.tar.gz')  # open the tar.gz file
        file.extractall(f'./{model}')  # unarchive/extract all the files from the tar.gz file
        checkpoint_path = os.path.join(os.getcwd(), model)  # gives the path of the file with the model we want

    return checkpoint_path


model_path = download_model(model='efficientdet-d1')
# model is set to efficientdet-d0 as a default, when calling download(), you will need to specify the model you want

def download_image():
    image_url = 'https://user-images.githubusercontent.com/11736571/77320690-099af300-6d37-11ea-9d86-24f14dc2d540.png'
    image_name = 'image.png'
    wget.download(image_url)
    img_path = os.path.join(os.getcwd(), image_name)

    return img_path

# Preparing Visualization settings
min_score_thresh = 0.35
max_boxes_to_draw = 200
line_thickness =   2

import PIL
# Get the largest of height/width and round to 128.
image_size = max(PIL.Image.open(img_path).size)

#View graph of model in tensorboard
!python model_inspect.py --model_name={MODEL} --logdir=logs &> /dev/null
%load_ext tensorboard
%tensorboard --logdir logs
Now, we need to export the saved model and the saved detectors in seperate folders of their own.
m = 'efficientdet-d1'  # @param
batch_size = 1

saved_model_dir = 'savedmodel'
!python model_inspect.py --runmode=saved_model --model_name={m}
  --ckpt_path={model_path} --saved_model_dir={saved_model_dir} \
  --batch_size={batch_size}  --hparams="mixed_precision=true"

 serve_image_out = 'serve_image_out'
!mkdir {serve_image_out}

!python model_inspect.py --runmode=saved_model_infer \
  --saved_model_dir={saved_model_dir} \
  --model_name={MODEL}  --input_image=testdata/img1.jpg  \
  --output_image_dir={serve_image_out} \
  --min_score_thresh={min_score_thresh}  --max_boxes_to_draw={max_boxes_to_draw}
Running these codes should save an image with its prediction in bounding boxes in the current working directory. However, I run my code in the Jupyter notebook, so to get you image to work in Jupyter add the following to your code.
from IPython import display
display.display(display.Image(os.path.join(serve_image_out, '0.jpg')))
For fuller code with much more detail, see the official tutorial notebook from google in this link (https://notebook.community/google/automl/efficientdet/tutorial).
With this article at OpenGenus, you must have the complete idea of EfficientDet.