
Table of Contents
Introduction
A Linked List is a linear data structure in Computer Science that stores data in a non-contiguous fashion in computer memory. It comprises nodes or elements that are interconnected through logical links. These links are established from one node to another using memory addresses.
Logical Representation
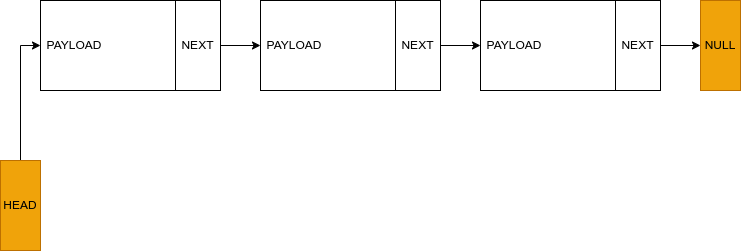
Each node consists of, at least, two basic parts. One is called the data or payload part and the other is the link or pointer part. The former stores the data intended for the current node while the pointer part links the current node to the next one in the list or it points to the end of the list.
Linked Lists are extensively employed in real-world software development. They are truly fundamental to the implementation of other data structures such as Trees, Stacks, Queues, and Adjacency Matrix. Linked Lists are also the basis to Dynamic Memory Management (DMM).
Why?
Computer memory is fundamentally laid out in sequential manner. When our program tries to store some data onto the RAM, it contacts the memory allocator of our system and requests for the required amount of bytes. The memory allocator then allocates, if available, the required amount from our RAM, and returns its address back to our program.
Sequential layout is an inherent property of the memory management mechanism, and comes with its own benefits and drawbacks.
For example,
If our program asks for allocation of an array, the memory allocator simply allocates a sequence of bytes sufficient enough and returns back the address to the start of the array. The array is then easy to work with, manipulate and/or traverse. We just need the base address to point to the start of the array and use offset bytes of comprising data type in order to address our array. While this sounds pretty nifty, these comforts bite back when we need to either scale up or scale down our memory requirements.
An Array of Capacity, 7.

Static data structures like arrays allocate memory at the compile time, often leading to inefficiencies. Unused memory can go to waste, while in high-demand situations it might be easily depleted, causing memory shortages. The scaling challenge of both excess and shortage illustrate the limitations of static memory allocation.
Introducing Linked Lists ...
Linked lists offer a dynamic solution to memory management. Unlike static data structures such as arrays, linked list allocates memory as needed over time. This dynamic allocation results in efficient resource utilization and avoids memory waste.
Memory Layout of a Linked List
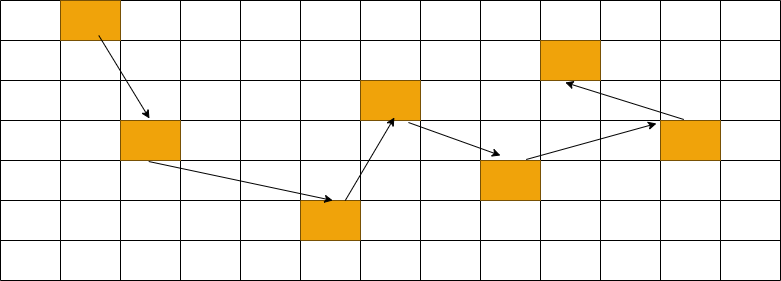
A linked list consists of nodes, logically connected to each other via memory addresses. The logical neighboring node may not be a physical neighbor of the previous or next node in the memory. This dynamic nature eliminates the scaling issues found in sequential data structures.
Implementation
Let's implement a linked list in Go language. Go is a statically typed, compiled, high-level and an expressive programming language which is syntactically very similar to C class of programming languages. We are going to implement the essential functionality of a linked list in order to demonstrate how a linked list is created, used, and manipulated. Our goal is to write an API that is capable of the following;
- Insertion of a node at any valid index given.
- Traversal of the linked list
- Deletion of a node at the index provided.
We will try to take care of edge cases and follow best practices. Let's begin;
Node
The Node represents the fundamental unit of linked list data structure, encapsulating both the payload as well as the reference to the next node in the sequence.
We can use the struct type in Go to define a node.
type Node struct {
    data interface{}
    next *Node
}
Our Node has data field of type empty interface meaning that it can store data of any data type. The other field is named next which is of type *Node, translating to the fact that it can contain reference to the next node in the list.
LinkedList
Our next step is to define a struct named LinkedList, which consists of two fields, namely head and len;
type LinkedList struct {
	head *Node
	len  int32
}
head is a pointer of type *Node because it would hold the address of the first node in the list. Meanwhile, len keeps the count of nodes present in the list. The default values of head and len are nil and 0, respectively. These are automatically assigned by the Go runtime
We are now ready to implement the routines for carrying out the functional operations on our LinkedList struct.
Firstly, we tackle the insertion operation.
Insert
The prototype of our insert method is as follows;
func (list *LinkedList) insert(value interface{}, index int32) error {
    // our implementation
    // ...
}
It takes two parameters;
- The
valueto be stored in the node indexat which the value is to be inserted.
insert returns an error in case of unsuccessful insert operation.
Following the best practices, we will make sure that the edge cases are covered and appropriate error message is returned in case of errors. The list should be 0 indexed to imitate the behavior that of arrays or slices.
Let's work our way through it. First of all, we make sure that the the index given is neither less than 0 nor greater than size of the list.
if index < 0 || index > list.len {
    return errors.New("index out of bounds")
}
If the conditions are not met, we construct a new index out of bounds error using errors package and return it to caller function, effectively halting the insertion operation.
In case of index within bounds, we move to the next step, that is, the creation of a new node.
// create a new temporary node
var newNode *Node = new(Node)

// set up the fields
(*newNode).data = value
(*newNode).next = nil
We create a node on the heap memory using Go's new allocation primitive, which returns the memory address of the newly created node. Which is stored in the newNode pointer. We assign the given value to the data fields and set the next field to nil because this node isn't yet a part of the list.
After the successful creation of newNode, it is time to insert into the list. We have to take the index into account, if its value is 0 then newNode is supposed to be the first node in the list and head pointer of the list is going to point towards it.
if index == 0 {
    newNode.next = list.head
    list.head = newNode
    list.len += 1
    return nil
}
newNode's next field is assigned the value of current head. If the list is empty, it would benil, otherwise, it would point to the first node in the list. The length of list is incremented by 1 and nil is returned. This marks a successful insertion at the start of the list.
Now, we need to tackle the general case, that is, insertion at any valid index. This involves a better planning strategy because we need to take care of the previous node in the list as well.
The algorithm to insert node at an arbitrary index, say n, is as follows:
- Create a
tempHeadpointer that serves as an alias for list'sheadpointer.. - Scan the list by utilizing the
tempHeadand get to then-1th node. - Assign
newNode'snextfield to then-1th node'snextfield. - Now point the
n-1th node'snextto the newly created node.
The Go code to achieve this looks like this;
// create a temporary head so that actual head variable isn't disturbed.
var tempHead *Node = list.head

// get to n - 1th node
var i int32
for i = 0; i < (index - 1); i++ {
    tempHead = tempHead.next
}

// now we are at n - 1th element or index
newNode.next = tempHead.next
tempHead.next = newNode

// increase the length of list
list.len += 1

return nil
Below is a visual illustration of this procedure.

The newNode ends up at the provided index. This concludes the implementation of insert operation. The final results looks like this:
func (list *LinkedList) insert(value interface{}, index int32) error {
	var newNode *Node = new(Node)

	(*newNode).data = value
	(*newNode).next = nil

	if index < 0 || index > list.len {
		return errors.New("index out of bounds")
	}

	if index == 0 {
		newNode.next = list.head
		list.head = newNode
		list.len += 1
		return nil
	}

	var tempHead *Node = list.head

	var i int32
	for i = 0; i < (index - 1); i++ {
		tempHead = tempHead.next
	}

	newNode.next = tempHead.next
	tempHead.next = newNode

	list.len += 1
	return nil
}
Now let's implement traverse method.
Traverse
Scanning through the
listfrom start to finish and printing each node's value is referred to as traversal.
The method's prototype is as follows:
func (list *LinkedList) traverse() {
    // implementation code
    // ....
}
Traversal is straightforward to implement. We create a temporary pointer initialized with list.head. We then run a loop till the end of the list. We might either utilize the list's length to determine its end or use the fact that the list ends with the last node's next field pointing towards nil.
The latter is a more concise option. We check the current node's next field, and stop the loop if points to nil.
func (list *LinkedList) traverse() {
    // If the list is empty, return gracefully!
    if list.head == nil {
        return
    }

    tempHead := list.head
    for tempHead != nil {
        fmt.Printf("%+v\t", tempHead.data)
        tempHead = tempHead.next
    }
    fmt.Println()
}
\t used in fmt.Printf() prints a tab after each value. The value stored in current node's data is printed in each iteration and then tempHead is assigned the next node's address in the list, thereby moving forward in the list.
Now that we are done with implementing insert and traverse operations, we move towards last important method which is delete operation.
Delete
delete is logically very similar to insert and involves almost the same steps, but instead of inserting the node, we remove a node from the list at the given index.
func (list *LinkedList) delete(index int32) error {
    // implementation
}
Our first step is to ensure index range safety. This is different than that of insert. The index specified should be in range of 0 to (n-1) instead of being in range 1 to n. This is because a node can be inserted at the nth index but removal requires a node to be already present at the given index.
// ensure safe index range for deletion
if index < 0 || index > list.len-1 {
    return errors.New("index out of bounds")
}
If index is in range, we handle the special case of deletion which pertains to removal of a node from the beginning of the list.
We simply make the head pointer point to the next pointer of the node at index 0, essentially deleting the first node.
// Special case: removing the first element from the list.
if index == 0 {
    list.head = list.head.next // <-- No Resource Deallocation
    list.len -= 1

    return nil
}
GarbageCollection
This is the most important part to understand. You might have noticed that we didn't have to deallocate the node ourselves like we do in C class of languages, and this is because of GO's Garbage Collection.
Go is a garbage collected language. The application binary generated by its compiler actually comes with a managed runtime. When the binary is executed, the garbage collector runs in the background tracking the program's resources.
When a resource, such as, this deleted node is found to be lurking around in the memory without any live reference , the node's resources are automatically released and it is removed from the memory by the GC. This way, the programmer doesn't have to do the memory management manually, thus increasing productivity and development speed.
Now, onto the general case of deletion at an arbitrary index.
The steps are pretty similar to that of insertion operation.
- Create
tempHeadpointing towardslist.head. - Scan the list by utilizing the
tempHeadand get to theindex-1th node. - Assign this node's
nextthe next node'snext, thereby skipping the node present atindexposition.
in delete method, we add the following:
tempHead := list.head
for i := 0; i < int(index)-1; i++ {
    tempHead = tempHead.next
}

// delete the node
tempHead.next = tempHead.next.next
list.len -= 1
The following visual illustration helps understand this better,

Following is the final form of delete method.
func (list *LinkedList) delete(index int32) error {
    // ensure safe index range for deletion
    if index < 0 || index > list.len-1 {
        return errors.New("index out of bounds")
    }

    // Special case: removing the first element from the list.
    if index == 0 {
        list.head = list.head.next // <-- No Resource Deallocation
        list.len -= 1

        return nil
    }

    // general case
    tempHead := list.head
    for i := 0; i < int(index)-1; i++ {
        tempHead = tempHead.next
    }

    // delete the node
    tempHead.next = tempHead.next.next
    list.len -= 1

    return nil
}
This concludes the implementation of a working linked list in GO programming language. A lot of details, optimizations and functionalities have been skipped over in favor of brevity, and conciseness of this write up.
I hope that you picked up on a thing or two, peace!