
Get this book -> Problems on Array: For Interviews and Competitive Programming
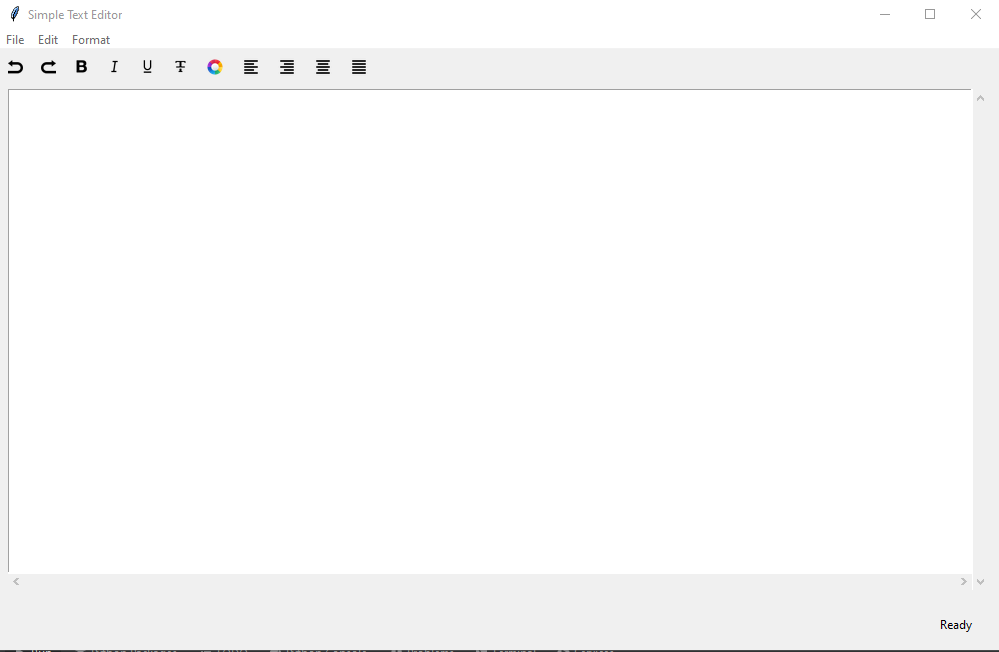
In this article, we have created a simple text editor using Python. A text editor is a computer that lets users to edit or manipulate text according to their needs. Users can open files to read or edit. The files need to be the types supported on the text editor.
This text editor is created using the Tkinter library of Python. It is used for its ease of use and for the graphical representation and addition of functionalities.
This is a strong Python project for SDE Portfolio. Get the code running using the following command:
git clone https://github.com/OpenGenus/text-editor-python.git
cd text-editor-python
python main.py
Introduction
We have added simple functionalities for the text editor to perform, such as, creating new file, opening a file, and saving a file. They are included in the file menu and we can also use them with keyboard shortcuts.
This text editor can perform cut, copy, and paste actions. These functions are included in the edit menu and shortcuts can be applied for these as well.
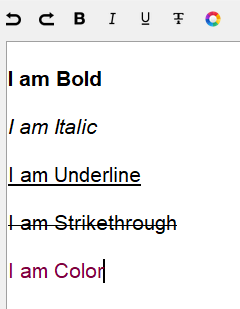
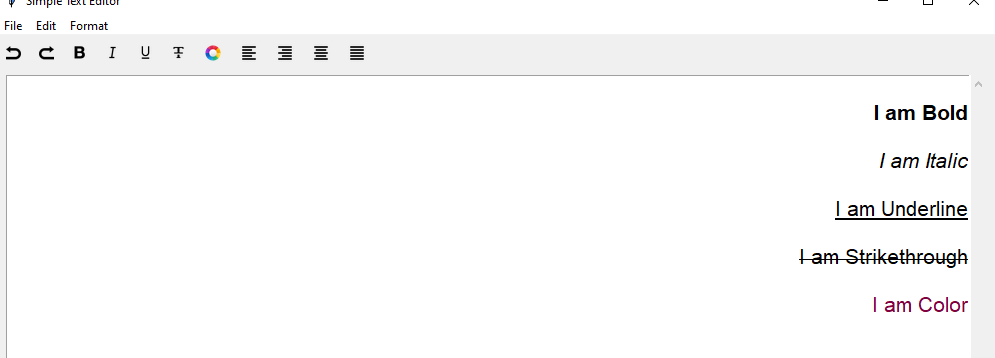
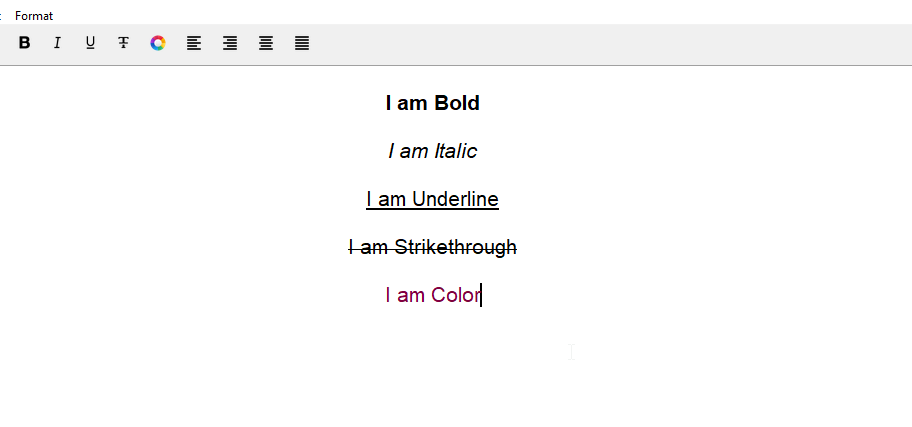
The texts can be bold, italic, strikethrough, underlined and we can change the color of the texts. The toolbar contains these options. It also contains alignment actions. The texts can be aligned to the left, right, center, and justified.
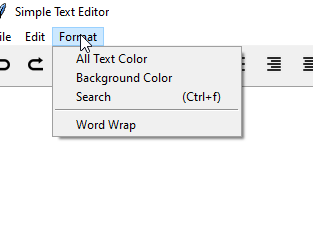
A format menu is added for some extra functions. These are changing background color, changing all text color, a checkbutton for text wrap, and a search option for finding text.
Creating the Frame
We start by importing necessary libraries and declaring some variables. We are using Tkinter and PIL library. PIL is only used for handling images used for some icons. We set the title and the size of the frame.
from tkinter import *
from PIL import Image, ImageTk
from tkinter import filedialog
from tkinter import font
from tkinter import colorchooser

root = Tk()
root.title("Simple Text Editor")
root.geometry("1000x600")
root.resizable(True,True)
Here, we set some variable names that can be accessed globally and the values can be changed. Next we create a toolbar that will hold our buttons, a main frame, a textbox, vertical and horizontal scrollbars for the frame, a menu, and at the bottom a status update that will let us know the status of the file.
# set variable for open file name
global open_status_name
open_status_name = False

global selected
selected = False

# create a toolbar
toolbar_frame = Frame(root)
toolbar_frame.pack(fill=X, pady=5)

# create a main frame
my_frame = Frame(root)
my_frame.pack(pady=5)

# vertical scrollbar
ver_scroll = Scrollbar(my_frame)
ver_scroll.pack(side=RIGHT, fill=Y)

# horizontal scrollbar
hor_scroll = Scrollbar(my_frame, orient='horizontal')
hor_scroll.pack(side=BOTTOM, fill=X)

# create text box
my_text = Text(my_frame, width=80, height=20, font=("Helvetica", 16), selectbackground="lightgrey",
               selectforeground="black", undo=True,
               yscrollcommand=ver_scroll.set, xscrollcommand=hor_scroll.set, wrap="none")
my_text.pack()

# configure scrollbar
ver_scroll.config(command=my_text.yview)
hor_scroll.config(command=my_text.xview)

# create menu
my_menu = Menu(root)
root.config(menu=my_menu)

# add status bar to bottom
status_bar = Label(root, text='Ready        ', anchor=E)
status_bar.pack(fill=X, side=BOTTOM, ipady=15)
The scrollbars, textbox, and toolbar is set to the main frame. The scrollbars are configured to the built in command for vertical and horizontal view.
The Text Editor:
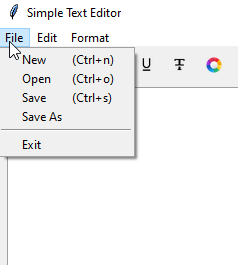
File Menu
In the file menu, these functionalities are available; new file, open file, save, save as, and exit. For each function, a separate method is defined.
New File
For a new file, the title becomes 'Untitled' and the status bar gets updated to 'New File'.
# ***************************** File Menu ********************************

# create new file function
def new_file(e):
    # Delete previous file
    my_text.delete("1.0", END)
    # Update status bar
    root.title("Untitled")
    status_bar.config(text="New File        ")

    global open_status_name
    open_status_name = False
Open File
For the open file, we first delete the previous texts from the textbox. We define the file path and the types of files our text editor will open. Then we open the file to read. With that we update the status bar and the global variable that is needed. This global variable keeps the opened file
stored so that we can use it for other methods such as saving the file.
# open files
def open_file(e):
    my_text.delete("1.0", END)
    # Grab filename
    text_file = filedialog.askopenfilename(initialdir="E:/", title="Open File",
                filetypes=(
                    ("Text Files", "*.txt"),("HTML Files", "*.html"),
                    ("Python Files", "*.py"),("All Files", "*.*")
                ))
    # check to see if there is a file name
    if text_file:
        global open_status_name
        open_status_name = text_file

    # update status bar
    name = text_file
    status_bar.config(text=f'{name}        ')
    name = name.replace("E:/", "")
    root.title(f'{name}')

    # open file to read
    text_file = open(text_file, 'r')
    lines = text_file.read()
    # add file to textbox
    my_text.insert(END, lines)
    # close opened file
    text_file.close()
Save File
Before saving a file we first check if the file is already saved, otherwise we assign a name to the file. To save the file, we add the directory path and open the file to write so that we can save the changes. The global variable is passed through to check if a file is new or it already exists and is open.
def save_as_file(e):
    text_file = filedialog.asksaveasfilename(defaultextension=".*", initialdir="E:/", title="Save File", filetypes=(
                       ("Text Files", "*.txt"), ("HTML Files", "*.html"),
                       ("Python Files", "*.py"), ("All Files", "*.*")
                                    ))
    if text_file:
        name = text_file
        status_bar.config(text=f'Saved: {name}        ')
        name = name.replace("E:/", "")
        root.title(f'{name}')

    # save the file
    text_file = open(text_file, 'w')
    text_file.write(my_text.get(1.0, END))
    # close the file
    text_file.close()

def save_file(e):
    global open_status_name
    if open_status_name:
        text_file = open(open_status_name, 'w')
        text_file.write(my_text.get(1.0, END))
        # close the file
        text_file.close()

        status_bar.config(text=f'Saved: {open_status_name}        ')

    else:
        save_as_file(e)
Add File Menu and Keyboard Shortcuts
Adding these functions to the command of the File Menu functions. We are also binding them to keyboard shortcuts. An event is passed through every method to store the keyboard actions.
# add file menu
file_menu = Menu(my_menu, tearoff=False)
my_menu.add_cascade(label="File", menu=file_menu)
file_menu.add_command(label="New", command=new_file, accelerator="(Ctrl+n)")
file_menu.add_command(label="Open", command=open_file, accelerator="(Ctrl+o)")
file_menu.add_command(label="Save", command=save_file, accelerator="(Ctrl+s)")
file_menu.add_command(label="Save As", command=save_as_file)
file_menu.add_separator()
file_menu.add_command(label="Exit", command=root.quit)

# file bindings
root.bind('<Control-Key-n>', new_file)
root.bind('<Control-Key-o>', open_file)
root.bind('<Control-Key-s>', save_file)
The filemenu also has the option to exit the program. It is added at the end of the menu and a quit command of the library is used for this action. We are adding a separator to separate this section from the rest.
File Menu:
Edit Menu
In the edit menu, we have only included cut, copy, paste, undo, redo and select all function. A global variable is passed through the editmenu functions to store and access the selected text. Also, these methods have an event value that stores the keyboard actions.
Cut Text
For the 'cut' method, we select the text and then delete it. The clipboard is then cleared just to make sure there wasn't anything else stored. Then the selected text is added to the clipboard. For the key shortcut, a library method is used for the same function.
# ************************* Edit Menu *************************

# cut text
def cut_text(e):
    global selected
    # check keyboard shortcuts action
    if e:
        selected = root.clipboard_get()
    else:
        if my_text.selection_get():
            # grab selected text
            selected = my_text.selection_get()
            # delete selected text
            my_text.delete("sel.first", "sel.last")
            # clear the clipboard then append
            root.clipboard_clear()
            root.clipboard_append(selected)
Copy Text
The same library method as the 'cut' function is used in the 'copy' function for key shortcut. All the rest of the process is same as the 'cut' method, except for deleting the text. For 'copy' method, we don't delete the text, we just copy it to the clipboard and clear the board before that so that no previous value is stored.
# copy text
def copy_text(e):
    global selected
    # check keyboard shortcuts action
    if e:
        selected = root.clipboard_get()

    if my_text.selection_get():
        # grab selected text
        selected = my_text.selection_get()
        # clear the clipboard then append
        root.clipboard_clear()
        root.clipboard_append(selected)
Paste Text and Select All
The global value carries all the text stored in the clipboard. So we use this global value for the 'paste' method. We find the position our cursor is and where we want the text to be, then we insert the text.
We are defining a method to select all the text altogether. The 'sel' tag is added to select the text from start to end.
# paste text
def paste_text(e):
    global selected
    # check keyboard shortcuts action
    if e:
        selected = root.clipboard_get()

    else:
        if selected:
            position = my_text.index(INSERT)
            my_text.insert(position, selected)

# Select all
def select_all(e):
    # add sel tag to select all text
    my_text.tag_add('sel', '1.0', 'end')
Add Edit Menu and Keyboard Shortcuts
We are adding each methods as commands of the menu. A lamba function is used for passing events. For undo and redo, we are using built-in library methods. We are using a separator for separating the 'select all' section.
# add edit menu
edit_menu = Menu(my_menu, tearoff=False)
my_menu.add_cascade(label="Edit", menu=edit_menu)
edit_menu.add_command(label="Cut", command=lambda: cut_text(False), accelerator="(Ctrl+x)")
edit_menu.add_command(label="Copy", command=lambda: copy_text(False), accelerator="(Ctrl+c)")
edit_menu.add_command(label="Paste", command=lambda: paste_text(False), accelerator="(Ctrl+v)")
edit_menu.add_separator()
edit_menu.add_command(label="Undo", command=my_text.edit_undo, accelerator="(Ctrl+z)")
edit_menu.add_command(label="Redo", command=my_text.edit_redo, accelerator="(Ctrl+y)")
edit_menu.add_separator()
edit_menu.add_command(label="Select All", command=lambda: select_all(True), accelerator="(Ctrl+a)")

# edit bindings
root.bind('<Control-Key-x>', cut_text)
root.bind('<Control-Key-c>', copy_text)
root.bind('<Control-Key-v>', paste_text)

# select binding
root.bind('Control-A', select_all)
root.bind('Control-a', select_all)
We are binding the keyboard actions to shortcuts for cut, copy, paste, and select all.
Edit Menu:

Format Menu
In the format menu, we are keeping changing the background color, changing all text color, wrapping text, and the search function.
Change Color
We are defining two functions to change the background color of the textbox and the color of all the text added to the textbox. The ColorChooser library is used for picking color of choice. We are adding '[1]' to generalize the hex value of the color.
# **************************** Format Menu ******************************

# change bg color
def bg_color():
    my_color = colorchooser.askcolor()[1]
    if my_color:
        my_text.config(bg=my_color)

# change all text color
def all_text_color():
    my_color = colorchooser.askcolor()[1]
    if my_color:
        my_text.config(fg=my_color)
Wrap Text
AS there is a value we can assign to for wrap, we don't need to put in much effort. We just need to configure the textbox to wrap= "word" or "none".
def wrap():
    if word_wrap.get() == True:
        my_text.config(wrap="word")
    else:
        my_text.config(wrap="none")
Find Text
To find a text, we use a different window over the frame. A box appears where we can put the word or words we want to find, and the found values are painted red. We set an event value for keyboard shortcut for this function. The search method searches from start to end to find the values. Two buttons are added for search and cancel.
# find text
def check(value, e):
    my_text.tag_remove('found', "1.0", "end")
    my_text.tag_config('found', foreground='red')
    list_of_words = value.split(' ')
    for word in list_of_words:
        index = "1.0"
        while index:
            index = my_text.search(word, index, nocase=1, stopindex=END)
            if index:
                lastIndex = '%s+%dc' % (index, len(word))
                my_text.tag_add('found', index, lastIndex)
                index = lastIndex

# cancel search
def cancel_search(value):
    my_text.tag_remove('found', "1.0", "end")
    value.destroy()
    return "break"

# create search box
def find_text(e):
    search = Toplevel(root)
    search.title(' Find Text ')
    search.transient(root)
    search.resizable(False, False)
    Label(search, text=' Find All:').grid(row=0, column=0, sticky='e')
    x = search.winfo_x()
    y = search.winfo_y()
    search.geometry("+%d+%d" % (x+500, y+300))
    entry_widget = Entry(search, width=25)
    entry_widget.grid(row=0, column=1, padx=2, pady=2, sticky='we')
    entry_widget.focus_set()

    Button(search, text='Search', underline=0,
           command=lambda: check(entry_widget.get(), e)).grid(row=0, column=2, sticky='e'+'w', padx=2, pady=5)

    Button(search, text='Cancel', underline=0,
           command=lambda: cancel_search(search)).grid(row=0, column=4, sticky='e'+'w', padx=2, pady=5)
Add Format Menu and Keyboard Shortcut
Creating the format menu by adding the commands of every function. The word wrap is set after a separator. We are using the checkbutton for word wrap. We are also binding the key for using the shortcut.
# add format menu
format_menu = Menu(my_menu, tearoff=False)
my_menu.add_cascade(label="Format", menu=format_menu)
format_menu.add_command(label="All Text Color", command=all_text_color)
format_menu.add_command(label="Background Color", command=bg_color)
format_menu.add_command(label="Search", command=find_text, accelerator="(Ctrl+f)")

format_menu.add_separator()
word_wrap = BooleanVar()
format_menu.add_checkbutton(label="Word Wrap", onvalue=True, offvalue=False, variable=word_wrap, command=wrap)

root.bind('<Control-Key-f>', find_text)
Format Menu:
Toolbar
Now we set the toolbar. We are adding the text styles, alignments and undo redo buttons on the toolbar. Images are added for the icons of these functions.
Bold
For bold, we configure the font weight to "bold". We use tag to bold the selected text.
# ***************************** ToolBar *****************************

# bold text
def bold():
    # create a font
    bold_font = font.Font(my_text, my_text.cget("font"))
    bold_font.configure(weight="bold")

    # configure a tag
    my_text.tag_configure("bold", font=bold_font)
    current_tags = my_text.tag_names("sel.first")

    # If state to see if a tag has been set
    if "bold" in current_tags:
        my_text.tag_remove("bold", "sel.first", "sel.last")

    else:
        my_text.tag_add("bold", "sel.first", "sel.last")
Italic
For Italic, we configure the font to slant = "italic". We use tag to make the selected text italic.
# italic text
def italic():
    # create a font
    italic_font = font.Font(my_text, my_text.cget("font"))
    italic_font.configure(slant="italic")

    # configure a tag
    my_text.tag_configure("italic", font=italic_font)
    current_tags = my_text.tag_names("sel.first")

    # If state to see if a tag has been set
    if "italic" in current_tags:
        my_text.tag_remove("italic", "sel.first", "sel.last")

    else:
        my_text.tag_add("italic", "sel.first", "sel.last")
Text Color
For changing the color, we use the same process. But we add a ColorChooser for picking the color of choice. Using tag we add color to the selected text.
# change text color
def text_color():
    # pick a color
    my_color = colorchooser.askcolor()[1]
    if my_color:
        status_bar.config(text=my_color)

        # color text
        color_font = font.Font(my_text, my_text.cget("font"))

        # configure a tag
        my_text.tag_configure("colored", font=color_font, foreground=my_color)
        current_tags = my_text.tag_names("sel.first")

        # If state to see if a tag has been set
        if "colored" in current_tags:
            my_text.tag_remove("colored", "sel.first", "sel.last")

        else:
            my_text.tag_add("colored", "sel.first", "sel.last")
Color Chooser:

Underline and Strikethrough text
For underlining and overstriking text, we only need to set the underline and overstrike variable of the font to True. The rest of the process is same as others.
# underline text
def underline():
    # create a font
    underline_font = font.Font(my_text, my_text.cget("font"))
    underline_font.configure(underline=True)

    # configure a tag
    my_text.tag_configure("underline", font=underline_font)
    current_tags = my_text.tag_names("sel.first")

    # If state to see if a tag has been set
    if "underline" in current_tags:
        my_text.tag_remove("underline", "sel.first", "sel.last")

    else:
        my_text.tag_add("underline", "sel.first", "sel.last")

# strike text
def strike():
    # create a font
    strike_font = font.Font(my_text, my_text.cget("font"))
    strike_font.configure(overstrike=True)

    # configure a tag
    my_text.tag_configure("overstrike", font=strike_font)
    current_tags = my_text.tag_names("sel.first")

    # If state to see if a tag has been set
    if "overstrike" in current_tags:
        my_text.tag_remove("overstrike", "sel.first", "sel.last")

    else:
        my_text.tag_add("overstrike", "sel.first", "sel.last")
Toolbar Functions:
Align Text
First of all, we define a function to remove all the align tags to make sure there is no allignment defined. This means the lines are justified. For every alignment method, we need to remove any alignment there may be and configure the tag to the alignment we want.
def remove_align_tags():
    current_tags = my_text.tag_names("sel.first")
    if "left" in current_tags:
        my_text.tag_remove("left", "sel.first", "sel.last")
    if "right" in current_tags:
        my_text.tag_remove("right", "sel.first", "sel.last")
    if "center" in current_tags:
        my_text.tag_remove("center", "sel.first", "sel.last")

def align_left():
    remove_align_tags()
    my_text.tag_configure("left", justify='left')
    my_text.tag_add("left", "sel.first", "sel.last")

def align_right():
    remove_align_tags()
    my_text.tag_configure("right", justify='right')
    my_text.tag_add("right", "sel.first", "sel.last")

def align_middle():
    remove_align_tags()
    my_text.tag_configure("center", justify='center')
    my_text.tag_add("center", "sel.first", "sel.last")

def align_justify():
    remove_align_tags()
Text Alignment(Left, Right, Center):

Creating Toolbar Buttons
All of the methods of toolbar are set on buttons. We use icon images to show these buttons and resize all of them to the same size. We are using grid instead of pack to have better control over the position of the buttons. We are adding the same amount of padding around the buttons to create some space among them.
# **************** Create Toolbar buttons *********************

# undo & redo button
undo_icon = ImageTk.PhotoImage(Image.open("icons/undo.png").resize((15,15), Image.LANCZOS))
undo_button = Button(toolbar_frame, borderwidth=0., image=undo_icon, command=my_text.edit_undo)
undo_button.grid(row=0, column=0, sticky=W, padx=8, pady=2)

redo_icon = ImageTk.PhotoImage(Image.open("icons/redo.png").resize((15,15), Image.LANCZOS))
redo_button = Button(toolbar_frame, borderwidth=0., image=redo_icon, command=my_text.edit_redo)
redo_button.grid(row=0, column=1, sticky=W, padx=8, pady=2)

# bold button
bold_icon = ImageTk.PhotoImage(Image.open("icons/bold.png").resize((15,15), Image.LANCZOS))
bold_button = Button(toolbar_frame, borderwidth=0., image=bold_icon, command=bold)
bold_button.grid(row=0, column=3, sticky=W, padx=8, pady=2)

# italic button
italic_icon = ImageTk.PhotoImage(Image.open("icons/italics.png").resize((15,15), Image.LANCZOS))
italic_button = Button(toolbar_frame, borderwidth=0., image=italic_icon, command=italic)
italic_button.grid(row=0, column=4, sticky=W, padx=8, pady=2)

# underline button
underline_icon = ImageTk.PhotoImage(Image.open("icons/underline.png").resize((15,15), Image.LANCZOS))
underline_button = Button(toolbar_frame, borderwidth=0., image=underline_icon, command=underline)
underline_button.grid(row=0, column=5, sticky=W, padx=8, pady=2)

# overstrike button
strike_icon = ImageTk.PhotoImage(Image.open("icons/strike.png").resize((15,15), Image.LANCZOS))
strike_button = Button(toolbar_frame, borderwidth=0., image=strike_icon, command=strike)
strike_button.grid(row=0, column=6, sticky=W, padx=8, pady=2)

# text color
color_icon = ImageTk.PhotoImage(Image.open("icons/color.png").resize((18,18), Image.LANCZOS))
color_text_button = Button(toolbar_frame, borderwidth=0., image=color_icon, command=text_color)
color_text_button.grid(row=0, column=7, padx=8, pady=2)

# align left
left_icon = ImageTk.PhotoImage(Image.open("icons/align_left.png").resize((18,18), Image.LANCZOS))
left_button = Button(toolbar_frame, borderwidth=0., image=left_icon, command=align_left)
left_button.grid(row=0, column=8, padx=8, pady=2)

# align right
right_icon = ImageTk.PhotoImage(Image.open("icons/align_right.png").resize((18,18), Image.LANCZOS))
right_button = Button(toolbar_frame, borderwidth=0., image=right_icon, command=align_right)
right_button.grid(row=0, column=9, padx=8, pady=2)

# align center
center_icon = ImageTk.PhotoImage(Image.open("icons/align_middle.png").resize((18,18), Image.LANCZOS))
center_button = Button(toolbar_frame, borderwidth=0., image=center_icon, command=align_middle)
center_button.grid(row=0, column=10, padx=8, pady=2)

# align justify
justify_icon = ImageTk.PhotoImage(Image.open("icons/align_justify.png").resize((18,18), Image.LANCZOS))
justify_button = Button(toolbar_frame, borderwidth=0., image=justify_icon, command=align_justify)
justify_button.grid(row=0, column=11, padx=8, pady=2)
At the end, we call the mainloop() function to keep the window running and listen to the events or actions we perform.
root.mainloop()
With this article at OpenGenus, you must have the complete idea of how to develop a Python project of a Simple Text Editor.