Open-Source Internship opportunity by OpenGenus for programmers. Apply now.
Let us explore a simple, yet very useful aspect of Rust.. Modules!
Table of contents
- What are Modules?
- How to use Modules
- Example!
What are Modules?
Modules allow us to organize our code by separating similar functionality into their own groups for ease of readability and reuse, if need be! Modules also allow us to control the privacy of our code, by making things private or pub (public). Modules are part of the crate system of Rust, so they are very closely related.
How to use Modules
In our previous article, the tests, you'll notice that I used mod to configure a test module, where I put all my testing functionality.
For reference..
#[cfg(test)]
mod tests {
    use super::search_for;

    #[test]
    fn test_search_for_valid() {
        let content = "Lorem ipsum dolor sit amet, consectetur adipiscing elit.
        Donec imperdiet ullamcorper eros eget dictum.
        Integer vel metus malesuada nisi elementum posuere.";

        let query = "Lorem ipsum";

        assert_eq!(search_for(content, query), true);
    }

    #[test]
    fn test_search_for_invalid() {
        let content = "Lorem ipsum dolor sit amet, consectetur adipiscing elit.
        Donec imperdiet ullamcorper eros eget dictum.
        Integer vel metus malesuada nisi elementum posuere.";

        let query = "Rust was here";

        assert_eq!(search_for(content, query), false);
    }
}
The keyword used to specify the definition of a new module is 'mod', as seen in 'mod tests' above. After that we use curly braces to open up that module's scope.
Example!
Let's write something a little more interesting to explore these modules though. For example.. A warehouse system. We'll have a backend, and frontend. Storage and dispatches respectively. Let's write a library instead of a binary for this, since we haven't tried that out yet.
Lib.rs:
mod Warehouse {
    mod Storage {
        fn add_to_storage() {}

        fn check_storage() {}

        fn take_from_storage() {}
    }

    mod Dispatches {
        fn request_item() {}

        fn receive_item() {}

        fn dispatch_item() {}
    }
}
The following tree represents the hierarchy of our crate in it's current state. Under the crate, we have the Warehouse module, which in turn includes the Storage module, and the Dispatches module, each with their own set of functions. Crate, the root, is also technically a module, but it's not something we define.
crate
 └── Warehouse
     ├── Storage
     │   ├── add_to_storage
     │   ├── check_storage
     │   └── take_from_storage
     └── Dispatches
         ├── request_item
         ├── receive_item
         └── dispatch_item
For simplicity's sake, in the following examples I'll be using characters as items, and numbers to represent amount. If I had a more specific example, I could build several structures to represent each of these items, but it's beyond the scope of this article. I can show you the concept without all the extra fluff.
For rust to figure out where the functionality we want is, we need to use paths, in the same away our operating system uses paths to find files. Likewise, there are two kinds of paths, Absolute paths and Relative Paths.
mod Warehouse {
    mod Storage {
        fn add_to_storage() {}

        fn check_storage() {}

        fn take_from_storage() {}
    }

    mod Dispatches {
        fn request_item() {}

        fn receive_item(item: i32) {}

        fn dispatch_item() {}
    }
}

pub fn store_item(item: i32) {
    receive_item(item);
}

As you can see, receive_item is not found in the scope, because our store_item function IS outside of the scope of our Warehouse module! I'll use both relative and absolute paths to demonstrate how to use both, but you only need to use one. It's entirely up to you which one you'll use, most likely dependent of the project structure that you end up building on.
pub fn store_item(item: i32) {
    // crate::Warehouse::Dispatches::receive_item(item); Absolute!
    Warehouse::Dispatches::receive_item(item); // Relative
}
But this will not compile.

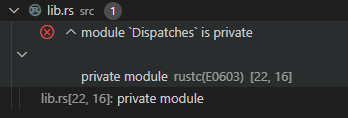
Our Dispatches module is indeed, by default, private. As I said before, modules let you control which parts of your code are freely accessible by other parts(IE: public) or private. So, let's make our Dispatches module public!
 pub mod Dispatches {
        // Snip!
    }
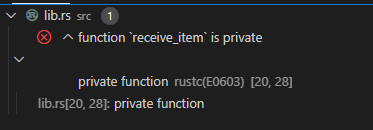
But this won't compile yet! Because...

Just like in structs, the fact that the module itself is public, does not mean that the individual variables and functions within that module are also public. Everything is private by default, and also each thing has to be stated to be public explicitly. So.. let's do that!
// Snip!
pub fn receive_item(item: i32) {}
// Snip!
This does compile, although it does nothing yet.
There's also the keyword super, which works like '..' in some (if not all I believe), operating systems to indicate that you want to go to the parent location. So for example, from within the Dispatches module, we could do something like the following, to access Storage, instead of going down from the crate. (In this simple example, the tree is not deep enough to really make a difference, but it's helpful to be able to go only 1 step up, instead of all the way up to the crate in certain occasions). Super makes us go one up from Dispatches to Warehouse, and from there we can access Storage, then the functions.
        pub fn receive_item(item: i32) {
            super::Storage::add_to_storage(item);
        }
But writing all these super long '::' access chains is cumbersome, specially if you need to use several of them which is the more likely situation. There's the Use keyword that lets you bring certain paths into scope, and skip most of these :: notations.
        use crate::Warehouse::Storage;
        pub fn receive_item(item: i32) {
            Storage::add_to_storage(item);
        }
We shorten the link a bit, by using the 'use' keyword and the path to bring into scope that particular path. So instead of using super, then Storage, or Crate, warehouse and then storage, we can just straight up use Storage. Use statements can be placed anywhere within the scope of the things that need that shortened path.
We can also use the 'as' keyword to add custom names to our paths. Ridiculous example but it gets the point across.
pub mod Dispatches {
        use crate::Warehouse::Storage as DispatchStorage;

        fn request_item(item: i32) {
            DispatchStorage::add_to_storage(item);
        }
        pub fn receive_item(item: i32) {
            DispatchStorage::add_to_storage(item);
        }
        fn dispatch_item() {}
    }
We can use modules along with some of the other tools that Rust offers to make a good attempt at following an OOP programming pattern, albeit it will not be 100% OOP, due to the fact that certain things are missing from the language or not implemented in the same way as other OOP languages, as discussed in my very first article.
That's it for today! I hope you can start reorganizing your rust code the way you like it and want to with the help of the contents here! Happy coding!
