
In this article, we will learn how to develop an application for Numerical Converter to convert one positional numerals into another with GUI.
Introduction
The Numeral Converter is a tool that allows users to convert numbers from one numeral system to another.
- It is a useful utility for programmers, mathematicians, and anyone who works with numbers in different bases.
- The converter can handle four numeral systems: binary, octal, decimal, and hexadecimal.
- With this tool, users can quickly and easily convert numbers from one numeral system to another, without having to do the conversions manually.
- The Numeral Converter is an excellent example of a Java application that uses a graphical user interface to provide a simple and intuitive user experience.
In this article, we will discuss how to develop a Numeral Converter using JavaFX, a Java library for building graphical user interfaces.
Algorithm
Numeral conversion is the process of converting a number from one numeral system to another. In our case, we are converting numbers between the Binary, Octal, Decimal, and Hexadecimal systems.
The algorithm for converting a number from one numeral system to another involves two steps:
- Convert the input number to its equivalent value in base 10. This is done by multiplying each digit in the input number by its corresponding power of the base and adding the results.
- Convert the base 10 value to the desired output numeral system. This is done by repeatedly dividing the base 10 value by the base of the output numeral system and recording the remainder at each step. The remainders are then read in reverse order to get the output number.
Example - 1 ( bin -> dec -> bin )
- In the Binary system, the digit in the rightmost position has a value of 2^0 (1), the digit in the second position from the right has a value of 2^1 (2), the digit in the third position from the right has a value of 2^2 (4), and so on.
- To convert the Binary number 1010 to Decimal, we would calculate: 1 x 2^3 + 0 x 2^2 + 1 x 2^1 + 0 x 2^0 = 8 + 0 + 2 + 0 = 10.
- To convert the Decimal number 10 to Binary, we would repeatedly divide by 2 and record the remainders:
10 / 2 = 5 remainder 0
5 / 2 = 2 remainder 1
2 / 2 = 1 remainder 0
1 / 2 = 0 remainder 1
- The remainders read in reverse order give us the Binary number 1010, which is the equivalent of the Decimal number 10.
Example - 2 ( oct -> dec -> hex )
- In the Octal system, the digit in the rightmost position has a value of 8^0 (1), the digit in the second position from the right has a value of 8^1 (8), the digit in the third position from the right has a value of 8^2 (64), and so on.
- To convert the octal number 1400 to Decimal, we would calculate: 1 x 8^3 + 4 x 8^2 + 0 x 8^1 + 0 x 8^0 = 512 + 256 + 0 + 0 = 768.
- To convert the Decimal number 768 to Hexdecimal, we would repeatedly divide by 16 and record the remainders:
768 / 16 = 48 remainder 0
48 / 16 = 3 remainder 0
3 / 16 = 0 remainder 3
- The remainders read in reverse order give us the Hexdecimal number 300, which is the equivalent of the Decimal number 768.
In our code, we didn't implemented this algorithm, But we utilized the inbuilt features of BigInteger class. like this,
BigInteger number = new BigInteger(inputNum, fromBase); // constructor
return number.toString(toBase);  // method
Getting Started
Getting Started with Numeral Converter:
To get started with developing a Numeral Converter, you will need to have Java and JavaFX installed on your computer. JavaFX is a Java library that provides a set of graphics and media APIs for building rich, cross-platform user interfaces. JavaFX is included with Java SE, so if you have Java installed on your machine, you should be ready to go.
Once you have Java and JavaFX installed, you can start by creating a new JavaFX project in your preferred IDE (Integrated Development Environment), such as IntelliJ IDEA or Eclipse. You will also need to create a new Java class to hold the code for your Numeral Converter application.
In this article, we will use the following JavaFX classes to build our Numeral Converter:
- GridPane: A layout container that lays out its children in a grid formation.
- Label: A non-editable text control used for displaying a short, descriptive piece of text.
- TextField: A text input control that allows the user to enter and edit text.
- ComboBox: A drop-down list control that allows the user to select one item from a list of options.
- Button: A control that is used to initiate an action when clicked.
We will also create a separate Java class called "Convert" to hold the conversion logic for our application.
With these tools and resources, you can start developing your own Numeral Converter application. In the next sections, we will dive into the details of creating the user interface and implementing the conversion logic for the application.
Implementation
Implementation of Numeral Converter:
-
The Numeral Converter application we are developing in this article allows users to convert numbers between different numeral systems, including binary, octal, decimal, and hexadecimal. The conversion logic is implemented in a separate Java class called Convert, which contains a single static method called doconvert.
-
The doconvert method takes three parameters: the input number as a string, the numeral system the input number is in, and the numeral system the output number should be in. The method first converts the input number from its original numeral system to a BigInteger using the BigInteger class. It then converts the BigInteger to the desired output numeral system using the toString method, which takes an integer argument representing the target numeral system.
-
The user interface for our Numeral Converter is implemented using JavaFX. We create a GridPane layout container, which contains the input and output fields, as well as the selection boxes for choosing the input and output numeral systems. We also add a "Convert" button to the layout container, which initiates the conversion process when clicked.
-
The conversion process is handled by an event handler that is attached to the Convert button. When the button is clicked, the event handler retrieves the input number and the selected numeral systems from the input fields and selection boxes. It then calls the doconvert method in the Convert class to perform the conversion and updates the output field with the result.
Overall, the implementation of the Numeral Converter is straightforward and easy to understand. By using JavaFX and the BigInteger class, we are able to create a user-friendly application that can handle large numbers and convert them between different numeral systems quickly and efficiently.
Project Setup
Before, we get into writing the code for GUI. let us discuss about JavaFX library and its advantages over others (javax.swing).
JavaFX Library
JavaFX is a Java library used for building cross-platform desktop applications with rich graphical user interfaces (GUIs).
- It was introduced as a replacement for Swing, another Java GUI library, and has become the preferred choice for building Java desktop applications.
- JavaFX offers a comprehensive set of APIs for creating modern and visually appealing user interfaces that can run on a variety of platforms, including Windows, Mac, and Linux.
- JavaFX provides a range of features and capabilities for designing and implementing GUIs, including support for animations, multimedia, 3D graphics, and special effects.
- It also includes a wide range of UI controls, such as buttons, text fields, combo boxes, and tables, which can be customized to fit the specific needs of your application.
- One of the key benefits of JavaFX is its support for FXML, a markup language used for defining the structure of a UI.
- This allows developers to separate the design and layout of a UI from the application logic, making it easier to maintain and modify the code over time.
- Additionally, JavaFX provides a Scene Builder tool for designing UIs visually, which can further simplify the development process.
- JavaFX is included in the Java Development Kit (JDK) and can be used with a variety of Java IDEs, such as Eclipse, NetBeans, and IntelliJ IDEA.
- It also supports a range of third-party libraries and tools for enhancing its functionality and ease of use.
Overall, JavaFX is a powerful and versatile library for building modern and visually appealing desktop applications in Java. Its rich set of APIs, support for FXML, and ease of use make it a popular choice for developers looking to create cross-platform GUIs.
Advantages of JavaFX
JavaFX and javax.swing are both GUI toolkits for creating desktop applications in Java. While both have their own advantages and disadvantages, JavaFX has several advantages over javax.swing:
-
Rich User Interface: JavaFX provides a more modern and rich user interface as compared to javax.swing. JavaFX has a more versatile layout management system, more built-in UI controls, and a better visual appearance.
-
Improved Performance: JavaFX has improved performance compared to javax.swing. JavaFX makes use of hardware acceleration for rendering, which results in faster and smoother animations, transitions, and other effects.
-
Better Integration: JavaFX is better integrated with other Java technologies such as Java 8 lambdas, streams, and properties. This results in more concise and readable code that is easier to maintain.
-
CSS Styling: JavaFX allows for styling of UI components using Cascading Style Sheets (CSS), which is a widely-used and well-established technology for styling web pages. This provides more flexibility in terms of customizing the appearance of UI components.
-
Scene Graph: JavaFX is built on a scene graph, which is a hierarchical structure that represents the UI components and their relationships. This makes it easier to work with complex UI layouts and provides better performance for rendering.
Overall, JavaFX provides a more modern and versatile GUI toolkit that is better suited for developing complex desktop applications with rich user interfaces.
Creating the GUI
Step 1: Setting up the Project
- The first step is to set up a new JavaFX project in your IDE. You can use any IDE that supports JavaFX, such as Eclipse or IntelliJ IDEA. In this tutorial, we will be using IntelliJ IDEA.
To set up the project, follow these steps:
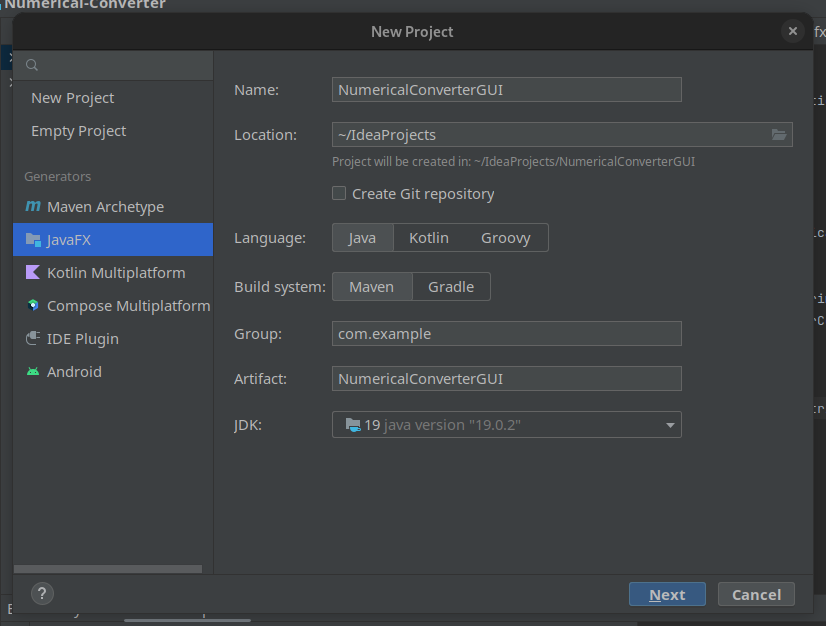
- Open IntelliJ IDEA and click on "Create New Project" from the welcome screen.
- Select "JavaFX" from the list of project templates and click "Next".
- Choose a name and location for your project and click "Finish".
- This will create a new JavaFX project with a basic project structure.
Step 2: Creating the GUI
The next step is to create the GUI for our numeral converter. We will be using a GridPane layout to organize our controls.
To create the GUI, follow these steps:
- create a GUI class by right clicking on the src floder of our project.
- Now, let's code our GUI.
package com.example.numeralconvertergui;

import javafx.application.Application;
import javafx.geometry.Insets;
import javafx.geometry.Pos;
import javafx.scene.Scene;
import javafx.scene.control.*;
import javafx.scene.layout.GridPane;
import javafx.stage.Stage;
import org.jetbrains.annotations.Contract;
import org.jetbrains.annotations.NotNull;

public class NumeralConverterGUI extends Application {

    @Override
    public void start(Stage primaryStage) {
        // Create a GridPane to hold our controls
        GridPane gridPane = new GridPane();
        gridPane.setAlignment(Pos.CENTER);
        gridPane.setHgap(10);
        gridPane.setVgap(10);
        gridPane.setPadding(new Insets(25, 25, 25, 25));

        // Add labels and text fields for input and output
        Label inputLabel = new Label("Input number:");
        gridPane.add(inputLabel, 0, 0);

        TextField inputField = new TextField();
        gridPane.add(inputField, 1, 0);

        Label fromLabel = new Label("From:");
        gridPane.add(fromLabel, 0, 1);

        ComboBox<String> fromComboBox = new ComboBox<>();
        fromComboBox.getItems().addAll("Binary", "Octal", "Decimal", "Hexadecimal");
        fromComboBox.setValue("Binary");
        gridPane.add(fromComboBox, 1, 1);

        Label toLabel = new Label("To:");
        gridPane.add(toLabel, 0, 2);

        ComboBox<String> toComboBox = new ComboBox<>();
        toComboBox.getItems().addAll("Binary", "Octal", "Decimal", "Hexadecimal");
        toComboBox.setValue("Octal");
        gridPane.add(toComboBox, 1, 2);

        Label outputLabel = new Label("Output number:");
        gridPane.add(outputLabel, 0, 3);

        TextField outputField = new TextField();
        outputField.setEditable(false);
        gridPane.add(outputField, 1, 3);

        // Add a button to perform the conversion
        Button convertButton = new Button("Convert");
        convertButton.setOnAction(event -> {
            // Get the input number and numeral systems
            String inputNum = inputField.getText();
            String fromNumeralSystem = fromComboBox.getValue();
            String toNumeralSystem = toComboBox.getValue();

            // Call your conversion function here to get the output number
            String outputNum = Convert.doconvert(inputNum, fromNumeralSystem, toNumeralSystem);

            // Set the output field to the output number
            outputField.setText(outputNum);
        });
        gridPane.add(convertButton, 1, 4);

        // Create a scene and set it on the stage
        Scene scene = new Scene(gridPane, 400, 250);
        primaryStage.setTitle("Numeral Converter");
        primaryStage.setScene(scene);
        primaryStage.show();
    }

    public static void main(String[] args) {
        launch(args);
    }
}
-
The Above code is a JavaFX application for a numeral converter GUI. It defines a class called NumeralConverterGUI that extends the Application class from the JavaFX library.
-
The start() method is overridden from the Application class and is used to create the main graphical user interface of the application. It creates a GridPane layout, adds labels, text fields, combo boxes, and a button to the layout.
-
The ComboBox is used to select the input and output numeral systems from a list of options. The TextField is used to enter the input number and display the output number.
-
The Convert class is used to perform the actual conversion, and it is called when the Convert button is clicked. The output of the conversion is displayed in the output TextField.
-
The main() method is the entry point of the application, and it calls the launch() method to start the application.
Coversion
- For the conversion, we can just use BigInteger class.
package com.example.numeralconvertergui;

import org.jetbrains.annotations.Contract;
import org.jetbrains.annotations.NotNull;

import java.math.BigInteger;

public class Convert {
    // Your conversion function(s) go here
    @NotNull
    @Contract(pure = true)
    public static String doconvert(String inputNum, String fromNumeralSystem, String toNumeralSystem) {
        int fromBase = getBase(fromNumeralSystem);
        int toBase = getBase(toNumeralSystem);
        BigInteger number = new BigInteger(inputNum, fromBase);
        return number.toString(toBase);
    }

    private static int getBase(String numeralSystem) {
        return switch (numeralSystem) {
            case "Binary" -> 2;
            case "Decimal" -> 10;
            case "Octal" -> 8;
            case "Hexadecimal" -> 16;
            default -> throw new UnsupportedOperationException("Invalid numeral system: " + numeralSystem);
        };
    }
}
This code contains the class Convert which is responsible for performing the actual numeral conversion.
The doconvert method takes three parameters:
- inputNum is the number to be converted
- fromNumeralSystem is the numeral system of the input number (e.g. "Binary", "Octal", "Decimal", "Hexadecimal")
- toNumeralSystem is the numeral system to convert the number to (e.g. "Binary", "Octal", "Decimal", "Hexadecimal")
The method first calls the getBase method to get the base for each numeral system. It then creates a BigInteger object from the inputNum in the base of fromNumeralSystem. Finally, it calls the toString method on the BigInteger object with the toBase as an argument to get the converted number in the desired numeral system.
The getBase method is a private helper method that takes a numeralSystem parameter and returns the corresponding base for that numeral system. It uses a switch statement to determine the base based on the string value of the numeralSystem parameter.
The annotations @NotNull and @Contract(pure = true) are used to indicate that the method will never return null and that it is a pure function that does not modify any state and always returns the same result for the same input.
Output
- When we run GUI class, a application window open like the following.
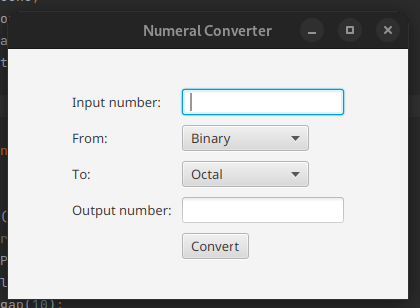
- we can select any one from [ Binary , Octal , Decimal , Hexadecimal ] for fromNumeralSystem or toNumeralSystem.
Further Improvements
Overall, the project seems to work well and achieve its intended functionality. However, there are a few potential areas for improvement:
-
Error handling: Currently, if the user enters an invalid input or selects an invalid numeral system, the program will throw an exception. It would be better to provide more informative error messages to the user, such as displaying a dialog box with a helpful message.
-
Input validation: The program assumes that the input number is a valid number in the selected numeral system. However, this may not always be the case. It would be better to validate the input to ensure that it is a valid number in the selected numeral system before attempting to convert it.
-
User interface: The user interface is quite basic and could be improved with more advanced controls, such as sliders or drop-down menus with a larger selection of numeral systems.
-
Code organization: The code is currently organized into two separate files, one for the main application and one for the conversion function. While this separation is good, there could be more modularity by creating separate classes for each component, such as a separate class for the input and output fields.
-
Code optimization: The current implementation of the conversion function converts the input number to a BigInteger before converting it to the output numeral system. This may not be necessary for smaller input values and could be optimized for better performance.
Conclusion
In conclusion, the Numeral Converter GUI is a simple and effective tool for converting numbers between different numeral systems.
- The implementation uses JavaFX for the GUI and BigInteger for the underlying conversion logic.
- The code is well-organized and modular, making it easy to understand and maintain.
- However, there is always room for improvement, such as adding input validation or improving the user interface.
- Overall, this project provides a good starting point for anyone interested in building a numeral converter application in Java.