
Reading time: 40 minutes | Coding time: 5 minutes
Not many programs execute all their statements in strict order from beginning to end. Most programs (like many humans) decide what to do in response to changing circumstances. The flow of control jumps from one part of the program to another, depending on calculations performed in the program. Program statements that cause such jumps are called control statements. There are two major categories:
- Loops
- for loop
- while loop
- do while loop
- Decisions
- if else
- if else if
- switch
- break
- continue
- goto
- Functions
Loops
Loops cause a section of your program to be repeated a certain number of times. The repetition continues while a condition is true. When the condition becomes false, the loop ends and control passes to the statements following the loop.
There are three kinds of loops in C++:
- for loop
- while loop
- do while loop
for Loop
A for loop is a repetition control structure that allows you to efficiently write a loop that needs to execute a specific number of times. All its loop-control elements are gathered in one place, while in the other loop constructions they are scattered about the program, which can make it harder to unravel how these loops work.
Syntax
for ( init; condition; increment ) {
   statement(s);
}
Control flow of for loop

Sample Program
#include <iostream>
using namespace std;
int main()
{
    int j;        //define a loop variable
    for(j=0; j<=10; j++)   //loop from 0 to 10
    cout << j * j << “ ";  //displaying the square
    cout << endl;
    return (0);
}
Output
0 1 4 9 16 25 36 49 64 81 100
EXPLANATION
The body of the loop is the code to be executed each time through the loop. Repeating this code is the raison d’être for the loop. In this example the loop body consists of a single statement:
cout << j * j << “ “;
while Loop
The for loop does something a fixed number of times. What happens if you don’t know how many times you want to do something before you start the loop? In this case a different kind of loop may be used: the while loop.
Syntax
while(condition)
{
   statement(s);
}
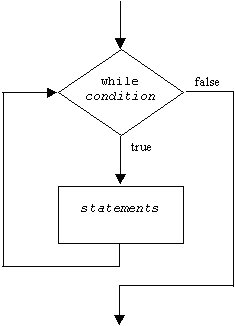
In while loop, condition is evaluated first and if it returns true then the statements inside while loop execute, this happens repeatedly until the condition returns false. When condition returns false, the control comes out of loop and jumps to the next statement in the program after while loop.
NOTE: The important point to note when using while loop is that we need to use increment or decrement statement inside while loop so that the loop variable gets changed on each iteration, and at some point condition returns false. This way we can end the execution of while loop otherwise the loop would execute indefinitely.
Control flow of while loop
Sample Program
#include <iostream>
using namespace std;
int main()
{
    int n = 99;        // make sure n isn’t initialized to 0

    while( n != 0 )    // loop until n is 0
        cin >> n;          // read a number into n
        cout << endl;
return 0;
}
Output
Here’s some sample output. The user enters numbers, and the loop continues until 0 is entered,at which point the loop and the program terminate.
1
27
33
144
9
0
do while Loop
In a while loop, the test expression is evaluated at the beginning of the loop. If the test expression is false when the loop is entered, the loop body won’t be executed at all. In some situations this is what you want. But sometimes you want to guarantee that the loop body is executed at least once, no matter what the initial state of the test expression. When this is the
case you should use the do loop, which places the test expression at the end of the loop.
Syntax
do
{
   statement(s);
} while(condition);
First, the statements inside loop execute and then the condition gets evaluated, if the condition returns true then the control jumps to the “do” for further repeated execution of it, this happens repeatedly until the condition returns false. Once condition returns false control jumps to the next statement in the program after do-while.
Control flow of do while loop

Sample Program
#include <iostream>
using namespace std;
int main()
{
    long dividend, divisor;
    char ch;
    do                     //start of do loop
    {                      //do some processing
        cout<<“Enter dividend: “; cin >> dividend;
        cout<<“Enter divisor: “; cin >> divisor;
        cout<<“Quotient is “ << dividend / divisor;
        cout<<“, remainder is “ << dividend % divisor;
        cout << “\nDo another? (y/n): “;   //do it again?
        cin >> ch;
    }
        while( ch != ‘n’ );         //loop condition
return 0;
}
EXPLANATION
Most of this program resides within the do loop. First, the keyword do marks the beginning ofthe loop. Then, as with the other loops, braces delimit the body of the loop. Finally, a while statement provides the test expression and terminates the loop. This while statement looks much like the one in a while loop, except for its position at the end of the loop and the fact that it ends with a semicolon.
When to use which loop
We’ve made some general statements about how loops are used. The for loop is appropriate when you know in advance how many times the loop will be executed. The while and do loops are used when you don’t know in advance when the loop will terminate (the while loop when you may not want to execute the loop body even once, and the do loop when you’re sure you
want to execute the loop body at least once).
These criteria are somewhat arbitrary. Which loop type to use is more a matter of style than of hard-and-fast rules. You can actually make any of the loop types work in almost any situation. You should choose the type that makes your program the clearest and easiest to follow.
Decisions
Decisions can be made in C++ in several ways. The most important is with the if...else statement, which chooses between two alternatives. This statement can be used without the else , as a simple if statement. Another decision statement, switch , creates branches for multiple alternative sections of code, depending on the value of a single variable. Finally, the conditional operator is used in specialized situations.
if-else statement
Sometimes you have a condition and you want to execute a block of code if condition is true and execute another piece of code if the same condition is false. This can be achieved in C++ using if-else statement.
This is how an if-else statement looks:
if(condition) {
   Statement(s);
}
else {
   Statement(s);
}
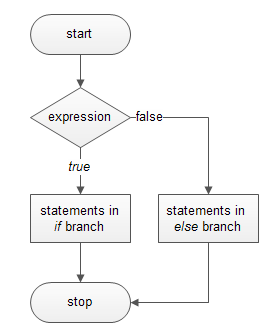
The statements inside “if” would execute if the condition is true, and the statements inside “else” would execute if the condition is false.
Flow diagram of if-else
Example
#include <iostream>
using namespace std;
int main()
{
    int x;
    cout << “\nEnter a number: “;
    cin >> x;
    if( x > 100 )
        cout << “That number is greater than 100\n”;
    else
        cout << “That number is not greater than 100\n”;

return 0;
}
Output
Here’s output from two different invocations of the program:
Enter a number: 300
That number is greater than 100
Enter a number: 3
That number is not greater than 100
if-else-if Statement in C++
if-else-if statement is used when we need to check multiple conditions. In this control structure we have only one “if” and one “else”, however we can have multiple “else if” blocks. This is how it looks:
if(condition_1) {
   /*if condition_1 is true execute this*/
   statement(s);
}
else if(condition_2) {
   /* execute this if condition_1 is not met and
    * condition_2 is met
    */
   statement(s);
}
else if(condition_3) {
   /* execute this if condition_1 & condition_2 are
    * not met and condition_3 is met
    */
   statement(s);
}
.
.
.
else {
   /* if none of the condition is true
    * then these statements gets executed
    */
   statement(s);
}
Note: The most important point to note here is that in if-else-if, as soon as the condition is met, the corresponding set of statements get executed, rest gets ignored. If none of the condition is met then the statements inside “else” gets executed.
switch statement
If you have a large decision tree, and all the decisions depend on the value of the same variable, you will probably want to consider a switch statement instead of a ladder of if...else or else if constructions.
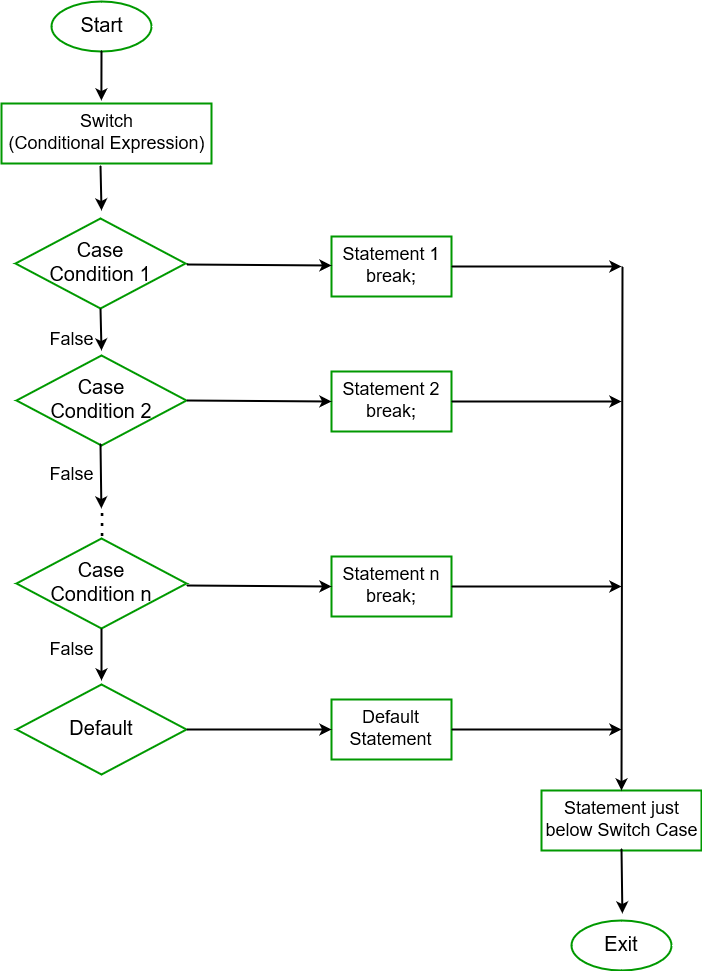
Switch case statement is used when we have multiple conditions and we need to perform different action based on the condition. When we have multiple conditions and we need to execute a block of statements when a particular condition is satisfied. In such case either we can use lengthy if..else-if statement or switch case. The problem with lengthy if..else-if is that it becomes complex when we have several conditions. The switch case is a clean and efficient method of handling such scenarios.
Syntax
switch (variable or an integer expression)
{
     case constant:
     //C++ code
     ;
     case constant:
     //C++ code
     ;
     default:
     //C++ code
     ;
}
Switch case flow diagram
Switch Case statement is mostly used with break statement even though the break statement is optional. Let us see an example without break statement and then switch case with break.
Sample program
#include <iostream>
using namespace std;
int main(){
   int num=5;
   switch(num+2) {
      case 1:
        cout<<"Case1: Value is: "<<num<<endl;
      case 2:
        cout<<"Case2: Value is: "<<num<<endl;
      case 3:
        cout<<"Case3: Value is: "<<num<<endl;
      default:
        cout<<"Default: Value is: "<<num<<endl;
   }
   return 0;
}
Output
Value is: 5
Explanation: In switch I gave an expression, you can give variable as well. I gave the expression num+2, where num value is 5 and after addition the expression resulted 7. Since there is no case defined with value 4 the default case got executed.
Break statement in switch case
The break keyword causes the entire switch statement to exit. Control goes to the first statement following the end of the switch construction.
Break statements are used when you want your program-flow to come out of the switch body. Whenever a break statement is encountered in the switch body, the execution flow would directly come out of the switch, ignoring rest of the cases. This is why we must end each case block with the break statement.
Program
#include <iostream>
using namespace std;
int main(){
   int i=2;
   switch(i) {
      case 1:
        cout<<"Case1 "<<endl;
        break;
      case 2:
        cout<<"Case2 "<<endl;
        break;
      case 3:
        cout<<"Case3 "<<endl;
        break;
      case 4:
        cout<<"Case4 "<<endl;
        break;
      default:
        cout<<"Default "<<endl;
    }
    return 0;
}
Output
Case2
Keynotes
- Case doesn’t always need to have order 1, 2, 3 and so on. It can have any integer value after case keyword. Also, case doesn’t need to be in an ascending order always, you can specify them in any order based on the requirement.
- You can also use characters in switch case. for example –
#include <iostream>
using namespace std;
int main(){
   char ch='b';
   switch(ch) {
      case 'd': cout<<"Case1 ";
      break;
      case 'b': cout<<"Case2 ";
      break;
      case 'x': cout<<"Case3 ";
      break;
      case 'y': cout<<"Case4 ";
      break;
      default: cout<<"Default ";
   }
   return 0;
}
- Nesting of switch statements are allowed, which means you can have switch statements inside another switch. However nested switch statements should be avoided as it makes program more complex and less readable.
Goto statement
The C++ goto statement is also known as jump statement. It is used to transfer control to the other part of the program. It unconditionally jumps to the specified label.
It can be used to transfer control from deeply nested loop or switch case label.
Syntax
Syntax1      |   Syntax2
----------------------------
goto label;  |    label:
.            |    .
.            |    .
.            |    .
label:       |    goto label;
Flow Diagram

Example
#include <iostream>
using namespace std;
int main()
{
ineligible:
      cout<<"You are not eligible to vote!\n";
      cout<<"Enter your age:\n";
      int age;
      cin>>age;
      if (age < 18){
              goto ineligible;
      }
      else
      {
              cout<<"You are eligible to vote!";
      }
}
Output
You are not eligible to vote!
Enter your age:
16
You are not eligible to vote!
Enter your age:
7
You are not eligible to vote!
Enter your age:
22
You are eligible to vote!
The continue statement
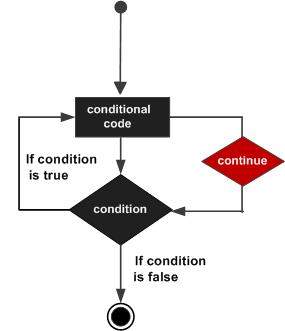
The break statement takes you out of the bottom of a loop. Sometimes, however, you want to go back to the top of the loop when something unexpected happens. Executing continue has this effect.
NOTE: In case of functions, the control is transferred to the address in which the function code is located (like goto).
Flow Control
Syntax
continue;
continue statement in a loop
#include <iostream>
using namespace std;
int main(){
   for (int num=0; num<=6; num++) {
      /* This means that when the value of
       * num is equal to 3 this continue statement
       * would be encountered, which would make the
       * control to jump to the beginning of loop for
       * next iteration, skipping the current iteration
       */

      if (num==3) {
          continue;
      }
      cout<<num<<" ";
   }
   return 0;
}
Output
0 1 2 4 5 6
As you can see that the output is missing the value 3, however the for loop iterate though the num value 0 to 6. This is because we have set a condition inside loop in such a way, that the continue statement is encountered when the num value is equal to 3. So for this iteration the loop skipped the cout statement and started the next iteration of loop.
Function
Consider the following example:
#include<iostream>
void factr(int y)
{
    int x = 0;
    while(1)
    {
       x++;
       if (x>y)
       break;
       if(y%x!=0)
       continue;
       sum=sum+x;
   }
   std::cout<<"\n Sum of factors: "<<sum;
}

int main ( )
{
   int y;
   std::cout«"Enter a number: ";
   cin>>y;
   factr(y);
   return 0;
}
Output
Enter a number: 8
Sum of factors: 15
The function code is located at a memory location M1. The code calling a function may be located at M2. In this case, the program control will be transferred from memory location M2 to M1.
Ideally, in sequential execution, program flow from memory location goes from M2 to M2+1. In case of functions, it will jump to another memory location in which the code of the function exists just like a goto statement (from M2 to M1).