
This article presents a design and implementation approach to develop a console typing speed test in Python Programming Language. We have explained the process step by step.
Contents
- Introduction
- User Interface of the typing test
- User input
- Calculating speed
- Adding audio
- Main() function
Introduction
- A typing speed test is a test that measures the typing speed and typing accuracy of the test taker.
- The typing test requires the user to type out a passage of text within a set time duration.
- The test measures the number of words the user can type, also called words per minute (WPM) and the accuracy of the typed text.
- The final typing speed is calculated after considering the errors made by the user.
User Interface of the typing test
- We implement the typing speed test as a console application, so for terminal handling and methods we use the curses module in Python.
- In order to use the curses module, we import it. To do anything on the terminal, the first step is to initialize it, initialization is done using the function initscr().
- This function will determine the terminal characteristics and allocates space for the windows and the space for curscr and stdscr.
- To install curses on Windows, use the following command in the command prompt:
pip install windows-curses
import curses

stdscr = curses.initscr()
- initscr() returns a window object that represents the entire screen, when curses is initialized, the length and width of the terminal display returned by initscr() are equal to the physical terminal length and width.
- The refresh() function is used to refresh the external display so it matches the stdscr terminal display when changes are made to this display.
- The wrapper() function takes a callable object and does the initializations described in it.
- To add text in the display, the function addstr() is used. This function takes a string value and displays it on a window. The position where the text needs to be displayed can also be mentioned if needed.
import curses

def main(stdscr):
    stdscr = curses.initscr()
    text = "Hello!"

    stdscr.addstr(0, 5, text)
    stdscr.refresh()

    curses.napms(1000)

curses.wrapper(main)
- (0, 5) is of the format (y, x), the cursor moves to the position (y, x) in the window and displays the text.

User input
- We get the key presses of the user using the getkey() function. The keypresses are then used to evaluate if the user is mistyping a character of the typing test text.
- The function window.getkey([y, x]) gets the user input and returns a string. Get a character, returning a string instead of an integer, as getch() does. In no-delay mode it raises an exception if there is no input.
keyPress = stdscr.getkey()
Displaying the text
- To display text in different colors, we should call the function curses.start_color() after initscr(). A color pair consists of a foreground or text color and a background color.
- Curses allows an attribute value for each cell, to get the attribute value corresponding to a color pair using the color_pair() function.
- Function init_pair(pair_num, foreground_color, background_color) is used to change the definition of color pair pair_num. Now the new foreground color will be foreground_color and the new background color of the color pair pair_num will be background_color.
- The color pair '0' cannot be changed, the foreground or the text color is white and the background color is black.
Function : curses.init_pair(pair_number, fg, bg)
pair_number denotes the number of the color pair to be changed.
fg denotes the foreground color number.
bg denotes the background color number.
curses.start_color()
curses.init_pair(1, curses.COLOR_MAGENTA, curses.COLOR_BLACK)
- The layout could be the text to be typed at the top of the window, then the typing speed in characters per minute can be displayed followed by words typed per minute and the time elapsed since the start of the speed typing test.

#adding text to the window
stdscr.addstr(text)

#adding wpm, cpm and time elapsed
stdscr.addstr(5, 0, f"Typing Speed in words per minute (wpm): {wpm}")
stdscr.addstr(4, 0, f"Typing Speed in characters per minute : {cpm}")
stdscr.addstr(6, 0, f"Seconds elapsed : {round(seconds_passed, 2)} seconds")
- Now we want to display the typed text in a different color and the mistypes or errors of the user in a different color. We define the color pairs 1 and 2 as follows:
curses.init_pair(1, curses.COLOR_MAGENTA, curses.COLOR_BLACK)
curses.init_pair(2, curses.COLOR_CYAN, curses.COLOR_BLACK)
- So if the character returned from user input matches the corresponding character to be entered, then let's display the typed text in Magenta.
- If the character returned from user input doesn't match with the character to be typed then we display the error in Blue.
for index, letter in enumerate(typed_text):
    correct_char = text[index]
    if letter != correct_char:
            text_color = curses.color_pair(2)
    else:
        text_color = curses.color_pair(1)


    stdscr.addstr(0, index, letter, text_color)
A flowchart depicting the code organization in the program:
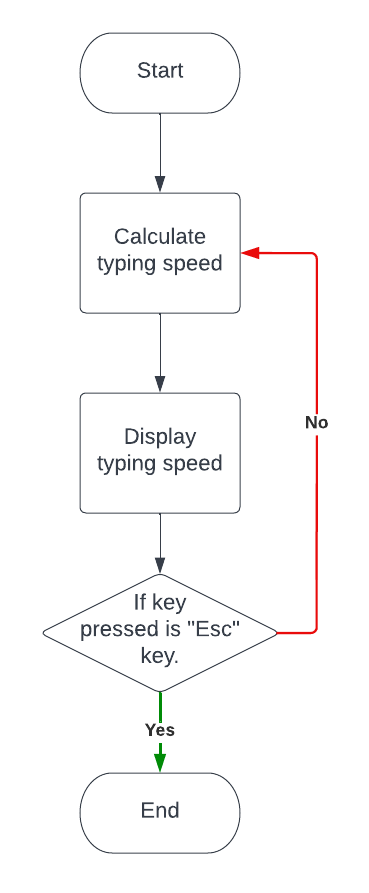
- First the speed of the text being typed by the user is calculated dynamically.
- Then the typing speed is updated on the user interface.
- Once the entire text is typed, the user is given a choice to either redo the test or exit the test. Pressing the 'Esc' key causes the program to exit, any other key will reset the test.
Calculating speed
- To calculate the typing speed, we need to consider the number of characters typed and the time elapsed.
- Then the number of characters typed per minute or cpm can be calculated by dividing the number of characters typed with the time elapsed in minutes.
seconds_passed = max((time.time() - start_time), 1)
cpm = int(len(typed_text) / (seconds_passed/60))
wpm = round((cpm/5), 2)
Adding audio
- Adding audio to the typing test is optional, we use Pygame module here to add audio, to install Pygame on Windows, use the following command in the command prompt:
pip install pygame
- First we initialize the mixer module to load the audio file and play it.
- The mixer has a streaming channel for music playback. It can be accessed through the pygame.mixer.music module.
#initializes the mixer module
mixer.init()

#loading the audio file
mixer.music.load("audio.mp3")

#playing the audio file
mixer.music.play()
Main function
text = "The quick brown fox jumps over the lazy dog, is a sentence containing all the letters of the alphabet."

    curses.init_pair(1, curses.COLOR_MAGENTA, curses.COLOR_BLACK)
    curses.init_pair(2, curses.COLOR_CYAN, curses.COLOR_BLACK)
    curses.init_pair(3, curses.COLOR_WHITE, curses.COLOR_BLACK)
    curses.init_pair(4, curses.COLOR_RED, curses.COLOR_BLACK)

    while True:
        speed(stdscr)

        #play music
        mixer.init()
        mixer.music.load('C:\\Users\\a\\Desktop\\TypeTest\\sounds\\successMessage.mp3')
        mixer.music.play()


        stdscr.addstr(8, 0, "Yay!! Press any key to continue. \nTo exit press the escape button.")


        keyPress = stdscr.getkey()

        #break if esc key is pressed
        if ord(keyPress) == 27:
            break

curses.wrapper(main)
- We call the speed() function from the main function, the speed() function calculates the typing speed of the user and passes it in different formats (cpm, wpm) along with the elapsed time and text typed to the show_speed() function.
- The show_speed() function displays the speed in different formats and also displays the color of the typed character by the user.
- Now to allow the user to exit, we set the Esc key as the exit key. If the user presses Esc, the application closes.
 A snapshot during the typing test.
With this article at OpenGenus, you must have the complete idea of how to develop a console application for Typing speed test in Python.