
Get this book -> Problems on Array: For Interviews and Competitive Programming
Detecting key presses in JavaScript can be very useful for many applications, including games, text editors, and form input validation. In this article, we will explore the different ways of detecting key presses in JavaScript with code snippets and images.
The first method we will explore is the keydown event. The keydown event is fired when a key is pressed down. To detect a key press using the keydown event, we can add an event listener to the document object like so:
<!DOCTYPE html>
<html>
<head>
<title>Keydown Event Listener</title>
</head>
<body>
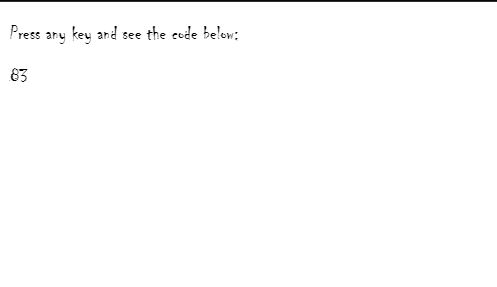
<p>Press any key and see the code below:</p>
<p id="code"></p>
<script>
const codeElement = document.getElementById('code');
document.addEventListener('keydown', function(event) {
codeElement.innerText = event.keyCode;
});
</script>
</body>
</html>
In this code snippet, we are adding an event listener to the document object for the keydown event. When a key is pressed down, the event listener will be called and the key that was pressed will be logged to the console.
Here is the images showing output of the above code:
We can also use the keyup event to detect when a key is released. The keyup event is fired when a key is released after being pressed down. To detect a key release using the keyup event, we can add an event listener to the document object like so:
<!DOCTYPE html>
<html>
  <head>
    <title>Keyup Event Listener</title>
  </head>
  <body>
    <p>Type something and release the key:</p>
    <p id="output"></p>
    <script>
      const outputElement = document.getElementById('output');

      document.addEventListener('keyup', function(event) {
        outputElement.innerText = `You released the ${event.key} key.`;
      });
    </script>
  </body>
</html>
In this code snippet, we are adding an event listener to the document object for the keyup event. When a key is released, the event listener will be called and the key that was released will be logged to the console.
Here is the output image: 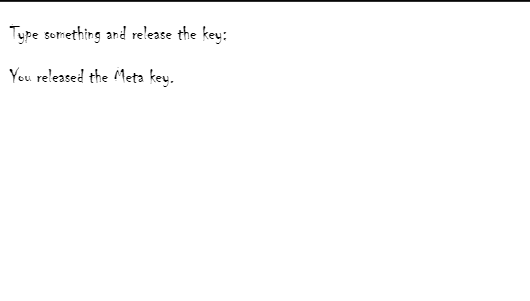
We can also use the keypress event to detect when a key is pressed down and released. The keypress event is fired when a key is pressed down and then released. To detect a key press using the keypress event, we can add an event listener to the document object like so:
<!DOCTYPE html>
<html>
<head>
<title>Keypress Event Listener</title>
</head>
<body>
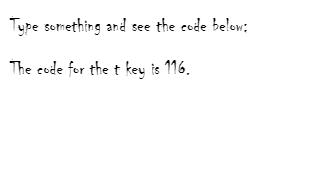
<p>Type something and see the code below:</p>
<p id="output"></p>
<script>
const outputElement = document.getElementById('output');
document.addEventListener('keypress', function(event) {
outputElement.innerText = `The code for the ${event.key} key is ${event.keyCode}.`;
});
</script>
</body>
</html>
In this code snippet, we are adding an event listener to the document object for the keypress event. When a key is pressed down and released, the event listener will be called and the key that was pressed will be logged to the console.
Have a look at output:
The KeyboardEvent is an interface for keyboard events, such as keydown, keyup, and keypress. It contains several properties and methods that provide information about the event, including:
key: Returns the string representing the pressed key, taking into account the current keyboard layout. For example, if the user presses the "a" key on a US keyboard layout, the key property will return the string "a". If the user presses the same physical key on a French keyboard layout, the key property will return the string "q".
keyCode: Returns the numeric code of the pressed key. This property is deprecated and has been replaced by the key property, but is still supported in some browsers for legacy reasons.
Here's an example code snippet that shows the KeyboardEvent object for a few different keys:
<!DOCTYPE html>
<html>
<head>
<title>Keypress Event Listener</title>
</head>
<body>
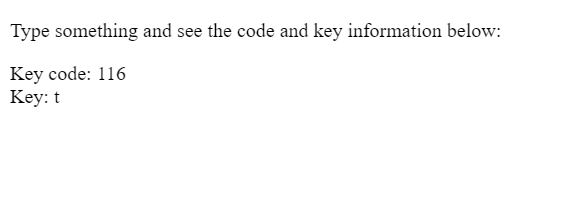
<p>Type something and see the code and key information below:</p>
<p id="output"></p>
<script>
const outputElement = document.getElementById('output');
document.addEventListener('keypress', function(event) {
outputElement.innerText = `Key code: ${event.keyCode}\nKey: ${event.key}`;
// Example objects for a few different keys
if (event.key === 'a') {
console.log(event);
} else if (event.key === 'Enter') {
console.log(event);
} else if (event.key === '/') {
console.log(event);
}
});
</script>
</body>
</html>
In this example, we use the keypress event to detect when the user presses any key. We then display the keyCode and key properties of the KeyboardEvent object in the output element.
Have a look at the output:
Also see examples of KeyboardEvent objects for three different keys: "a", "Enter", and "/". When any of these keys is pressed, we output the full KeyboardEvent object to the console using console.log(). The output will vary depending on the browser and operating system being used. Here's an example of what the output for the "a" key might look like:
KeyboardEvent {
  altKey: false,
  bubbles: true,
  cancelBubble: false,
  cancelable: true,
  charCode: 97,
  code: "KeyA",
  composed: true,
  ctrlKey: false,
  currentTarget: null,
  defaultPrevented: false,
  detail: 0,
  eventPhase: 0,
  isComposing: false,
  isTrusted: true,
  key: "a",
  keyCode: 97,
  location: 0,
  metaKey: false,
  path: [window],
  repeat: false,
  returnValue: true,
  shiftKey: false,
  sourceCapabilities: InputDeviceCapabilities {firesTouchEvents: false},
  target: window,
  timeStamp: 1645867287969,
  type: "keypress",
  view: Window {frames: Window, postMessage: ƒ, blur: ƒ, focus: ƒ, close: ƒ, …},
  which: 97
}
As you can see, the KeyboardEvent object contains a lot of information about the event, including whether certain modifier keys (such as altKey, ctrlKey, and shiftKey) were pressed, the code and name of the key (code and key properties), the character code (charCode), and more.
Note that the keyCode property is deprecated and has been replaced by the key property, which provides a more consistent and reliable way to determine which key was pressed, regardless of the keyboard layout or input method being used. In general, you should avoid using keyCode and instead use key or code whenever possible.
Keep in mind that different browsers and operating systems may handle keyboard events differently, and some keys may not produce a keypress event at all. For example, some browsers may not produce a keypress event for certain special keys like the arrow keys, function keys, or media keys. It's important to test your code on a variety of platforms and devices to ensure that it works as expected.
It is important to note that the keydown, keyup, and keypress events are different and can produce different results depending on the key being pressed. For example, some keys do not produce a keypress event, such as the arrow keys and the Enter key.
Now that we have explored the different ways of detecting key presses in JavaScript, let's look at some practical examples.
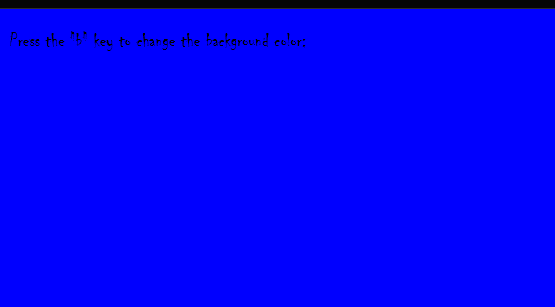
Example 1: Changing the Background Color
<!DOCTYPE html>
<html>
  <head>
    <title>Changing the Background Color</title>
  </head>
  <body>
    <p>Press the "b" key to change the background color:</p>
    <script>
      document.addEventListener('keydown', function(event) {
        if (event.key === 'b') {
          document.body.style.backgroundColor = 'blue';
        }
      });

      document.addEventListener('keyup', function(event) {
        if (event.key === 'b') {
          document.body.style.backgroundColor = '';
        }
      });
    </script>
  </body>
</html>
In this example, we use the keydown event to detect when the user presses the "b" key. When the "b" key is pressed, we change the background color of the body element to blue. We also use the keyup event to detect when the user releases the "b" key. When the "b" key is released, we change the background color of the body element back to its default value (which is an empty string).
Have a look at ouput:
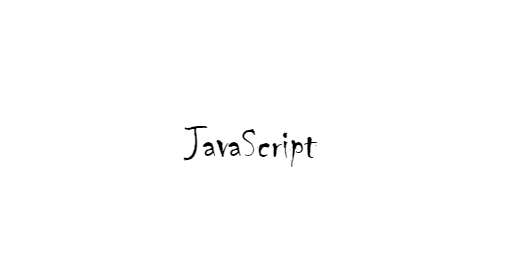
Example 2: Typing Game
In this example, we will create a typing game where the user has to type a specific word as fast as possible. We will use the keyup event to detect when the user has typed the word correctly.
<!DOCTYPE html>
<html>
  <head>
    <title>Typing Game</title>
    <style>
      #word {
        font-size: 36px;
        margin-top: 100px;
        text-align: center;
      }
    </style>
  </head>
  <body>
    <div id="word">JavaScript</div>
    <script>
      const word = document.getElementById('word');
      let currentWord = '';

      document.addEventListener('keydown', function(event) {
        currentWord += event.key;
        word.innerText = currentWord;
      });

      document.addEventListener('keyup', function(event) {
        if (currentWord === 'JavaScript') {
          alert('You typed the word correctly!');
        } else {
          currentWord = '';
          word.innerText = 'JavaScript';
        }
      });
    </script>
  </body>
</html>
In this code snippet, we have created an HTML file with a div element that contains the word 'JavaScript'. We have also added some CSS to style the div.
We have added event listeners for the keydown and keyup events. When a key is pressed down, we add the key to the currentWord variable and update the text of the word element. When a key is released, we check if the currentWord variable matches the word 'JavaScript'. If it does, we display an alert to the user indicating that they typed the word correctly. If it doesn't, we reset the currentWord variable and the text of the word element.
Here is the output:
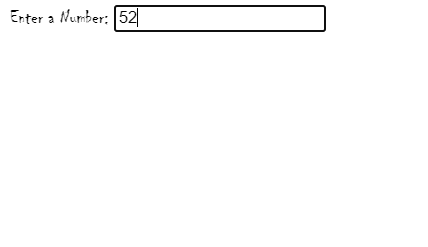
Example 3: Form Validation
In this example, we will use the keypress event to validate user input in a form. We will prevent the user from typing non-numeric characters in an input field.
<!DOCTYPE html>
<html>
  <head>
    <title>Form Validation</title>
  </head>
  <body>
    <form>
      <label for="number">Enter a Number:</label>
      <input type="text" id="number" name="number">
    </form>
    <script>
      const numberInput = document.getElementById('number');

      numberInput.addEventListener('keypress', function(event) {
        const charCode = event.charCode;
        if (charCode < 48 || charCode > 57) {
          event.preventDefault();
        }
      });
    </script>
  </body>
</html>
In this code snippet, we have created an HTML file with a form that contains an input field for a number. We have also added some JavaScript code to validate user input in the input field.
We have added an event listener for the keypress event on the numberInput element. When a key is pressed down, we get the character code of the key and check if it is a numeric character (i.e. between 48 and 57). If it is not a numeric character, we prevent the default action of the event (i.e. typing the non-numeric character).
Conclusion
Detecting key presses in JavaScript can be very useful for many applications, including games, text editors, and form input validation. In this article, we have explored the different ways of detecting key presses in JavaScript using the keydown, keyup, and keypress events. We have also provided practical examples of how to use key presses in different scenarios. With these examples and knowledge, you should now be able to detect key presses in JavaScript and use them in your own applications.