
Get this book -> Problems on Array: For Interviews and Competitive Programming
Hello everyone, Today we will explain to you about a very important and strong application in image processing and of course in Machine Learning which is "Single Image Super Resolution" So, let's focus as I will describe in this article, the original research paper called Photo-Realistic Single Image Super-Resolution Using a Generative Adversarial Network.
We have listed different model architectures, datasets and research papers for this application (Single Image Super Resolution).
Table Of Contents
1. What is Super Resolution.
2. Loss Functions.
3. Using VGG 19.
4. GAN Composition.
5. Datasets for super resolution.
6. Another model architectures.
7. Summary and Applications
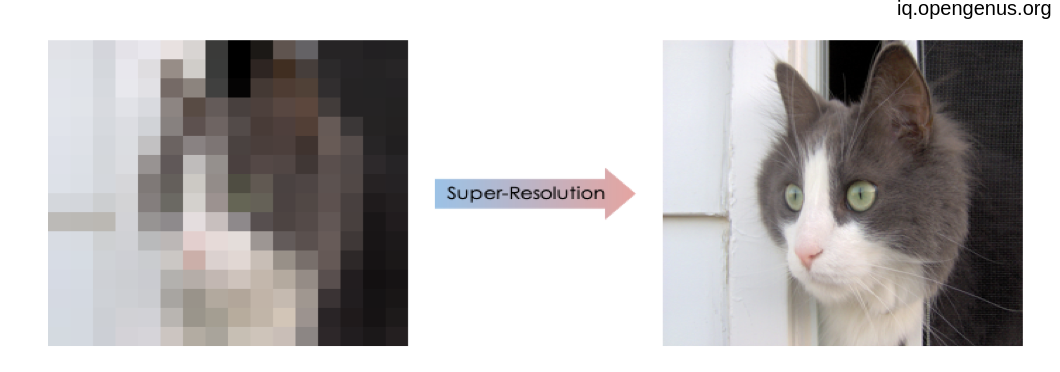
1. What is Super Resolution
First of all we want to recognize the concept of resolution and super resolution.
So, what happen if you have a 32 * 32 pixel image then you try to print it in paper with size of 128 * 128 pixel ? the image will stretch of course. and there are many algorithms that control this stretching like linear interpolation and copying the closest pixels called nearest neighbor upscaling also there is bilinear or bicubic upscaling algorithm but all of these algorithm leading to low-resolution image "with large pixels".
As we can't add information that is not already there, whatever we process the data "the image" according to data processing inequality
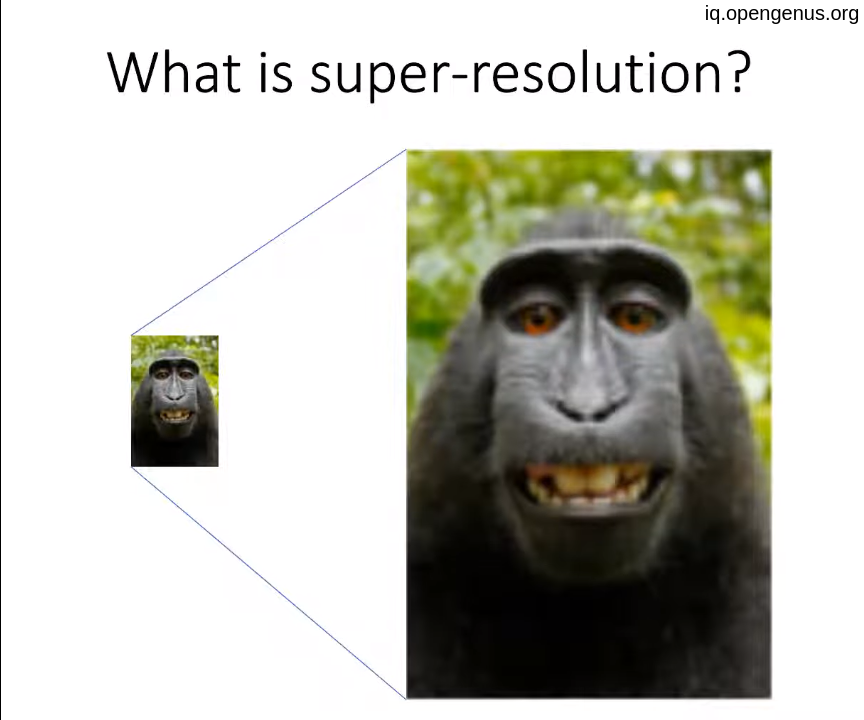
So, we will try to convert this low-resolution image to a high-resolution one as closest as possible to the real high-resolution image as it will definitely be not very accurate specially in the fine details Using Deep-Learning or specifically using GAN " Generative Adversarial Networks" that use Generator and Descriminator architecture.
The hole idea is that the generator will try to generate a fake image and the descriminator will assess it comparing to a high resolution one and telling the generator back that image look a fake high-resolution one try to improve it and this training process continues till the generator successes to build a high-resolution image that looks like the real one .
2. Loss Functions
But we have a challenging point, what is our loss function for our model.
Does the mean square error work ?
it is an old debate leading to the answer "NO", MSE not enough for express a human perception of an image. it is obvious in this paper called Mean Squared Error: Love It or Leave It? and its link :
https://ece.uwaterloo.ca/~z70wang/publications/SPM09.pdf.
AS we see in the paper that all of this distorted image are equally distant from the original one in term of MSE. As MSE only care about pixel-level not the whole content. .
.
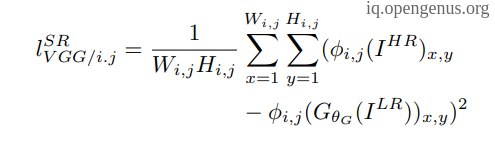
SO, we will the Perceptual loss function :
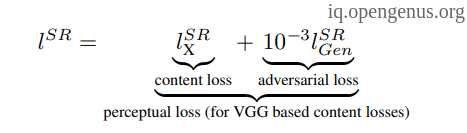
which is a weighed sum of :
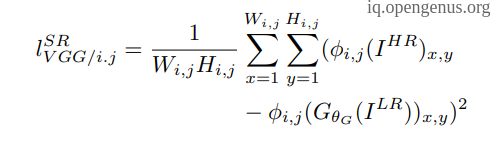
- Content loss which is the mean square error but on the feature-map level resulting from VGG-19 model.
- Adversarial or Generator loss which is a binary cross entropy between the output of the generator and the real image.
3. Using VGG 19.
As we said above that the MSE not the answer for loss function as it care about pixel-level So, we will use a pre-trained model like VGG-19 then use the MSE on the feature map level between genetated fake image and the real image :
from keras.applications import VGG19

def build_vgg(hr_shape):

    vgg = VGG19(weights="imagenet",include_top=False, input_shape=hr_shape)
    model = Model(inputs=vgg.inputs, outputs=vgg.layers[10].output)
    return model
we only use the first 10 layers of VGG model that pre-trained on "imagenet" dataset.
4. GAN Composition.
First we will see the generator architecture.
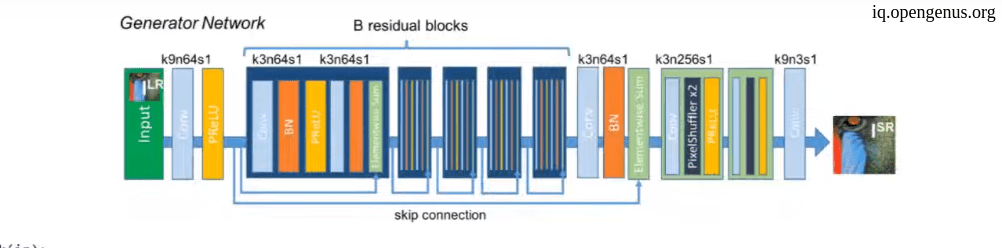
As we see it is consist of multiple residual blocks using skip connections. and here is the code for residual blocks :
def res_block(image):

    res_model = Conv2D(64, (3,3), padding = "same")(image)
    res_model = BatchNormalization()(res_model)
    res_model = PReLU(shared_axes = [1,2])(res_model)

    res_model = Conv2D(64, (3,3), padding = "same")(res_model)
    res_model = BatchNormalization()(res_model)
    addition = add([image,res_model])
    return addition
And for final upscaling process :
def upscale_block(image):

    up_model = Conv2D(256, (3,3), padding="same")(image)
    up_model = UpSampling2D( size = 2 )(up_model)
    up_model = PReLU(shared_axes=[1,2])(up_model)

    return up_model
So the final Generator :
def create_gen(gen_image, num_res_block):
    layers = Conv2D(64, (9,9), padding="same")(gen_image)
    layers = PReLU(shared_axes=[1,2])(layers)

    x = layers

    for i in range(num_res_block):
        layers = res_block(layers)

    layers = Conv2D(64, (3,3), padding="same")(layers)
    layers = BatchNormalization(momentum=0.8)(layers)
    layers = add([layers,x])

    layers = upscale_block(layers)
    layers = upscale_block(layers)

    output = Conv2D(3, (9,9), padding="same")(layers)
    model = Model(inputs=gen_image, outputs=output)
    return model
Don't forget our generator function is to generate a fake image and continuous training till the fake image be a high resolution image.
Second we will see the Descriminator architecture :

python code for Descriminator blocks :
def discriminator_block(image, filters, strides=1, bn=True):

    x = Conv2D(filters, (3,3), strides = strides, padding="same")(image)

    if bn:
        x = BatchNormalization( momentum=0.6 )(x)

    x = LeakyReLU( alpha=0.2 )(x)

    return x
So, this is the Descriminator :
def create_disc(disc_image):

    d_filters = 64

    d1 = discriminator_block(disc_image, d_filters, bn=False)
    d2 = discriminator_block(d1, d_filters, strides=2)
    d3 = discriminator_block(d2, d_filters*2)
    d4 = discriminator_block(d3, d_filters*2, strides=2)
    d5 = discriminator_block(d4, d_filters*4)
    d6 = discriminator_block(d5, d_filters*4, strides=2)
    d7 = discriminator_block(d6, d_filters*8)
    d8 = discriminator_block(d7, d_filters*8, strides=2)

    d9 = Flatten()(d8)
    d10 = Dense(df*16)(d8_5)
    d11 = LeakyReLU(alpha=0.2)(d9)
    output = Dense(1, activation='sigmoid')(d10)
    model = Model(disc_image, output)
    return model
then combining the two parts :
def create_comb(gen_model, disc_model, vgg, lr_image, hr_image):
    gen_img = gen_model(lr_image)

    gen_features = vgg(gen_img)

    disc_model.trainable = False
    disc_output = disc_model(gen_img)

    return Model(inputs=[lr_image, hr_image], outputs=[disc_output, gen_features])
then continue to the training process till a good losses then your model is ready for Super Resolution.
5. Datasets for super resolution.
There are many datasets that is prepared for super resolution applications like :
- UHDSR4K (https://github.com/HDCVLab/UHD4K_UHD8K)
- UHDSR8K (https://github.com/HDCVLab/UHD4K_UHD8K)
- Set5 (https://uofi.box.com/shared/static/kfahv87nfe8ax910l85dksyl2q212voc.zip)
- SET14 (https://uofi.box.com/shared/static/igsnfieh4lz68l926l8xbklwsnnk8we9.zip)
- Urban100 (https://uofi.box.com/shared/static/65upg43jjd0a4cwsiqgl6o6ixube6klm.zip)
- BSD500 (http://www.eecs.berkeley.edu/Research/Projects/CS/vision/grouping/BSR/BSR_bsds500.tgz)
- Real SR (https://drive.google.com/file/d/1Iqx3AbUlLjR_JglsQIq9y9BEcrNLcOCU/view)
- CelebA (http://mmlab.ie.cuhk.edu.hk/projects/CelebA.html)
- PIPAL
(https://arxiv.org/pdf/2007.12142.pdf )
6. Another model architectures.
the above model architecture is called SRGAN (Super Resolution Generative Adversarial Network)
but this not the only one of course there are many of the architectures that made a great gob in this application like :
- SRCNN (Super Resolution CNN) :
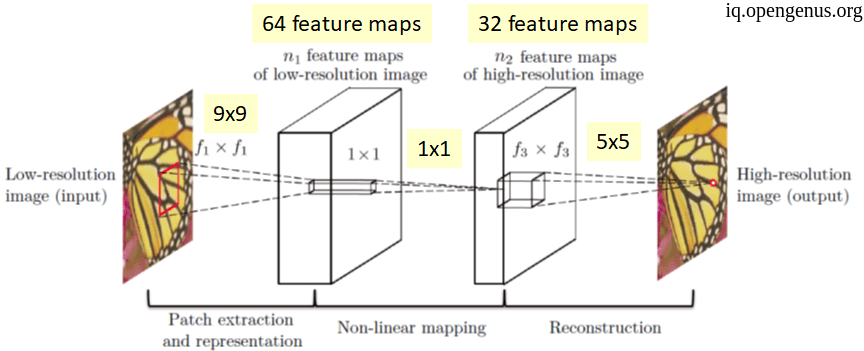
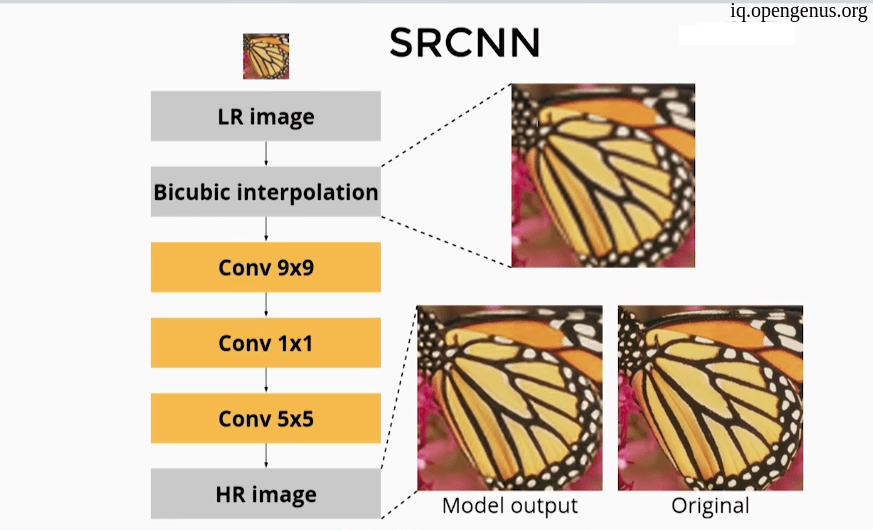
As you see SRCNN is to simple with no batch normalization or regularization although it made a good results but it was hard to train the model. - Residual networks :
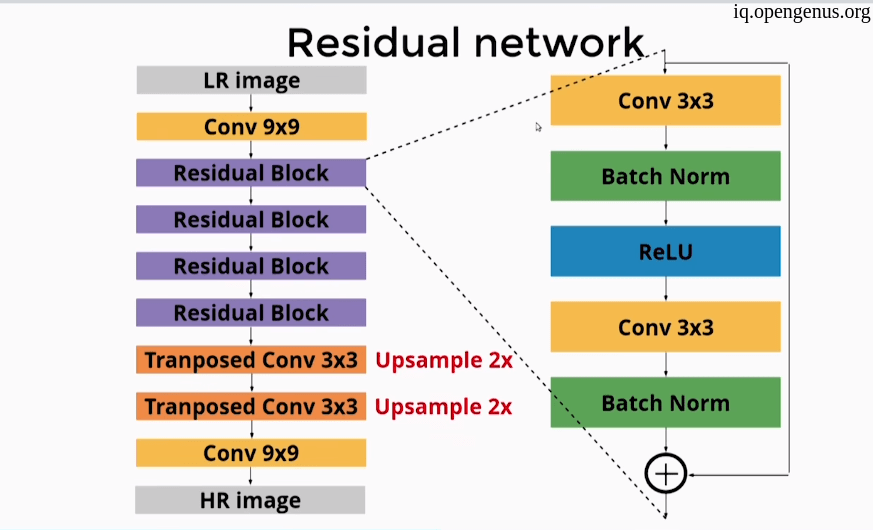
more complex architecture lead to more good results .
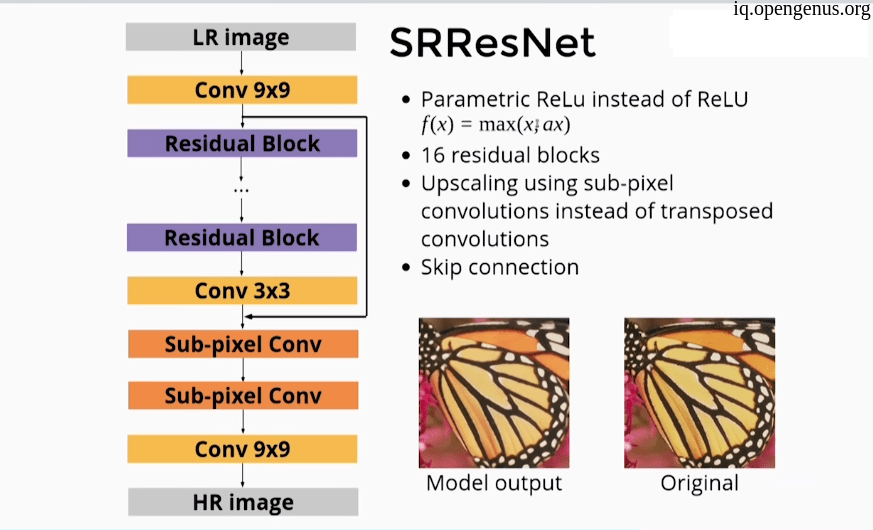
- SRResNet :
Using a more complex architecture like ResNet architecture and PRelu instead of Relu activation function.
Using Sub-pixel convolution instead of transposed convolution.
also using skip connections.
- ESRGAN: Enhanced Super-Resolution Generative Adversarial Networks:
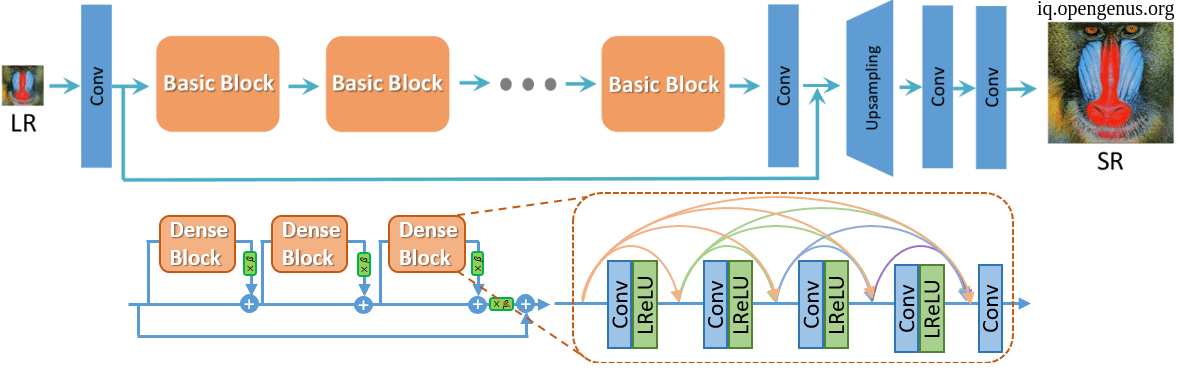
The main architecture of the ESRGAN is the same as the SRGAN with some modifications.- ESRGAN has Residual in Residual Dense Block(RRDB) which combines multi-level residual network and dense connection without Batch Normalization.
- Using Relativistic GAN instead of the standard one.

So, the using of more complex architecture with no batch normalization and also modifying the loss function leading to more accurate results.
5. Summary and Applications:
One of the most application of this tech "the field of video games" which we can now get a very good resolution from a low resolution ones.
And As we saw we can use Neural Networks like GANS and VGG to map a low resolution image to a very good high resolution one.
and there are some extra papers for deep diving :
- Image quality assessment: from error visibility to structural similarity (SSIM Paper)(https://ece.uwaterloo.ca/~z70wang/publications/ssim.pdf)
- Loss Functions for Image Restoration with Neural Networks (https://arxiv.org/pdf/1511.08861.pdf)
- Image Super-Resolution Using Deep Convolutional Networks (SRCNN Paper)(https://arxiv.org/pdf/1501.00092.pdf)
- ESRGAN: Enhanced Super-Resolution Generative Adversarial Networks
(https://arxiv.org/pdf/1809.00219.pdf) - AI Neural Networks being used to generate HQ textures for older games
- Zoom to Learn, Learn to Zoom
- Handheld Multi-Frame Super-Resolution
(https://arxiv.org/pdf/1905.03277.pdf)