
Get this book -> Problems on Array: For Interviews and Competitive Programming
![]()
The world of web developement is constantly changing as different JavaScript Frameworks and Tools provide different approaches to web development. But large number of websites on the internet are simple informative sites like marketing sites and blogs which don't require much complex structure.In such scenarios static websites generators like Gatsby, Hugo and Jekyll comes in the picture.
In this article, we are going to build a static website using Gatsby. Gatsby is React based, GraphQL powered static website generator.It combines best of React, GraphQL, and Webpack. The things that makes Gatsby special is its smooth development environment, increadible results and awsome development community.
So without wasting any time Let's dive right into it.
What is Gatsby
Quoting GatsbyJS,
Gatsby is a free and open source framework based on React that helps developers build blazing fast websites and apps.
Sounds fancy right! Well to simplify, Gatsby uses React for UI and GraphQL for data management.Gatsby with platform such as Netlify can be used to deploy your website everytime you commit on github.
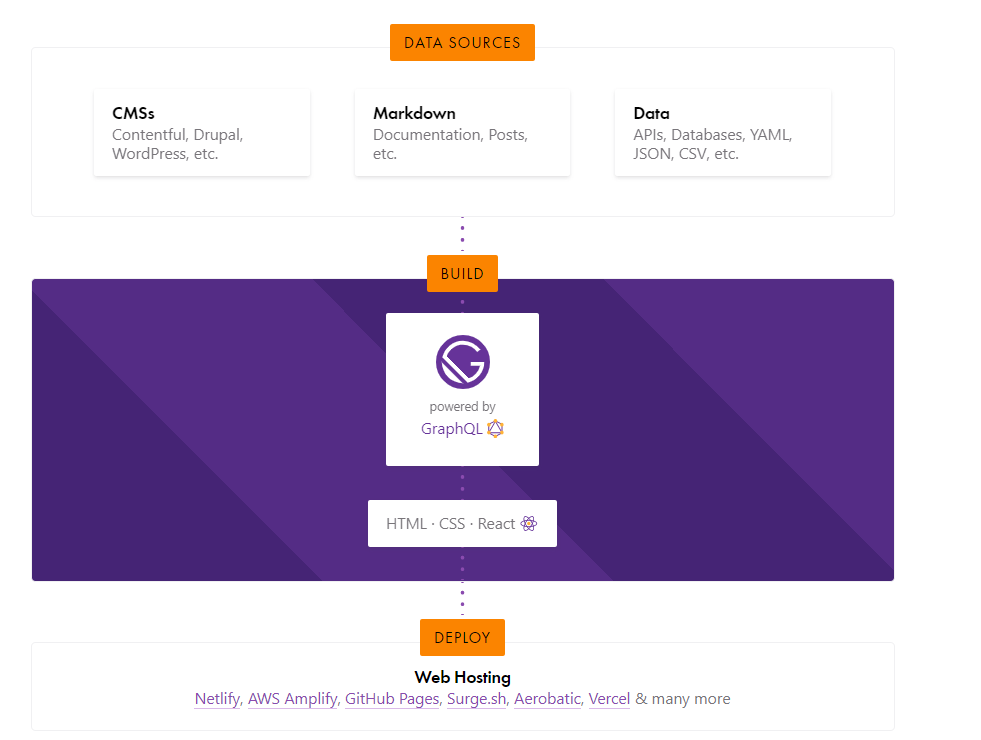
How Gatsby work?
Working of Gatsby is fairly simple, the content of your site is usually fetched from a markdown file, but you can use CMS such as Contenful or CSV or any API calls.Different UI components are build using React.And once your site is ready you can deploy your site using different services like Netlify and Github Pages.
Building a Static site with Gatsby
In this article, we are going build a simple static blogging site in which content will be rendered from markdown files. The key features that we will implement in our site ia as follows,
- React Components.
- GraphQL for query and staticquery
- Creating Slug for the Pages
- Deployment using Netlify.
(Note: As we are building a complete static website, this article is bit lengthy than usual so for convenience refer this repository from time to time.)
Now, follow below steps for building your website,
1. Installation and Environment Setup
Run following commands to install Gatsby and clone a hello world starter form github.
npm install -g gatsby-cli
gatsby new blogging-site https://github.com/gatsbyjs/gatsby-starter-hello-world
(Note: If you don't have node installed follow this link for installing node first.)
Install dependencies using following command,
npm install --save gatsby-source-filesystem gatsby-transformer-remark gatsby-plugin-typography typography react-typography typography-theme-kirkham gatsby-plugin-emotion @emotion/core
Now take this moment to go through the project folder and understand every component.
2. Create Markdown Files
In this project we are keeping the content of each blog in a seperate markdown file.So to add each blog create a title.md file in src/pages folder.Follow below structure for the markdown file
---
title: "The Fastest Man in the World"
date: "2019-05-21"
---

Usain Bolt is the fastest man in the world. 100 meters in 9.58 seconds and 200 meters in 19.19 seconds. Both world records. He has won nine gold medals in three different Olympics and is Jamaica’s most famous person since Bob Marley.
What’s the background of this great athlete? And what are the secrets of becoming the fastest man in the world? What can he teach us about improving performance?

<iframe width="560" height="315" src="https://www.youtube.com/embed/A-7pvdaZEkI" frameborder="0" allowfullscreen></iframe>
Create 4-5 such blogs in src\pages folder.
3.Create Layout and Footer Component
Layout component is the component which provide the basic skelaton to your web application.So to create layout component make a folder called components in the src directory and create layout.js file.Add Following code to layout file.
//Layout provides basic skelaton of the site
import React from "react"
import { css } from "@emotion/core"
import { useStaticQuery, Link, graphql } from "gatsby"

import { rhythm } from "../utils/typography"
import Footer from "./footer"
export default function Layout({ children }) {
  const data = useStaticQuery(
    graphql`
      query {
        site {
          siteMetadata {
            title
          }
        }
      }
    `
  )
  return (
    <div
      css={css`
        margin: 0 auto;
        max-width: 900px;
        padding: ${rhythm(2)};
        padding-top: ${rhythm(1.5)};

      `}
    >
      <Link to={`/`}>
        <h3
          css={css`
            margin-bottom: ${rhythm(2)};
            display: inline-block;
            font-style: normal;

          `}
        >
          {data.site.siteMetadata.title}
        </h3>
      </Link>
      <Link
        to={`/about/`}
        css={css`
          float: right;
        `}
      >
        About
      </Link>
      //Here children are the components of the page which uses layout.
      {children}
      <Footer/>
    </div>
  )
}
(Note: We have used static query in layout.js file as normal query can only be used by pages in Gatsby)
Similary create Footer component and add following code,
import React from 'react'
function Footer() {
return (
<footer >
<p>
<b>The Blogging Website © {new Date().getFullYear()} | Made with Gatsby</b></p>
</footer>
)
}
export default Footer
4. Update gatsby-config and gatsby-node file
In very gatsby project, there is gatsby-config.js file which keeps the configuration details of the project.Update the gatsby-config.js file in our project with the site metadata and exports as follows,
module.exports = {
  /* Your site config here */
  siteMetadata: {
    title: `The Blogging Site`,
  },
  plugins: [
    {
      resolve: `gatsby-source-filesystem`,
      options: {
        name: `src`,
        path: `${__dirname}/src/`,
      },
    },
    `gatsby-transformer-remark`,
    `gatsby-plugin-emotion`,
    {
      resolve: `gatsby-plugin-typography`,
      options: {
        pathToConfigModule: `src/utils/typography`,
      },
    },
  ],
}
We are creating a path/slug for each article on your site using the markdown file.So to do this we have to implement onCreateNode which creates the slug for each blog.
Create gatsby-node.js file in the root directory and add following code to it.
const path = require(`path`)
const { createFilePath } = require(`gatsby-source-filesystem`)

exports.onCreateNode = ({ node, getNode, actions }) => {
  const { createNodeField } = actions
  if (node.internal.type === `MarkdownRemark`) {
    const slug = createFilePath({ node, getNode, basePath: `pages` })
    createNodeField({
      node,
      name: `slug`,
      value: slug,
    })
  }
}

exports.createPages = async ({ graphql, actions }) => {
  const { createPage } = actions
  const result = await graphql(`
    query {
      allMarkdownRemark {
        edges {
          node {
            fields {
              slug
            }
          }
        }
      }
    }
  `)

  result.data.allMarkdownRemark.edges.forEach(({ node }) => {
    createPage({
      path: node.fields.slug,
      component: path.resolve(`./src/templates/blog-post.js`),
      context: {
        // Data passed to context is available
        // in page queries as GraphQL variables.
        slug: node.fields.slug,
      },
    })
  })
}
5. Add Typography Utility File
In our project we are using theme kirkham typography.So to use this typography create a folder called utils in the src directory and add typography.js file in it.
Use following code to update typography.js file.
import Typography from "typography"
import kirkhamTheme from "typography-theme-kirkham"

const typography = new Typography(kirkhamTheme)

export default typography
export const rhythm = typography.rhythm
6. Update index.js and Add about.js
Index file is the starting point of our site. In this file we query all the data from the markdown files.
Refer following code and update index.js in src/pages file.
import React from "react"
import { css } from "@emotion/core"
import { Link, graphql } from "gatsby"
import { rhythm } from "../utils/typography"
import Layout from "../components/layout"

export default function Home({ data }) {
  return (
    <Layout>
      <div>
        <h1
          css={css`
            display: inline-block;
            border-bottom: 1px solid;
          `}
        >
         Articles
        </h1>
        <h4>{data.allMarkdownRemark.totalCount} Posts</h4>
        {data.allMarkdownRemark.edges.map(({ node }) => (
          <div key={node.id}>
            <Link
              to={node.fields.slug}
              css={css`
                text-decoration: none;
                color: inherit;
              `}
            >
              <h3
                css={css`
                  margin-bottom: ${rhythm(1 / 4)};
                `}
              >
                {node.frontmatter.title}{" "}
                <span
                  css={css`
                    color: #555;
                  `}
                >
                  — {node.frontmatter.date}
                </span>
              </h3>
              <p>{node.excerpt}</p>
            </Link>
          </div>
        ))}
      </div>
    </Layout>
  )
}

export const query = graphql`
  query {
    allMarkdownRemark(sort: { fields: [frontmatter___date], order: DESC }) {
      totalCount
      edges {
        node {
          id
          frontmatter {
            title
            date(formatString: "DD MMMM, YYYY")
          }
          fields {
            slug
          }
          excerpt
        }
      }
    }
  }
`
Create about.js file in the src/pages folder and add following code.
import React from "react"
import { graphql } from "gatsby"
import Layout from "../components/layout"

export default function About({ data }) {
  return (
    <Layout>
      <h1>About {data.site.siteMetadata.title}</h1>
      <p>
        This is about section of the blogging website.
      </p>
    </Layout>
  )
}

export const query = graphql`
  query {
    site {
      siteMetadata {
        title
      }
    }
  }
`
7. Create Blog Post Template
For showing data from markdown files we need some common structure which will be provided by the blog-post.js template. So add blog-post.js file in src/template directory and update with following code.
import React from "react"
import { graphql } from "gatsby"
import Layout from "../components/layout"

export default function BlogPost({ data }) {
  const post = data.markdownRemark
  return (
    <Layout>
      <div>
        <h1>{post.frontmatter.title}</h1>
        <div dangerouslySetInnerHTML={{ __html: post.html }} />
      </div>
    </Layout>
  )
}

export const query = graphql`
  query($slug: String!) {
    markdownRemark(fields: { slug: { eq: $slug } }) {
      html
      frontmatter {
        title
      }
    }
  }
`
8. Run the Project
Now your site ready, run following command and check the site at http://localhost:8000/
gatsby develop
9. Deploying your gatsby-site on Netlify
Follow below steps to deploy your site on netlify.
1.Push your project to a Github Repository.
2.Log in to https://app.netlify.com/
3.Go to 'New site from Github'
4.Authorize with Github and give the project repository
5.Make sure build command is gatsby build
6.Hit Deploy
7.Your Site will be running.
Check out your site using link provided by Netlify.It should look like this
In this way with this article at OpenGenus, you have created a static blogging website using Gatsby. I hope this article helped you understanding how static website is created using Gatsby.