
Reading time: 25 minutes | Coding time: 15 minutes
In this article we will be exploring one of the ways to build a Convolution Neural Network from scratch in python. For that we will be using Keras API with TensorFlow backend. We will be working on the handwritten digits dataset from Kaggle (https://www.kaggle.com/c/digit-recognizer). We will be using the training and testing datasets separately as given.
First import the basic relavant libraries for computation such as:
- numpy is used primarily for mathematical calculations, but more so here because the neural networks take in only numpy arrays as inputs
- Matplotlib for making graphs
- Pandas for help in manipulating datasets

Load dataset
Then we load the datasets using pandas.
import numpy as np
import matplotlib.pyplot as plt
import pandas as pd
training_set = pd.read_csv('train.csv')
test_set = pd.read_csv('test.csv')
Since the training and testing sets are pandas dataframes, we need to convert them to numpy arrays. We can do that by simply writing .values after the command.
x_train = training_set.iloc[:, 1:].values
y_train = training_set.iloc[:, 0:1].values
x_test = test_set.iloc[:, :].values
Here, x_train refers to the input of the training set and y_train refers to the output or the ground truths of the training set. Since we do not have the ground truths for the test set as that is what we need to find out, we only have the input for the test set i.e. x_test.
Now, our datasets have each pixel of the picture of the handwritten digits as an entry of a row, i.e. 784 pixel values, we need to convert it into 28 * 28 2D numpy arrays.
x_train = x_train.reshape(-1, 28, 28, 1)
x_test = x_test.reshape(-1, 28, 28, 1)
x_train = x_train/255.
x_test = x_test/255.
Now, let us encode our ground truths, i.e. converting the labels into a form that is easier to work with. Hence we will convert 2 into [0, 0, 1, 0, 0, 0, 0, 0, 0, 0]. In other words, 2 will be switched on and all the other digits from 0 to 9 will be switched off.
from keras.utils import np_utils
y_train = np_utils.to_categorical(y_train, num_classes = 10)
With all of our data preprocessed, we are ready to build the convolutional neural network. The CNN will be trained on the training set, i.e. take x_train as the input and compare the output with y_train. Then we will predict the output for x_test.
So first we import the necessary libraries.
from keras.models import Sequential
from keras.layers import Dense, Dropout, Conv2D, MaxPool2D, Flatten
Notice that Keras already has the templates for the layers that we will need in a CNN including convolutional layer, Conv2D, Max Pooling layer, MaxPool2D, and the flattening layer, Flatten.
We will build the CNN using the Sequential model which will focus on one layer at a time and work its way sequentially.
classifier = Sequential()classifier.add(Conv2D(32, (5, 5), padding = 'Same', input_shape = (28, 28, 1), activation = 'relu'))
classifier.add(MaxPool2D(pool_size = (2, 2)))
classifier.add(Dropout(0.25))classifier.add(Conv2D(64, (3, 3),padding = 'Same', activation = 'relu'))
classifier.add(Conv2D(64, (3, 3),padding = 'Same', activation = 'relu'))
classifier.add(MaxPool2D(pool_size = (2, 2), strides = (2, 2)))
classifier.add(Dropout(0.25))classifier.add(Flatten())
classifier.add(Dense(units = 256, activation = 'relu'))
classifier.add(Dropout(0.5))classifier.add(Dense(units = 10, activation = 'sigmoid'))
So here we first initialise the classifier as a Sequential classifier and then add the convolutional and max pooling layers. We can further add more convolutional layers to increase accuracy depending on the output.
After max pooling, we flatten the processed input and enter it into an ANN with only one hidden layer.
classifier.compile(optimizer = 'rmsprop', loss = 'categorical_crossentropy', metrics = ['accuracy'])
Here we compile our CNN and set the opimiser as rmsprop. We can set other optimisers like adam and adadelta depending on the output.
from keras.preprocessing.image import ImageDataGenerator

datagen = ImageDataGenerator(

featurewise_center=False,

samplewise_center=False,

featurewise_std_normalization=False,

samplewise_std_normalization=False,

zca_whitening=False,

rotation_range=10,

zoom_range = 0.1,

width_shift_range=0.1,

height_shift_range=0.1,

horizontal_flip=False,

vertical_flip=False)

datagen.fit(x_train)
Here, I've increased the dataset by distorting some pictures, like rotating the images by 10 degress, zooming by 1% etc. Doing so, our model will learn better.
Now we move on to train our model.
track = classifier.fit_generator(datagen.flow(x_train,y_train, batch_size= 128),
                              epochs = 30, steps_per_epoch=x_train.shape[0]//128)
After our model has trained itself for the number of epochs that we specified, we can plot the model loss as well as accuracy. Theoretically, our model loss should decrease and the model accuracy should increase with increase in epochs. We will plot these by using matplotlib.
plt.subplot(2, 1, 1) plt.plot(track.history['loss']) plt.title("Model Loss")plt.subplot(2, 1, 2)
plt.plot(track.history['acc'])
plt.title("Model Accuracy")
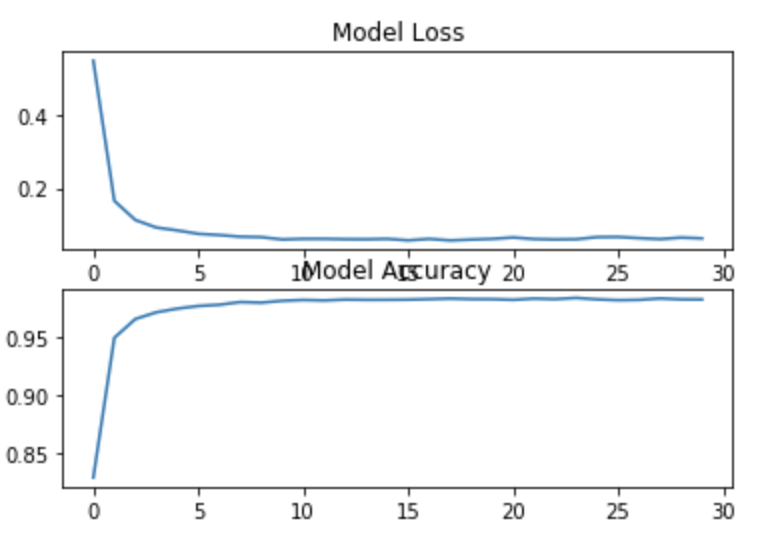
Thus, indeed our model loss has decreased and model accuracy has increased substantially. We can predict fairly accurately now.
predict = classifier.predict(x_test)
predict = np.argmax(predict, axis = 1)
Thus, now the digit that had the maximum probability is stored in predict.If we print predict we get array([2, 0, 9, ..., 3, 9, 2]). So clearly we see that we predicted 2, 0 and 9 as the first 3 digits. Let us check this by plotting the x_test values.
n = 3
plt.figure(figsize = (20, 8))
for i in range(n):
    ax = plt.subplot(1, n, i+1)
    plt.imshow(x_test[i].reshape(28, 28))
plt.show()
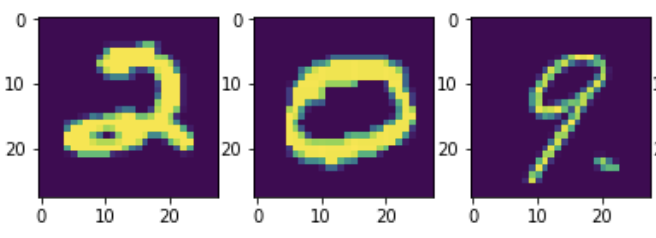
So indeed we predicted the first 3 digits correctly. We can individually check for each row like this.