
In this article, we are going to code a base for a server with a frontend using react, a backend using express, sequelize and PostgreSQL, and make an API to consume.
This guide won’t be so clear if you are starting to learn how to use some of the tools I listed, so if you want more details on why and what we are using, I would recommend you to learn more in depth first.
Why use these technologies
React
You might be asking why use React? React boosts your productivity because of the reusability of the components, it makes your browser load the DOM faster because of the usage of the virtual DOM and the framework is used in multiple platforms.
Sequelize
Sequelize is an ORM that facilitates your life when creating tables, making relations between the tables and validating the data that are going to migrate.
PostgreSQL
The database is ACID compliant, it is known for its performance, scalability and stability
Front-end: Using react components and consuming the API
If you want a simple page that won’t have new features or changes on the website, you can consume the API just with HTML, CSS and a little of JavaScript. However, this base server will have React for easy maintenance and the fact that react uses a virtual DOM will make the act of consuming an API faster.
Let’s install the 2 packages we will need:
npm i react react-dom
After that, we will make a simple structure:
mkdir src
cd src
mkdir components
echo> index.js
cd components
echo> app.jsx
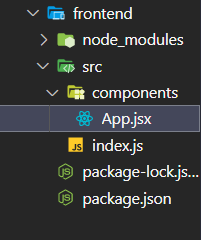
The structure will be like this:
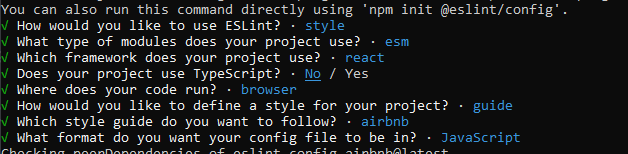
You can also add ESLint on the project, so it can analyze your code and identify some problems, this is the way I configure it for the frontend:
On the index.js file we are going to render the App.jsx file, the code will be:
import React from 'react';
import ReactDOM from 'react-dom';
import App from './components/App.jsx';

ReactDOM.render(<App />, document.getElementById('root'));
The App.jsx will return all the components that you will put inside the function, in this guide we won’t return anything because we are creating a base for you to use on whatever you want. Take a look at the code:
import React from 'react';

function App() {
  return (
    <div>
      {/* Components you want to add */}
    </div>
  );
}

export default App;
There are two options for you to consume the API on the components, Axios or Fetch. Both of them are great, so it’s a personal preference choice.
If you are going to use axios, I would recommend you to create a file (like the snippet) and import it on the components that are going to consume the API.
import axios from 'axios';

export default axios.create({
  baseURL: '<http://localhost:3001>',
});
Backend: express server, ORM equalize, database PostgreSQL
First, let’s install all the dependencies we’re going to use on the backend file:
npm init
npm i express dotenv sequelize
npm i -D nodemon sucrase sequelize-cli
npx eslint --init
the ESLint file will be configured this way:

Now let’s make the structure of the backend/API:
mkdir src
echo> nodemon.json
cd src
mkdir config
mkdir database
mkdir models
mkdir routes
echo> server.js
cd config
echo> index.js
cd ..
cd database
echo> sequelizeconfig.js
cd ..
cd models
echo> index.js
echo> model.js
cd ..
cd routes
echo> routes.js
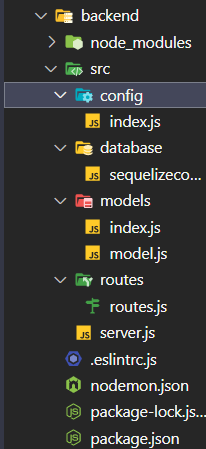
Let's see how the structure is:
On nodemon.json file we will write:
{
"execMap":{
"js": "node -r sucrase/register"
}
}
Once we create this script every time nodemon executes a js file, it will be compiled by sucrase before you run the code.
And on package.json at the scripts section, write:
"dev": "nodemon src/server.js"
Every time you execute npm run dev the backend and the API will start to run, so the API will be consumable
Let’s start coding!
Server
Now let’s go to the server.js file, to configure and code the server with express.
Don’t worry about the imports, we’re going to write code in every file we created.
const express = require('express');
const routes = require('./routes/routes');
const { sequelize } = require('./models/index');

const app = express();
sequelize.sync().then(() => {
  console.log('Connection succeeded');
});

app.use(express.urlencoded({ extended: true }));
app.use(express.json());
app.use(routes);

app.listen(3000);
Router
The routes file have the requests too, ideally you can make a controller folder, add the requests there and import the controller inside the routes, but in this example we will make it on the routes file for simplicity.
const { Router } = require('express');
const { model } = require('../models');

const router = new Router();

router.get('/', async (req, res) => {
  const info = await model.findAll();
  res.json(info);
});

router.post('/', async (req, res) => {
  const { name, email } = req.body;
  await model.create({ name, email });
  res.send('post ocurred');
});

module.exports = router;
Model
Let’s go to the model.js file inside the models folder, in this example the model information is pretty basic, but of course you can adapt to your own use.
const Example = (sequelize, DataTypes) => {
  const Exemple = sequelize.define('ExampleModel', {
    name: {
      type: DataTypes.STRING,
    },
    email: {
      type: DataTypes.STRING,
    },
  }, {
    tablename: 'Example',
  });

  return Example;
};

module.exports = Example;
Now to the index.js inside the models folder.
const Sequelize = require('sequelize');
const sequelize = require('../config/index');
const ExampleModel = require('./model');

const model = ExampleModel(sequelize, Sequelize.DataTypes);

const db = {
  model,
  sequelize,
};

module.exports = db;
Database
Let’s go to the database section, at the seuqelizeconfig.js file write:
const Sequelize = require('sequelize');
const ConfigDatabase = require('../config');

const sequelize = new Sequelize(ConfigDatabase);

module.exports = sequelize;
Config
Last but not least, let’s go to the config folder at the index file, so we can configure the database the way we want.
const Sequelize = require('sequelize');
require('dotenv').config();

const sequelize = new Sequelize({
  dialect: 'postgres',
  host: 'localhost',
  database: 'example',
  username: 'postgres',
  password: process.env.PASSWORD,
  port: 5432,
  logging: true,
});

module.exports = sequelize;
The this process.env.PASSWORD is going to process your password on a .env file, it’s important to configure the env file and do not commit it in any GitHub repository.
Possible changes
Remember this is only a base for you start coding as fast as possible, that means you can make your changes and adapt the backend or frontend tools, if you think MongoDB is better for your case make some adapts on the files. The structure of the files are in MVC pattern, so you can understand better.
With this article at OpenGenus, you must have the complete idea of how to build a Server with react, node, express, sequelize and PostgreSQL.