
Unit Testing is the process of testing the specified block of code to check whether everything is perfectly fine as per developed. It basically run over the specified block and check the output for the given input. It is useful for developers for checking the individual section of code and to identify and fix the errors. The tests are usually run on the frontend of the browser. These tests are contained in a collection which consists of several tests which are designed to be executed for a block or module.
We have explored Unit testing in JavaScript in depth and demonstrated it by developing a simple application to perform arithmetic operations like addition, subtraction and multiplication along with Unit testing.
Problems Developers face while Testing
Beside the advantages of unit testing, developers also face some challenges while performing the tests. Some of them are as follows -
- JavaScript cannot support Unit test in browser in a stable as well as in runtime environment.
- Some block that has to be tested may contain multiple dependencies
- Some can face difficulties with the rendering of the page and the DOM manipulation.
- Sometimes, some of the system actions responding to the javascript is not understandable.
Solutions to the above given problems are -
- Avoid using Global variable as much as possible.
- Avoid manipulating pre-defined objects.
- Try to create code with lesser number of dependencies.
- Always create small pieces of code that has to be tested.
Unit Testing Frameworks
There are several frameworks for JavaScript Unit Testing. They are listed below -
- Unit.Js
- QUnit
- Jasmine
- Karma
- Mocha
- Jest
- AVA
Here, in this article, we will use Mocha for Unit Testing since I found it more simpler than other frameworks. You are free to use the framework of our own. All of them does the same.
Before starting, lets learn about Mocha.
Mocha
We can run Mocha on Node.js or in the browser. It makes use of Asynchronous Testing. It provides accuracy for identifying the bugs since the tests are run in a serial manner. Furthur, it also provides the support for additional features such as APIs, etc.
Here, in this article, we are also using "assert" module to check the correctness of the block of code. Lets have a brief introduction of "assert" module.
Assert Module
This module provided the set of functions that are used to validate the block or section of the code. It provides the way of testing the blocks of code. If the expresseion returns 0 or false, then the assertion is said to be a failure and the program is terminated. We can install it with the following command ->
npm install assert@latest --save
It will install the latest version of assert module.
After installing it, require the module in the file by ->
const assert = require('assert);
Goal of the Application that we are going to develop.
- The application will perform the basic mathematical operations (add, multiply, substract, divide).
- This application will also provide users with the CLI which will be helpful for the users to clearly understand our application.
So, Lets Start Developing the Application.
Initial Steps
Firstly, always initialize your application with a package.json file before starting. So lets initialize ->
npm init
You will be asked to enter the package name, description, and other details. Either fill the details or just press enter. It will provide the default names by just pressing Enter. But, when it will ask for the "test command" type "mocha" in the field, since, it is the framework we are using.
Next, we will install the dependencies that we will be using in this application. So, first install "mocha" ->
npm install mocha --save-dev
After installing it, second we will install assert module ->
npm install assert --save
After installing, our package.json file will look like this ->
{
  "name": "UnitTesting",
  "version": "1.0.0",
  "description": "",
  "main": "index.js",
  "scripts": {
    "test": "mocha"
  },
  "author": "Pranjal Srivastava",
  "license": "ISC",
  "devDependencies": {
    "mocha": "^7.1.2"
  },
  "dependencies": {
    "assert": "^2.0.0"
  }
}
So, let define the structure of our directory ->
- node_modules (directory)
- package.json
- package-lock.json
- opr.js
- test.js
- cli.js
Note - Our main file will always be named "test.js".
Lets begin the actual development of our application.
Concatenation of the Strings
In our "test.js" file, write the following code ->
const assert = require('assert');
Now, open the "opr.js" file. In this file, we will define the function that will be used in the main "test.js". Lets start with the basic add operation. So, define the add function in "opr.js" file and export the function to be used in the other files.
const add = (a, b) => +a + +b

module.exports = { add }
Now, in "test.js" file ->
const assert = require('assert');
const opr = require('./opr.js')

it('Adding of 1 and 3', () => {
    assert.equal(opr.add(1, 3), 4)
  })
Here, "it()" function is defined by the jasmine framework. It is a testing framework. It is named so because of easily readable property. The second argument will be a callback function which will be executed to run the assert function.
Here, "assert.equal()" is used to test for whether the first given parameter is equal to the second given parameter. In our case, it is checking whether addition of 1 and 3 is equal to 4 or not. For executing the file, run the following command ->
npm test
After the executing the above given code, the output will be ->
> mocha

  ✓ Adding of 1 and 3

  1 passing (6ms)
In our case, the result evaluated to true since addition of 1 and 3 gives 4.
Therefore, we have our sample functions ready and it passed the test. Therefore, we can furthur expand our applications and testing functions. Therefore, in our "test.js" file, write the following code ->
const assert = require('assert');
const opr = require('./opr.js')

it('Addition of 1 and 3', () => {
  assert.equal(opr.add(1, 3), 4)
})

it('Substraction of 33 and 3', () => {
  assert.equal(opr.subtract(33, 3), 30)
})

it('Multiplication of 12 and 12', () => {
  assert.equal(opr.multiply(12, 12), 144)
})

it('Division of 10 and 2', () => {
  assert.equal(opr.divide(10, 2), 5)
})
So, lets define the function for substraction, multiplication, and division also. In "opr.js" file ->
const add = (a, b) => +a + +b,
      subtract = (a, b) => +a - +b,
      multiply = (a, b) => +a * +b,
      divide = (a, b) => +a / +b

module.exports = { add, subtract, multiply, divide }
After running "npm test" command, the output will be ->
> mocha

  ✓ Addition of 1 and 3
  ✓ Substraction of 33 and 3
  ✓ Multiplication of 12 and 12
  ✓ Division of 10 and 2

  4 passing (5ms)
Now, the first part of our application is finished. Lets come to the second part which is creating the CLI (Command Line Interface) which will be useful for the users to clearly understand our application.
Creating of CLI
To make a Command Line Interface, we will perform the development in "cli.js".
Firstly, we will import the functions of our "opr.js" file. So ->
const opr = require('opr');
Here, Our CLI will include "ReadLine" module for taking the input for the values from the user.
Therefore ->
npm install readline --save
And then,
const readline = require('readline');
Now, moving forward towards creating the CLI ->
const cli = readline.createInterface({
  input: process.stdin,
  output: process.stdout,
})
Here, we are using "cli" variable for creating the interface. The function ".createInterface()" comes pre-installed with the "readline" module. It takes two streams as arguments and created a readline interface. It is generally used with "process.stdin" and "process.stdout" for taking the user inputs.
So, now, lets write the welcome message for the user using out CLI.
console.log(`
    Welcome to our Command Line Interface implemented with Node.Js
    For the user's convenience, it will prompt for two numbers,
    and ask the users to enter the numbers of their choice
    `)
Now, lets begin with the development of functionality of our CLI.
... //the above previous written code

cli.question('First number: ', a => {
  cli.question('Second number: ', b => {
    cli.question(
      `
    Please select numbers for performing the following operations:
    1. Addition
    2. Subtraction
    3. Multiplication
    4. Division
    Enter your choice: `, (choice) => {
          switch (choice) {
            case '1':
              console.log(`Addition of ${a} and ${b} is ${opr.add(a, b)}.`)
              break;
            case '2':
              console.log(`Subtraction of ${a} and ${b} is ${opr.subtract(a, b)}.`)
              break;
            case '3':
              console.log(`Multiplication of ${a} and ${b} is ${opr.multiply(a, b)}.`)
              break;
            case '4':
              console.log(`Division of ${a} and ${b} is ${opr.divide(a, b)}.`)
              break;
            default:
              console.log('Please select a number between 1 and 4.')
              break;
          }

        cli.close()
      }
    )
  })
})
Here, we are using ".question()" function. This function is also pre-installed with "readline" module. It asks the question from the user provided by the developer as the first parameter and waits for the input then executes the callback function that is provided as the second argument.
Here, we used "cli.close()" method for exiting the "readline" module.
The switch statement defines the functionality of our CLI. If user wants to add two numbers, he/she will hit 1. If the user wants to Subtract, he/she will hit 2. If the user wants to multiply two numbers, he/she will hit 3. And, if he/she wants to divide, then 4 will be pressed. If any numbers not in range of 1 to 4 is given as input, then our CLI will restart and again ask for input between 1 and 4. Therefor, our CLI is completed.
The Whole Final code for it is as follows ->
const opr = require('./opr.js')
const readline = require('readline')

const cli = readline.createInterface({
  input: process.stdin,
  output: process.stdout,
})

console.log(`
    Welcome to our Command Line Interface implemented with Node.Js
    For the user's convenience, it will prompt for two numbers,
    and ask the users to enter the numbers of their choice
    `)

cli.question('First number: ', a => {
  cli.question('Second number: ', b => {
    cli.question(
      `
    Please select numbers for performing the following operations:
    1. Addition
    2. Subtraction
    3. Multiplication
    4. Division
    Enter your choice: `, (choice) => {
          switch (choice) {
            case '1':
              console.log(`Addition of ${a} and ${b} is ${opr.add(a, b)}.`)
              break;
            case '2':
              console.log(`Subtraction of ${a} and ${b} is ${opr.subtract(a, b)}.`)
              break;
            case '3':
              console.log(`Multiplication of ${a} and ${b} is ${opr.multiply(a, b)}.`)
              break;
            case '4':
              console.log(`Division of ${a} and ${b} is ${opr.divide(a, b)}.`)
              break;
            default:
              console.log('Please select a number between 1 and 4.')
              break;
          }

        rl.close()
      }
    )
  })
})
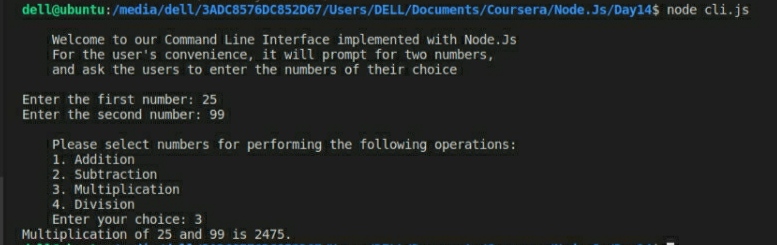
Now, lets look at the output ->
Hence, with this article at OpenGenus, you must have the complete idea of Unit Testing in JavaScript and applying it in a sample application. Enjoy.