
Reading time: 35 minutes | Coding time: 15 minutes
In this post, we will look at one of the most notable projects in Deep Learning, that is Image Captioning. We will look at how it works along with implementation in Python using Keras.
What is Image Captioning?
Image Captioning refers to the process of generating a textual description from a given image based on the objects and actions in the image.
Image captioning was one of the most challenging tasks in the domain of Artificial Intelligence (A.I) before Karpathy et al. proposed a state of the art technique for generating captions automatically for a given image. Link- cs.stanford.edu/people/karpathy/deepimagesent/
By the end of this post, we will be able to develop a deep learning-based model which can generate captions for a given image.

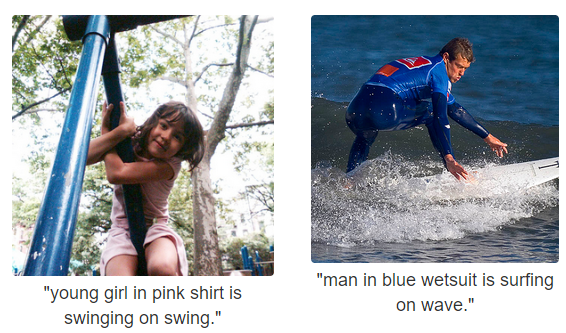
Image source- https://cs.stanford.edu/people/karpathy/deepimagesent/
Working of Image Captioning
The core idea behind image captioning is to combine and utilize the concepts of Computer Vision and Natural Language Processing. This task of image captioning is composed of two logical models which are namely an Image-based model and a Language-based model. The former is responsible for extracting the features out of a given image while the latter translates the features and objects provided by the image-based model to a natural sentence.
The Convolutional Neural Network (CNN) does the image processing and feature extraction related work while on the other hand Recurrent Neural Network (RNN) subsequently generates the required textual description (captions) using the features learned by CNN. This overall model/architecture is commonly termed as Encoder-Decoder model.
Here, Encoder is the Image-based model (CNN) while the Decoder is the Language-based model (RNN).
In a nutshell, an Encoder-Decoder model maps a fixed-length input with a fixed-length output and also the length of input and output may/may not differ. One popular application of this model is in machine translation. Consider the following example where we translate a sentence written in English to Chinese: “What are you doing today?” to Chinese (今天你在做什麼?). The input has five words, while the output has seven symbols.
In general, the last layer of the CNN model is a Dense/Fully connected layer, which has a number of neurons equal to the number of possible target classes. This layer has softmax activation function for a multi-class classification problem, where a probability assigned to each of the class and the class with maximum probability value becomes the predicted class. We are not interested in image classification and only require the rich encoding of the image (learned features) from CNN. These learned features are then passed into the decoder (language generation RNN) for producing the required captions.
Instead of training a CNN from scratch, we will use the Transfer-Learning technique since it gives quite impressive results. For more details on Transfer-learning refer to this- iq.opengenus.org/image-recognition-using-transfer-learning/
A pre-trained CNN model extracts the features from the image (by dropping the last layer- Fully connected/Dense layer). Then the feature vector is linearly transformed to have the same dimension as the input dimension of the LSTM(RNN) network. This network is trained as a language model on the feature vector.
So, for training a model that is capable of performing image captioning, we require a dataset that has a large number of images along with corresponding caption(s).
Dataset
To build a model, that generates correct captions we require a dataset of images with caption(s). Some of the such famous datasets are Flickr8k, Flickr30k and MS COCO (180k). These datasets contain 8,000, 30,000 and 180,000 images respectively. For this post, I will be using the Flickr8k dataset due to limited computing resources and less training time. Each image in this dataset is provided with five captions by different people since there exists a possibility to describe the same image in different ways. Having different captions also allows the model to generalize better.
Dataset link (fill the form and a link is mailed to you for downloading the dataset)- https://forms.illinois.edu/sec/1713398
Alternatively, you can download the dataset from here since the official site seems to have been taken down.
Images- https://github.com/jbrownlee/Datasets/releases/download/Flickr8k/Flickr8k_Dataset.zip
Captions- < href="https://github.com/jbrownlee/Datasets/releases/download/Flickr8k/Flickr8k_text.zip" style="color:blue">https://github.com/jbrownlee/Datasets/releases/download/Flickr8k/Flickr8k_text.zip
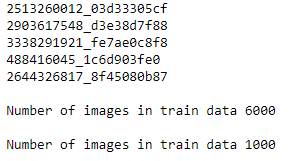
These 8000 images are divided into three sets, which are namely-
Training set- 6000 images for training the model.
Validation set- 1000 images for assessing the model’s performance while training.
Testing set- 1000 images for assessing the model’s performance after training.
Implementation
The implementation part is quite lengthy and requires patience and a thorough understanding of every piece of code. The main steps are-
Load Captions
def load_doc(filename):
    with open(filename) as file:
        text = file.readlines()
        return text

filename = "Flickr8k_text/Flickr8k.token.txt"
text = load_doc(filename)
for line in text[:10]:
    print(line,end='')

# every image has 5 captions

Mapping image with captions using dictionary
def image_to_captions(text):
    hash_map = {}
    for line in text:
        token = line.split()
        image_id = token[0].split('.')[0] # separating with '.' to extract image id (removing .jpg)
        image_caption = ' '.join(token[1: ])

        if(image_id not in hash_map):
            hash_map[image_id] = [image_caption]
        else:
            hash_map[image_id].append(image_caption)

    return hash_map


map_img_to_captions = image_to_captions(text)
print(*map_img_to_captions['1000268201_693b08cb0e'],sep='\n')
Data Preprocessing
Removing any token with length < 2 and using only alphabetic tokens (not using alpha-numeric)
def preprocess(map_img_to_captions):
    preprocessed_captions = []
    for key in map_img_to_captions.keys():
        for idx in range(len(map_img_to_captions[key])):
            tokens = map_img_to_captions[key][idx].split()
            tokens = [token.lower() for token in tokens if len(token)>1 if token.isalpha()]
            map_img_to_captions[key][idx] = ' '.join(tokens)

    return map_img_to_captions

preprocessed_map = preprocess(map_img_to_captions)
preprocessed_map['1000268201_693b08cb0e']

Create vocabulary (set of unique tokens) from captions
def create_vocabulary(preprocessed_map):
    vocabulary = set()
    for img_captions in preprocessed_map.values(): # list of 5 captions for each image
        for caption in img_captions:
            for token in caption.split():
                vocabulary.add(token)
    return vocabulary
Load images of Train & Test Data
def img_id_train(filename):
    with open(filename) as file:
        data = file.readlines()
        train_img_name = []
        for img_id in data:
            train_img_name.append(img_id.split('.')[0])
    return train_img_name

train_img_name = img_id_train('Flickr8k_text/Flickr_8k.trainImages.txt')
test_img_name  = img_id_train('Flickr8k_text/Flickr_8k.testImages.txt')
print(*train_img_name[:5],sep='\n')
print('\nNumber of images in train data',len(train_img_name))
print('\nNumber of images in train data',len(test_img_name))
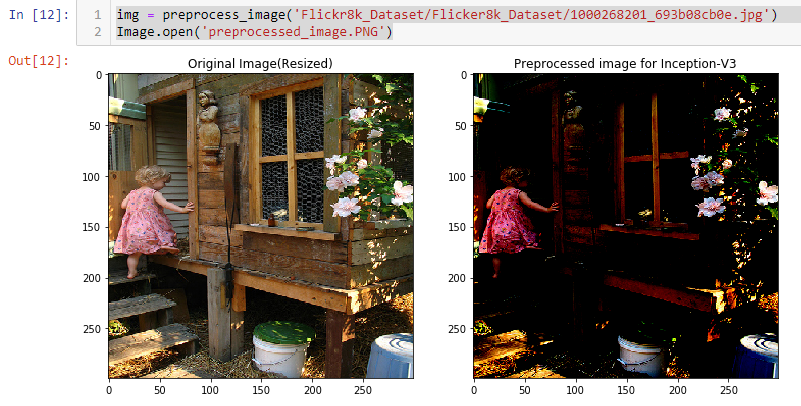
Preprocessing of images
- Resize image to (299,299)
- add one more dimension to make (1,299,299,3) since Inception-V3 required 4 dimension input
- preprocess image using custom function of Inception-V3 model
def preprocess_image(img_path):
    img = image.load_img(img_path,target_size=(299,299))
    # type(img): PIL.Image.Image
#     plt.figure(figsize=(12,6))
#     plt.subplot(121)
#     plt.imshow(img)
#     plt.title('Original Image(Resized)')

    img = image.img_to_array(img) # Converts PIL Image instance to numpy array (299,299,3)
    img = np.expand_dims(img, axis=0) #Add one more dimension: (1, 299, 299, 3) # Inception-V3 requires 4 dimensions
    img = preprocess_input(img) # preprocess image as per Inception-V3 model
#     plt.subplot(122)
#     plt.imshow(img[0])
#     plt.title('Preprocessed image for Inception-V3')

    return img  # shape: (1, 299, 299, 3)
Load pre-trained model and remove the last layer (Output layer)
# Load Inception-V3 model
model = InceptionV3(weights='imagenet')

# Create new model, by removing last layer (output layer) from Inception-V3
model_new = Model(inputs=model.input, outputs=model.layers[-2].output)
Encode images into feature vectors
This is the function which will encode a given image into a vector of size (2048, 0). We will use this to encode our training and test images.
# Function to encode given image into a vector of size (2048, )
def encode_image(image):
    image = preprocess_image(image) # preprocess image
    feature_vector = model_new.predict(image) # Get encoding vector for image
    feature_vector = feature_vector.reshape(feature_vector.shape[1], ) # reshape from (1, 2048) to (2048, )
    return feature_vector
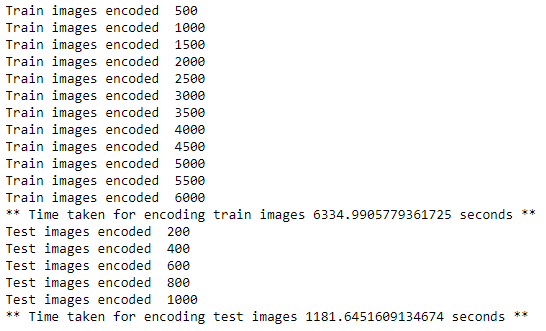
Encode all training images as follows:
# To encode all train images
start_train = time()
encoding_train = {}
for idx,img in enumerate(train_img_name):
    if( (idx+1)%500 == 0):
        print('Train images encoded ',idx+1)
    encoding_train[img] = encode_image(img)
print("** Time taken for encoding train images {} seconds **".format(time()-start_train))
Encode all test images as:
# To encode all test images
start_test = time()
encoding_test = {}
for idx,img in enumerate(test_img_name):
    if( (idx+1)%200 == 0):
        print('Test images encoded ',idx+1)
    encoding_test[img] = encode_image(img)
print("** Time taken for encoding test images {} seconds **".format(time()-start_test))
Load GloVe vectors (Global Vectors for Word Representation)
More details on this here- https://nlp.stanford.edu/projects/glove/
embeddings_index = {} # empty dictionary
f = open('glove.6B.200d.txt', encoding="utf-8")

for line in f:
    values = line.split()
    word = values[0]
    coefs = np.asarray(values[1:], dtype='float32')
    embeddings_index[word] = coefs
f.close()
print('Found %s word vectors.' % len(embeddings_index))
Defining the model
We have defined our model as follows:
inputs1 = Input(shape=(2048,))
fe1 = Dropout(0.5)(inputs1)
fe2 = Dense(256, activation='relu')(fe1)
inputs2 = Input(shape=(max_length_caption,))
se1 = Embedding(vocab_size, embedding_dim, mask_zero=True)(inputs2)
se2 = Dropout(0.5)(se1)
se3 = LSTM(256)(se2)
decoder1 = add([fe2, se3])
decoder2 = Dense(256, activation='relu')(decoder1)
outputs = Dense(vocab_size, activation='softmax')(decoder2)
model = Model(inputs=[inputs1, inputs2], outputs=outputs)
Train the model
Let us train our model as follows:
filepath="weights_best.hdf5"
checkpoint = [ModelCheckpoint(filepath, monitor='val_acc', verbose=1, save_best_only=True, mode='max')]

for i in range(epochs):
    generator = data_generator(train_captions, train_, word_to_index, max_length_caption, number_pics_per_bath)
    model.fit_generator(generator, epochs=1, steps_per_epoch=steps, verbose=1,callbacks=checkpoint)
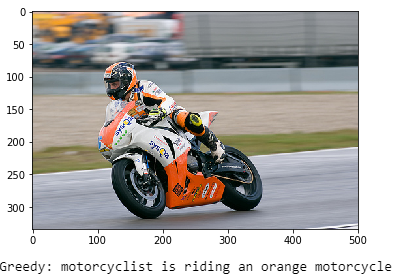
Make predictions
We will use our trained model to make predictions:
pic = list(encoding_test.keys())[z]
image = encoding_test[pic].reshape((1,2048))
x=plt.imread(images+pic)
plt.imshow(x)
plt.show()
print("Greedy:",greedySearch(image))
Conclusion
So, in this post, we saw how to develop a basic image captioning model in Keras. The complete code can be accessed from here-https://github.com/akki3d76/Image-Captioning-Using-Keras There is room for lots of improvements for generating more realistic captions, like-
- Using a bigger dataset
- Using a better preprocessing
- Using a different pre-trained model for extracting features from images or training a model from scratch
- Using attention models
- Using BLEU Score to evaluate and measure the performance of the model on validation set.
- Using Beam search instead of greedy search while making predictions.
- Extensive hyper-parameter tuning
Further to make it a complete end-to-end project, it can be deployed on a Flask based web-app using RESTful API.
Happy Captioning :)