
In this article, we will understand the concept of 2D Convolution and implement it using different approaches in Python Programming Language.
Table of contents
1. what is convolutions.
2. Our reference implementation.
3. Element wise convolution in python.
4. Matrix multiplications convolution.
5. Difference in Execution time for all of them.
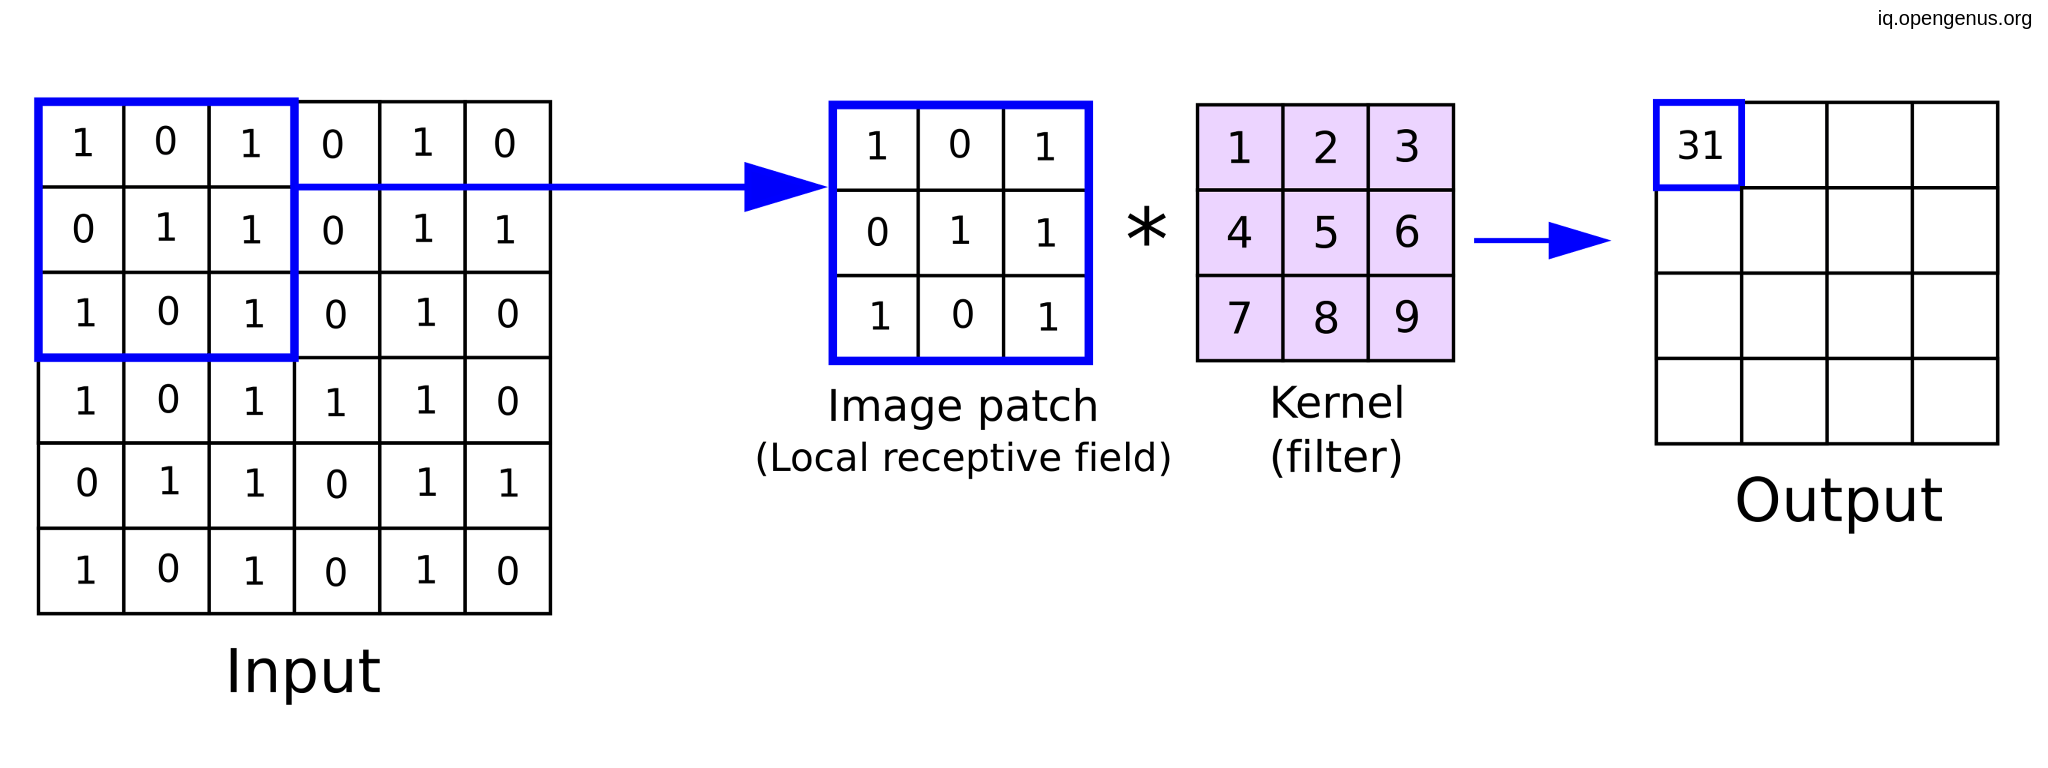
1. what is convolutions:
Before convolution, Deep neural networks was deal with image on the pixel level but it wasn't the most effective way until convolution neural network come with suggestion of trying to extract features from our images first (like vertical lines, horizontal lines, and circles) and fortunately it affected a lot in the deep neural network results.
And from here we will deep dive in the building block of this CNN which are
"Conv2D" layers and trying to implement it in pure python.
But before we start writing our code, we should have our testing point or a reference which we can compare out python code against.
2. Our reference implementation
I will prefer using Tensorflow over pytorch in our reference as according to their documentations pytorch store tensors in order (NCHW) (batch size, number of channels, height, width) and kernels in order of (OUT_CHANNELS, IN_CHANNELS, KERNELS_SIZE, KERNEL_SIZE) while Tensorflow store tensors in order (NHWC) (batch size, number of channels, height, width) and kernels in order of ( KERNELS_SIZE, KERNEL_SIZE, IN_CHANNELS, OUT_CHANNELS) which are more reasonable, So we will use TF to write our reference implementation :
import tensorflow as tf
import numpy as np
Importing numpy only for find the difference between the two results and making our zeros output.
def reference_func(A, weight):
    # making our image as a tensor
    A_tensor = tf.constant(A,dtype=tf.float32)

    # making our kernel as a tensor
    W_tensor = tf.constant(weight,dtype=tf.float32)

    # run convolution
    out =tf.nn.conv2d(input=A_tensor, filters= W_tensor,strides=[1, 1, 1, 1],padding="VALID")


    return out.numpy()
We wrote a function that accepting two parameters the image and the kernel then convert each of them to tensors so that tf can easily deal with them then applying conv2d function with stride =1 and no padding so our output dimensions will fellow this formula : (N, H-K+1, W-K+1, C_out)
A = np.random.randn(15,32,32,3)
W = np.random.randn(3,3,3,16)
out = reference_func(A,W)
print(out.shape)
(15,30,30,16)
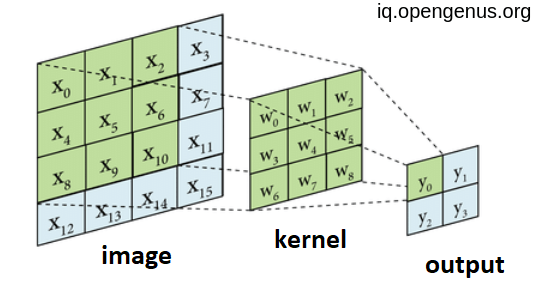
3. Element wise convolution in python:
Using deep implementations of For loops consider the simplest possible implementation of a convolution.
def py_conv(A, weight):
    N,H,W,C_in = A.shape
    K,Q,E,C_out = weight.shape

    out = np.zeros((N,H-K+1,W-K+1,C_out));
    for n in range(N):
        for c_in in range(C_in):
            for c_out in range(C_out):
                for y in range(H-K+1):
                    for x in range(W-K+1):
                        for i in range(K):
                            for j in range(K):
                                out[n,y,x,c_out] += A[n,y+i,x+j,c_in] * weight[i,j,c_in,c_out]
    return out
The py_conv function receive the image and the kernel the get the dimensions of each of them, creating an output image of zeros with the same dimensions according to the formula above, then loop for each image in the batch, then for each channel in the image then for each filter, then for each pixel of the hight then for each pixel of the width then for each cell of kernel hight and finally iterate for each pixel of kernel width and finally return the output of pixel-wise multiplications.
out2 = py_conv(A,W)
print(np.linalg.norm(out - out2))
0.00024300703910422653
almost zero. So our function in the write direction. but it was to dummy to depend on element-wise convolution in python so we will trying more efficient approach.
4. Matrix multiplications convolution:
If we suppose that our kernel composed of only one pixel of shape (1,1,3,16)
then the convolution will be as matrix multiplication over the channel dimensions.
W1 = np.random.randn(1,1,3,16)
out = reference_func(A,W1)
out2 = A @ W1[0,0]
print(np.linalg.norm(out - out2))
3.856014313862289e-05
Also very near to zero so we are one the wright way.
When we compute a matrix multiplication by a multi-dimensional array, it will treat the leading dimensions all as rows of a matrix. That is, the above operation would be equivalent to:
out2 = (A.reshape(-1,3) @ W1[0,0]).reshape(A.shape[0], A.shape[1], A.shape[2], W1.shape[3])
By the same strategy we can iterate over the kernel dimensions i
and j and use matrix-matrix multiplication to do the convolutions.
def matrix_mult(A, weight):
    N,H,W,C_in = A.shape
    K,Q,E,C_out = weight.shape
    out = np.zeros((N,H-K+1,W-K+1,C_out))

    for i in range(K):
        for j in range(K):
            out += A[:,i:i+H-K+1,j:j+W-K+1,:] @ weight[i,j]
    return out
A = np.random.randn(100,32,32,3)
W = np.random.randn(3,3,3,16)

out = reference_func(A,W)
out2 = matrix_mult(A,W)
print(np.linalg.norm(out - out2))
0.0006120513148633685
Almost zero is the difference between TF convolution and our naive code but the great difference will appear in the execution time for each approach as we will see.
5. Difference in Execution time for all of them:
- For tensorflow :
%%time
out = reference_func(A,W)
CPU times: user 23 ms, sys: 0 ns, total: 23 ms
Wall time: 18 ms.
- For py_conv function :
%%time
out2 = py_conv(A,W)
CPU times: user 44.6 s, sys: 95.7 ms, total: 44.7 s
Wall time: 45.4 s
As shown our naive implementation took about 3000 times the TF, and it is normal due to deeeep for loops in it.
- For matrix_mult function :
%%time
out3 = matrix_mult(A,W)
CPU times: user 55.1 ms, sys: 1 ms, total: 56.1 ms
Wall time: 59.8 ms.
Although it still taking more execution time but consider a huge progress than the element-wise approach.
Finally i hope you enjoyed with this article at OpenGenus, thank you.