
Get this book -> Problems on Array: For Interviews and Competitive Programming
Reading time:30 minutes
In this article, we will be creating a static Django website and understand the structure of the Django framework. This article would cover all the commands for Windows users. For other operating systems, the commands are almost similar, you can find them on the net.
Pre-requisites for this article would be:
- Basic Python
- Basic HTML
- Knowledge of CSS would be a plus
- The basic working of Django
You can download a suitable version of Python officially from [here] (https://www.python.org/downloads/) if not downloaded.
(Make sure that the Python path is included in your system environment variables)
Its recommended to use any suitable editor as their features will help you in future in development.
After downloading Python, we'll be installing Django using pip. Open the command prompt and type:
pip install django
This will successfully install Django.
For more information, see [official documentation].(https://docs.djangoproject.com/en/3.0/topics/install/)
After this, we'll be creating an empty Django project. Open the Command Prompt at an appropriate place in your system and run the following:
django-admin startproject myportfolio
Here, 'myportfolio' is just a name given to the project. (You can change it if you want) django-admin is the command-line utility for handling all administrative work and here it is used to start a new project.
After its successful execution, you'll see a folder named 'myportfolio' is created. Open the folder and you'll see this type of folder structure.
myportfolio
├── manage.py
├── myportfolio
│   ├── __init__.py
│   ├── settings.py
│   ├── urls.py
│   └── wsgi.py
│   └── asgi.py
This is a basic structure any Django project would have. When we'll use them here, we'll see why they are used.
settings.py
Now open settings.py file, we'll be making some changes to it. This file handles some necessary settings for the project.
It would be appropriate if we change the time on our website. We'll be changing the TIME_ZONE according to our region. Like for India, it would be
TIME_ZONE = 'Asia/Kolkata'
We will also add a path to our static files ( CSS files and images) so that they can be accessed easily. Just under the STATIC_URL add STATIC_ROOT given below.
STATIC_URL = '/static/'
STATIC_ROOT = os.path.join(BASE_DIR, 'static')
Starting the Server
Now to start the server, you need to be in the directory where manage.py is present and open the command prompt there and run the following command. (manage.py is used for managing the Django application)
python manage.py runserver
If executed successfully, you'll see the following line in the end.
Starting development server at http://127.0.0.1:8000/
Quit the server with CTRL-BREAK.
Now open http://127.0.0.1:8000/ (localhost) on your browser.
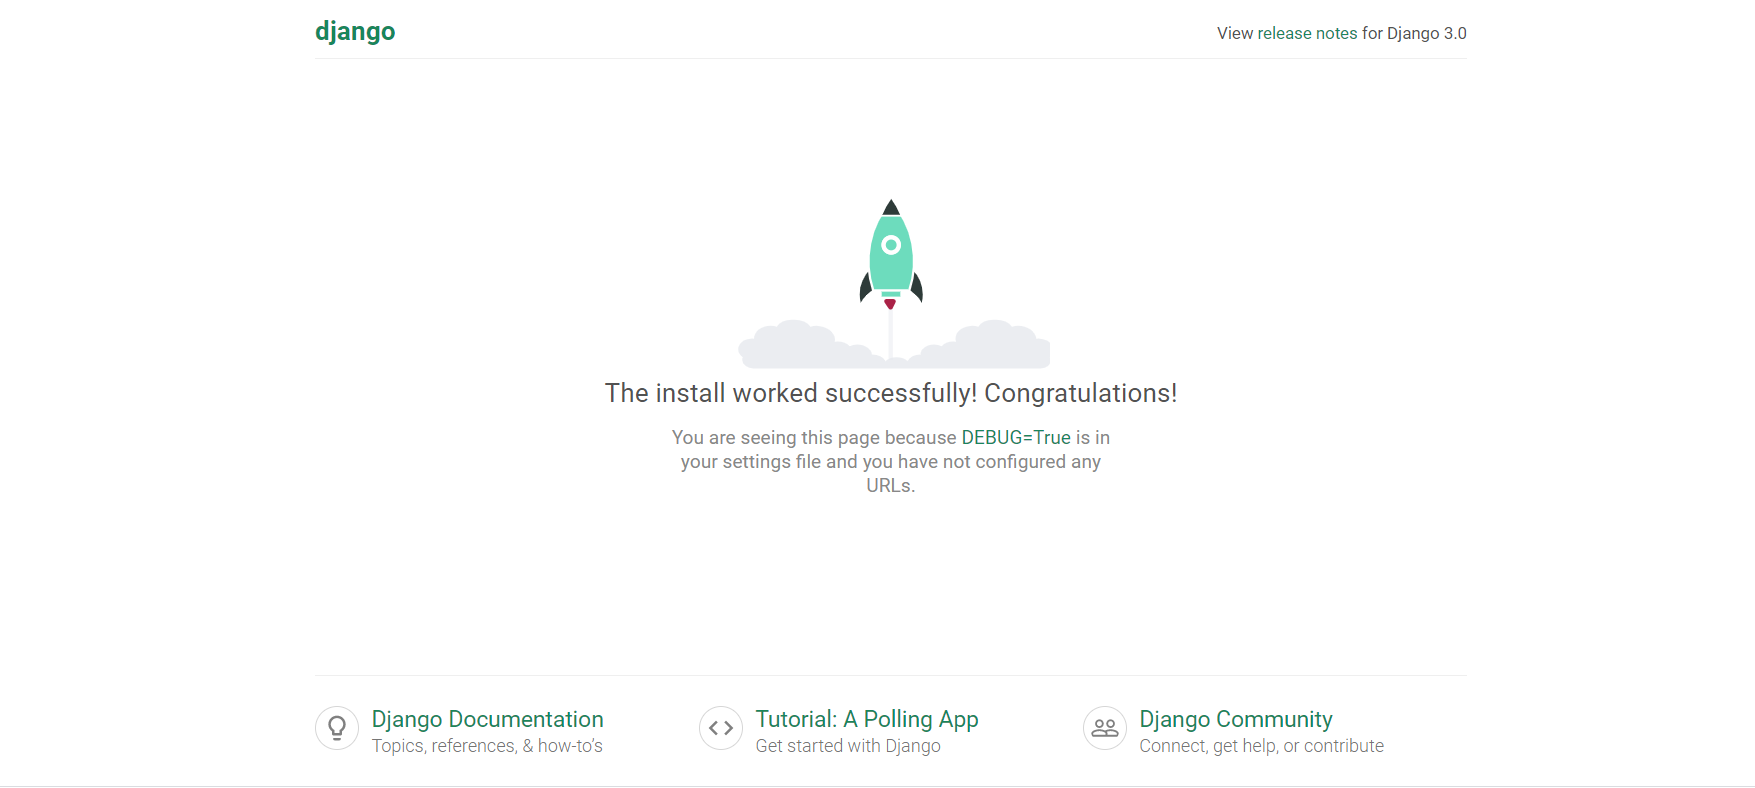
If this thing shows up then congratulations! you're successful in building your project and running it on the server.
Now, let us move forward.
Making an application
To keep things in Django neat and organized, one creates different applications for different parts of the project. For example, if we're building an e-commerce website then we may consider making different apps for the login page, cart, checkout, items, etc.
For now, we're making a simple website so we'll create a single application. Run the following command in the command prompt in the directory where manage.py is present.
python manage.py startapp myapp
After its successful execution, you'll see a folder named 'myapp'. (Every time you need to create an app you have to run the same command) Open the folder and you'll see this type of structure.
myapp
   ├── admin.py
   ├── apps.py
   ├── __init__.py
   ├── migrations
      └── __init__.py
   ├── models.py
   ├── tests.py
   └── views.py
We'll see their use later.
After we have created this app, we need to inform django that we have included an app in this project. We'll do so by making changes in settings.py file. Again open the file and add your app's name in the INSTALLED_APPS list and save it.
INSTALLED_APPS = [
    'django.contrib.admin',
    'django.contrib.auth',
    'django.contrib.contenttypes',
    'django.contrib.sessions',
    'django.contrib.messages',
    'django.contrib.staticfiles',
    'myapp',
]
views.py
Now let us create a view that will be rendered to the user when it opens the website.
Open views.py in 'myapp' folder and add the following code snippet.
def home(req):
    return render(req, "home.html")
This a function that will render an HTML file when a request is sent.
We'll create an empty folder named 'templates' (make sure the name is the same) in 'myapp' directory and inside that create an HTML file named "home.html".
Before adding the content lets deal with the URLs.
urls.py
Now, this file handles all the URLs ( which URL will correspond to which view) otherwise parts of our project would be in a broken state.
Now to handle URLs efficiently, it is recommended to have a urls.py file for each app as well. Well by default if you see in the myapp folder there's no such file, so we'll make a copy of urls.py present in myportfolio in myapp as well.
For urls.py in myportfolio modify this,
from django.contrib import admin
from django.urls import path
from django.urls.conf import include
from django.views.generic.base import RedirectView

urlpatterns = [
    path('', RedirectView.as_view(url="myapp/")),
    path('admin/', admin.site.urls),
    path('myapp/', include('myapp.urls')),
]
Here we're providing a list of different URL patterns that Django could encounter and what to do in that case. Here if you look carefully, if the path is 'myapp/' then it is directed to urls.py in myapp folder.
For urls.py in myapp modify this,
from django.contrib import admin
from django.urls import path
from django.views.generic.base import RedirectView
from myapp import views

urlpatterns = [
    path('', RedirectView.as_view(url="home/")),
    path('home/', views.home),
]
Now once done save all the changes and run the server again if not running already.
You'll see a blank screen which means it worked fine.
CSS and Images
To add suitable CSS and Bootstrap, in 'myapp' directory create a new folder named 'static' and inside that folder add these files and folders
(Note: You can create your own CSS file, the instructions to add CSS is given below)
Templates:HTML
Now its time to add some content in the HTML file. Open the file and start adding contents given.
<html>
<head>
    <meta charset="utf-8">
    <meta http-equiv="x-ua-compatible" content="ie=edge">
    <title>Portfolio</title>
    <meta name="viewport" content="width=device-width, initial-scale=1">
    <link href="/static/css/style.css" rel="stylesheet"/>
    <link href="/static/css/bootstrap.min.css" rel="stylesheet"/>
    <link href="/static/css/fontawesome.min.css" rel="stylesheet"/>
</head>
We have defined the head tag above in HTML. I've already added the links for CSS and bootstrap and their locations. You can modify them accordingly.
In the first section, we'll be adding some cover picture for the portfolio. Add the following code further inside the body tag.
<div class="slider_area">
        <div class="single_slider  d-flex align-items-center slider_bg_1">
            <div class="container">
                <div class="row align-items-center position-relative">
                    <div class="col-lg-9">
                        <div class="slider_text">
                            <h3>Hi, I'm Pulkit <br>
                                <span>Design student</span></h3>
                        </div>
                    </div>
                    <div class="my_img d-none d-lg-block">
                        <img src="/static/img/about/my_img.png" alt="">
                    </div>
                </div>
            </div>
        </div>
    </div>
Further we'll be adding some of our skills and details.
<div class="download_area">
      <div class="container">
          <div class="row">
              <div class="col-xl-10">
                  <div class="download_text">
                      <h3>I’m a design student currently an undergraduate working as a freelance. </h3>
                  </div>
              </div>
          </div>
          <div class="row">
              <div class="col-lg-6 col-md-6">
                  <div class="download_left">
                      <p>It's my dream to work for people and make great designs for them.
                      </p>
                      <h2 style="color: orange;">My Qualifications </h2> <br>
                      <h5 style="color: white;">BACHELOR OF DESIGN </h5>
                      <p>Delhi Technological University
                      </p>
                       <br>
                      <h5 style="color: white;">HIGH SCHOOL (SCIENCES) </h5>
                      <p>Dream High Public School
                      </p>

                  </div>
              </div>
              <div class="col-lg-5 offset-lg-1 col-md-6">
                  <div class="progress_skills">
                      <div class="single_progress">
                          <div class="label d-flex justify-content-between">
                              <span>Web Development</span>
                              <span>90%</span>
                          </div>
                              <div class="progress">
                                      <div class="progress-bar " role="progressbar" style="width: 90%" aria-valuenow="25" aria-valuemin="0" aria-valuemax="100"></div>
                                    </div>
                      </div>
                      <div class="single_progress">
                              <div class="label d-flex justify-content-between">
                                      <span>UI/UX</span>
                                      <span>70%</span>
                                  </div>
                              <div class="progress">
                                      <div class="progress-bar " role="progressbar" style="width: 70%" aria-valuenow="25" aria-valuemin="0" aria-valuemax="100"></div>
                                    </div>
                      </div>
                      <div class="single_progress">
                              <div class="label d-flex justify-content-between">
                                      <span>Adobe</span>
                                      <span>60%</span>
                                  </div>
                              <div class="progress">
                                      <div class="progress-bar" role="progressbar" style="width: 60%" aria-valuenow="25" aria-valuemin="0" aria-valuemax="100"></div>
                                    </div>
                      </div>

                      <div class="single_progress">
                          <div class="label d-flex justify-content-between">
                                  <span>Leadership</span>
                                  <span>80%</span>
                              </div>
                          <div class="progress">
                                  <div class="progress-bar" role="progressbar" style="width: 80%" aria-valuenow="25" aria-valuemin="0" aria-valuemax="100"></div>
                                </div>
                  </div>

                  <div class="single_progress">
                      <div class="label d-flex justify-content-between">
                              <span>ML and AI</span>
                              <span>75%</span>
                          </div>
                      <div class="progress">
                              <div class="progress-bar" role="progressbar" style="width: 75%" aria-valuenow="25" aria-valuemin="0" aria-valuemax="100"></div>
                            </div>
              </div>
                  </div>
              </div>
          </div>
      </div>
  </div>
For CSS, add the following elements,
@import url("https://fonts.googleapis.com/css?family=Roboto:300,300i,400,500,500i,700,900&display=swap");
@import url("https://fonts.googleapis.com/css?family=Roboto:300,300i,400,500,500i,700,900&display=swap");

body {
  font-family: "Roboto", sans-serif;
  font-weight: normal;
  font-style: normal;
}

.img {
  max-width: 100%;
}

h1, h2, h3, h4, h5 {
  font-family: "Roboto", sans-serif;
  color: #001D38;
}

ul {
  margin: 0px;
  padding: 0px;
}


li {
  list-style: none;
}


p {
  font-size: 16px;
  font-weight: 300;
  line-height: 28px;
  color: #4D4D4D;
  margin-bottom: 13px;
  font-family: "Roboto", sans-serif;
}


h3 {
  font-size: 24px;
}

 .slider_area .single_slider {
    height: 600px;
  }
}


.slider_area .single_slider .slider_text {
  padding: 303px 0;
}

.slider_area .single_slider .slider_text.about_slide {
  padding: 241px 0 258px 0;
}

.slider_area .single_slider .slider_text h3 {
  font-family: "Roboto", sans-serif;
  font-size: 80px;
  text-transform: capitalize;
  font-weight: 300;
  line-height: 90px;
  color: #fff;
  margin-bottom: 55px;
}


.slider_area .single_slider .slider_text h3 span {
  color: #000000;
}

.slider_area .single_slider .slider_text p {
  font-size: 30px;
  font-weight: 400;
  color: #F91842;
  font-family: "Roboto", sans-serif;
  margin-bottom: 24px;
}


.slider_area .single_slider .my_img {
  position: absolute;
  right: 0;
  bottom: 0;
}


.slider_area .single_slider .my_img img {
  width: 100%;
}


.download_area {
  padding: 110px 0 90px 0;
  background: #000000;
}

.download_area .download_text h3 {
  font-size: 36px;
  color: #fff;
  line-height: 46px;
  margin-bottom: 60px;
}

.download_area .download_left {
  margin-bottom: 30px;
}

.download_area .download_left p {
  font-size: 16px;
  line-height: 28px;
  color: #C9C9C9;
  margin: 20px 0;
}

.download_area .progress_skills .single_progress .progress {
  height: 6px;
  overflow: hidden;
  font-size: .75rem;
  background-color: #FFFFFF;
  border-radius: 5px;
}

.download_area .progress_skills .single_progress .progress .progress-bar {
  background: #DB9A64;
  border-radius: 5px;
}
After the code is added, we'll now add our services and here I've used some icons as well, you can add any of them suitably.
 <div class="service_area">
        <div class="container">
            <div class="row">
                <div class="col-xl-12">
                    <div class="section_title mb-50">
                        <h3>I do provide freelance services!</h3>
                    </div>
                </div>
            </div>
            <div class="row">
                <div class="col-lg-4 col-md-6">
                    <div class="single_service text-center">
                        <div class="icon">
                            <img src="/static/img/svg_icon/1.svg" alt="">
                        </div>
                        <h3>
                                Web & Mobile Design
                        </h3>

                    </div>
                </div>
                <div class="col-lg-4 col-md-6">
                    <div class="single_service text-center">
                        <div class="icon">
                            <img src="/static/img/svg_icon/2.svg" alt="">
                        </div>
                        <h3>
                                Web Development
                        </h3>

                    </div>
                </div>
                <div class="col-lg-4 col-md-6">
                    <div class="single_service text-center">
                        <div class="icon">
                            <img src="/static/img/svg_icon/3.svg" alt="">
                        </div>
                        <h3>
                                Adobe Illustrator
                        </h3>

                    </div>
                </div>

            </div>
        </div>
    </div>
Now, the last section that we would add is our projects or work.
<div class="gallery_area">
        <div class="container">
            <div class="row">
                <div class="col-xl-12">
                    <div class="section_title mb-50">
                        <h3>Some of my projects</h3>
                    </div>
                </div>
            </div>
            <div class="row justify-content-center">
                <div class="col-xl-10 col-lg-10">
                    <div class="row">
                        <div class="col-xl-6 col-lg-6 col-md-6">
                            <div class="single_gallery">
                                <div class="thumb">
                                    <img src="/static/img/gallery/1.jpg" alt="" style="width: 450px; height: 400px;">
                                </div>
                                <div class="gallery_heading">
                                    <span>Website for services</span>
                                </div>
                            </div>

                        </div>
                        <div class="col-xl-6 col-lg-6 col-md-6">
                            <div class="single_gallery">
                                <div class="thumb">
                                    <img src="/static/img/gallery/2.jpg" alt="" style="width: 450px; height: 400px;" >
                                </div>
                                <div class="gallery_heading">
                                    <span>UI and UX design</span>
                                </div>
                            </div>
                        </div>
                    </div>

                </div>
            </div>
        </div>
    </div>
When the code is completed, close the body and the HTML tag.
At the end, we'll add suitable CSS to the last two sections.
.gallery_area {
 background: #000000;
 padding-top: 120px;
 padding-bottom: 120px;
}

.gallery_area .single_gallery .thumb img {
 width: 100%;
}

.gallery_area .single_gallery .gallery_heading {
 padding: 20px 0;
 margin-top: 7px;
 margin-bottom: 70px;
}

.gallery_area .single_gallery .gallery_heading span {
 color: #fff;
 font-size: 16px;
 font-weight: 400;
 display: block;
 margin-bottom: 7px;
}

.gallery_area .single_gallery .gallery_heading h4 {
 font-size: 24px;
 font-weight: 400;
 color: #DB9A64;
}

.service_area {
 background: #3B2930;
 padding-bottom: 90px;
 padding-top: 120px;
}

.service_area.colord_bg {
 background: #000000;
}

.service_area .single_service {
 border: 1px solid #6B4B40;
 padding: 45px 30px;
 margin-bottom: 30px;
}

.service_area .single_service h3 {
 color: #DB9A64;
 margin-top: 22px;
 margin-bottom: 11px;
 font-weight: 400;
}


.service_products {
 background: #000000;
 padding-top: 0px;
 padding-bottom: 60px;
}

.service_products .padding_left {
 padding-left: 68px;
}


.service_products .service_wrap {
 margin-bottom: 60px;
}

.service_products .service_wrap .thumb img {
 width: 100%;
}

.service_products .service_wrap .service_text {
 margin: 30px 0;
}

.service_products .service_wrap .service_text h3 {
 color: #fff;
 font-size: 36px;
 font-weight: 400;
}
After successful modifications, refresh your browser again and you'll see the website has changed something like this.
Congratulations! You have created your portfolio website in Django.
Github Repository link: https://github.com/PkSharma101/Portfolio-Sample
Time to test yourself
Try this tutorial on your own and create your portfolio website.
With this article at OpenGenus, you must have the complete idea of creating a basic static portfolio website using Django. Enjoy.