
Reading time: 20 minutes
We have taken a deep look into using table elements in HTML and the different components and designs we can achieve.
In this article, we will learn to:
- Create a table in HTML
- Add borders to our tables
- Make cells span across multiple rows and columns
Tables in HTML can be created by using the <table> tag.
<tr>defines the table rows.<td>defines table element (cell) data.
Table cells are intersection of rows and columns and are the elementary unit of data.<th>defines the column heading.<caption>defines table caption.
Captions may or may not be defined.
But adding Captions tell the reader the about the topic so it is advised to be used.

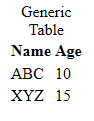
This image is a table created using code given in the next topic.
The following things can be deduced from the image:
- Caption is not a part of the table border (if the border is specified).
- Each row of the table is defined using the
<tr>tag. - The first row generally consists of headings which are defined by
<th>tag. - All other rows consists of data values which are defined in the
<td>tag.
1) Creating a Table in HTML
Generally, Tables are defined as rows of related data.
Syntax:
<table>
    <caption> Write caption here </caption>
    <!--Row1 Consists of Headings-->
    <tr>
        <th> Heading 1 </th>
        <th> Heading 2 </th>
        ...
    </tr>
    <!--Rest of the rows consists of data elements-->
    <tr>
        <td> Data Element for Heading 1 </td>
        <td> Data Element for Heading 2 </td>
        ...
    <tr>
    ... {Add as many rows you want} ...
</table>
Note: Headings of table are by default bold and center aligned.
Implementation
<table>
    <caption> Generic Table </caption>
    <tr>
        <th> Name </th>
        <th> Age </th>
    </tr>
    <tr>
        <td> ABC </td>
        <td> 10 </td>
    </tr>
        <tr>
        <td> XYZ </td>
        <td> 15 </td>
    </tr>
</table>
Output
Explanation:
- "Generic Table" is the caption of the table
- "Name" and "Age" are two headings defined in the first row
- Rest rows comprises of contents in the cell corrresponding to the column.
2) Adding Borders around Table Element
2.1) Adding Generic Border
Adding border using CSS Style property "border" adds a border around every cell.
Syntax:
<!--Add this CSS Code before HTML Code at the top
You can also add this code in an External CSS File-->
<style>
    table,td,th {border:2px solid black;}
</style>
Code:
<style>
    table,td,th {border:2px solid black;}
</style>
<table>
    <caption> Generic Table </caption>
    <tr>
        <th> Name </th>
        <th> Age </th>
    </tr>
    <tr>
        <td> ABC </td>
        <td> 10 </td>
    </tr>
        <tr>
        <td> XYZ </td>
        <td> 15 </td>
    </tr>
</table>
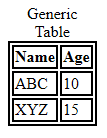
Output Analysis:
Border is added around the following HTML Element Tags:
<table>tag has the covering border.<th>and<td>have borders around each cell.
2.2) Adding Collapsed Border
As shown in above output, the border for each cell is defined individually.
If we want to have a common border for entire table, we use the border-collapse property of CSS.
Code:
<style>
    table,td,th {border:2px solid black; border-collapse:collapse;}
</style>
<table>
    <caption> Generic Table </caption>
    <tr>
        <th> Name </th>
        <th> Age </th>
    </tr>
    <tr>
        <td> ABC </td>
        <td> 10 </td>
    </tr>
        <tr>
        <td> XYZ </td>
        <td> 15 </td>
    </tr>
</table>
Output:
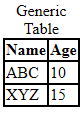
Collapsed border modifies generic border and just co-incides the adjacent borders into one border.
3) Table cells spanning Multiple Rows
Till now, we were defining tables as rows of data where first row is used only for heading.
Another way of defining tables is using each row for storing data under one heading which is defined in the first column of the row.
Syntax:
<table>
    <tr>
        <th> First Heading </th>
        <td> Entry 1.1 </td>
        <td> Entry 1.2 </td>
        ...
    </tr>
    <tr>
        <th> Second Heading </th>
        <td> Entry 2.1 </td>
        <td> Entry 2.2 </td>
        ...
    </tr>
    ...
</table>
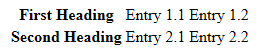
This type of table is used for one cell having multiple rows to store more than one value.
Code:
<style>
    table,td,th {border:2px solid black; border-collapse:collapse;}
</style>
<table>
    <tr>
        <th> Name </th>
        <td> ABC </td>
        <td> XYZ </td>
    </tr>
    <tr>
        <th rowspan="2"> Email </th>
        <td> ABC@gmail.com </td>
        <td> XYZ@gmail.com </td>
    </tr>
    <tr>
        <td> ABC@yahoo.com </td>
        <td> XYZ@hotmail.com </td>
    </tr>
</table>
Output:
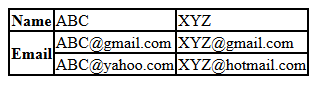
As show, Each column corresponding to Email Heading is divided into two rows, i.e., for each column, there are two row spans.
4) Table cells Spanning Multiple Columns
Many a times, a given column must have more than one value.
Example: A person generally has two phone numbers,
- Home Phone
- Work Phone
Thus, in general, for some data field, we need to span two or more columns.
This can be done use column span in table cells.
Syntax:
<th colspan="n">
Where n is the number of columns we need in the cell.
Code:
<style>
    table,td,th {border:2px solid black; border-collapse:collapse;}
</style>
<table>
    <caption> Column Span Example </caption>
    <tr>
        <th> Name </th>
        <th colspan="2"> Phone </th>
    </tr>
    <tr>
        <td> ABC </td>
        <td> 9898989898 </td>
	<td> 9797979797 </td>
    </tr>
        <tr>
        <td> XYZ </td>
        <td> 9696969696 </td>
        <td> 9595959595 </td>
    </tr>
</table>
Output:

Here, each row under the Phone column heading is divided into two columns, i.e., each row spans two columns.