
In this article, we'll be discussing on the steps to deploy a sample / basic Python Web-app on Heroku. Firstly we'll discuss on the Introduction to the article. Secondly, This section is for setting the expectation of the reader as well to make sure they are in the same page of understanding and they are following the article. After that, we'll understand the web-app file structure for the same. Later we'll look into the commands for creating & deploying a app at Heroku.
Following are the sections of this article:-
1. Introduction
In this article you will learn how to deploy a Python Web-app built using Flask web-framework to Heroku.
Nowadays there is no business that doesn't have a web app to help it a reach greater audience, or maybe provide its services through an online portal anywhere in the globe. Let us go-through the introduction part of Python, & Heroku.
- Python is an interpreted, high-level and general-purpose programming language.
- A framework "is a library that allows us to build web applications by providing reusable code and structure.
- There are a number of frameworks for Python like Flask, Tornado, Pyramid and Django.
- We have also used a web-server for the app called Gunicorn.
- Gunicorn is a Python WSGI HTTP Server for UNIX which is light on server resources and fast.
- We have made use of a simple framework: Flask, easy to learn and build web-app.
- Now going forward, Lets get the understanding on the Heroku Platform.
- Cloud Services models can be of three type, namely -
Platform as a Service(PaaS),Infrastructure as a Service(IaaS) &Software as a Service(SaaS).- Heroku Platform, is one of the first cloud platform as a service (PaaS) and supports several languages - Ruby, Java, Node.js, Scala, Clojure, Python, PHP, and Go.
2. Prerequisites
Following are few prerequisites, that we are making so that the readers are understand or need to go-through before proceeding with the article,
I. The Desktop OS is - Ubuntu, but most of the steps holds good for other operating system as well.
II. You are having account at Heroku platform. If not please create one by clicking here. Also install Heroku CLI.
III. You have the basic understanding of Python Programming.
IV. You are familiar with Linux Command line interface and install Heroku CLI.
V. Git installed & you have basic understanding with Git commands.
VI. A Python version >= 3.7 installed on your machine and following code inside the directory(sample-web-app) as mentioned in the next section.
# sample-web-app/app.py
from flask import Flask

app = Flask(__name__)

@app.route("/")
def home_view():
        return "<h1>Welcome to My website!</h1>"
3. File Structure for Application
Following is the File structure for our web-app without including the virtual environment, that is required to deploy the same on the Heroku platform.
sample-web-app/
├── app.py
├── Procfile
├── requirements.txt
└── runtime.txt
From the above File structure, Following is the brief description. We'll see detailed steps on these in the next section.
- sample-web-app - is the Web-Application Directory
- app.py - is the main app file.
- Procfile - is the Process file for Heroku to identify.
- requirements.txt - is the requirements file for installing the modules for the web-app.
- runtime.txt - is the runtime file for representing the Python version.
4. Create and Deploy app at Heroku
Following are the series of steps to Create & Deploy the web-app at Heroku.
Created a directory sample-web-app, under this directory we perform all the next steps.
1. Login to your Heroku account using CLI
You can log in by typing the following command in the terminal:
/<your_home>/sample-web-app$ heroku login -i
2. Create a web app on Heroku
After successful login to your Heroku account, now create a new application on Heroku using the following command:
/<your_home>/sample-web-app/$ heroku create < your_app_name >
Have replaced <your_app_name> with mysample-web-app, like as follows-
/<your_home>/sample-web-app$ heroku create mysample-web-app
3. Create Virtual Environment & Install modules
Create a virtual environment with venv and install Flask and Gunicorn web server, then install it by using the following command:
#created a virtual environment - 'myenv'
/sample-web-app$ python3 -m venv myenv

# Activating the virtual environment
/sample-web-app$ source myenv/bin/activate

#install gunicorn flask
(myenv)/sample-web-app$ pip3 install gunicorn flask
After activating virtual environment, you should be able to see that appear at the left hand side of your terminal, like (myenv)/sample-web-app$.
4. Create
requirementsfile in the same project directory
To generate the requirement.txt file, you can use the following command,
(myenv)/sample-web-app$ pip3 freeze > requirements.txt
5. Create a Procfile
Procfile is a Process file that is required for all Heroku applications. Procfile specifies the commands that are executed by the app on startup. Enter the following in Procfile:
(myenv)/sample-web-app$ echo 'web: gunicorn app:app' > Procfile
Lets check whether we got the entry on the above line inside the Procfile,
(myenv)/sample-web-app$ cat Procfile
web: gunicorn app:app
Here, the app is the name of your main app (.py) file. In my case, it is app.py.
NOTE: you have to create a Procfile without any file extensions.
6. Create Runtime text file to specify the Python version at runtime
After creating a runtime.txt, add your build Python version like below:
(myenv)/sample-web-app$ echo 'python-3.7.5' > runtime.txt
where python-3.7.5, is my current python version
Now, we are all set!
7. Initialize an empty git repository
Following command Initializes an empty git repository
(myenv)/sample-web-app$ git init

# you'll see the following message
Initialized empty Git repository in /<your_path>/sample-web-app/.git/
8. Finally Push the code to master Branch of Heroku git
Next, it is time to commit your final code using the following steps:
(myenv)/sample-web-app$ git add .
(myenv)/sample-web-app$ git commit -m "My first commit"

#Lastly, add git remote:

(myenv)/sample-web-app$ heroku git:remote -a YourAppName
(myenv)/sample-web-app$ git push heroku master
From the above series of command at terminal, it pushes your local code to the Heroku's git repository of your app. This is the git repository which was explicitly created while we created our app.
Here heroku git:remote -a YourAppName, replace YourAppName with your heroku app, mine is mysample-web-app
Your app is live now, and you can see your web app using the generated URL.
9. Testing the App
In the log that has been shown in the console after successfully executing the above command you will find a link for your application https://{your-project-name}.herokuapp.com/. This link was also created with the git link while we run the command - heroku create < your_app_name >.
Following is the output at browser,
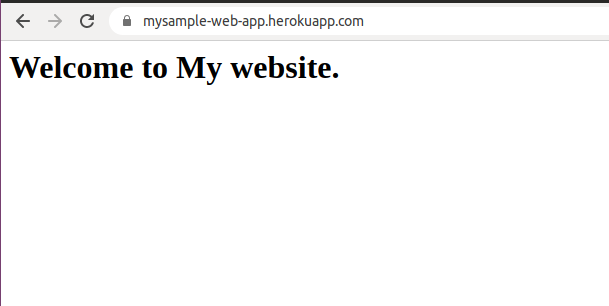
we can see that the app is up and running!
5. Conclusion
At last we are at the end of the article.In this article, We have learned some basic introduction on Python, web-frameworks, Cloud service models and Heroku's introduction. In later stage we have seen the sample web-app's file structure for deploying the same to Heroku. Lastly we have seen the detail guide for creating and deploying the web-app to the Heroku platform. Hope this was an informative article!
Thanks :)!