
Reading time: 20 minutes
In this tutorial, we will a simple web server in Node.js and run it locally on our machine listening to a port. It will response with a text data and HTTP headers.
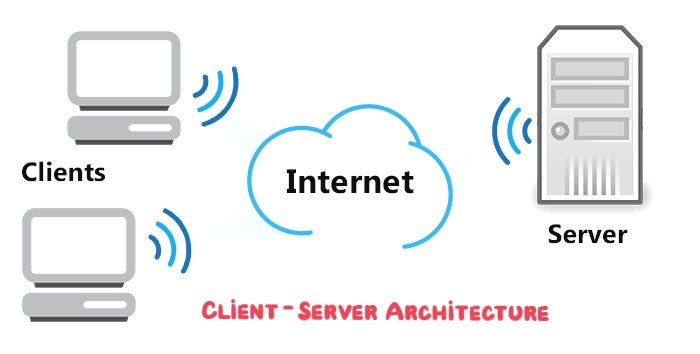
⭐ What is a Web Server ?
We all use Web servers throughout our day, from sending connect requests on LinkedIn to checking the daily forecast, or fetching some data from our favorite website, all of this is served by a Web Server.
In simple words, a Web Server is basically a system that accepts requests from the client and sends back responses.
It uses HTTP(Hypertext Transfer Protocol) to serve the files, that form Web pages to the clients. The clients themselves use HTTP client to send requests to the server.
⭐ Creating Web Server using Node.js
It's time we get started, and create our very own Web Server, capable of accepting requests and sending back responses.
Follow the given steps, and if at any point of time, you feel lost - (here's the link to the final code.)
📝 Step 1 : Create index.js
- To get started, open your terminal and use the following command, to create a directory:
mkdir my-web-server
- Traverse to the directory, using:
cd my-web-server
- Now, create a file named
index.js. Index.js is the file/module, where we'll write our program for the web server.
Now, we're all ready to start coding !
📝 Step 2 : Include the http module
http is a built-in module in Node.js. It provides us with all the networking capabilities, such as creating a HTTP server. It allows Node.js to transfer data over the HTTP(Hypertext Transfer protocol).
As the documentation says, To use the HTTP server and client one must require('http').
You may read more about the http module here.
So, to include the http module, we use the require command. Include the following command in your index.js
const http = require('http');
Here, we have created a http object that now contains all the functionalities offered to us by the module.
Now, to create a server, we need to do two things -
- Create a server
- Start the server - so that we can actually listen to incoming requests.
📝 Step 3: Create a server
We will create our server using createServer method on the http module. Include the following code in your index.js module.
const server = http.createServer((req, res) => {
  res.end("Hello from the server!");
});
The method accepts a callback function that gets called, each time a request hits our server. And this callback function gets access to two very important and fundamental variables - the request variable(req), and the response variable(res).
The end() method on res is used to send back responses to the server. It is the simplest way of sending a plain text response from the server to the client.
The createServer() method returns a http server, that is stored in our server variable.
📝 Step 4 : Listen to the server
To listen to our server, we use a method listen() on it.
Include the following code in your index.js to listen to the server
server.listen(8000, "127.0.0.1", () => {
  console.log("Server is listening to requests on port 8000");
});
The first parameter of method is port Number and is a required one. A port number is basically a sub address on a host. We use port Number 8000 here.
The next parameter specifies the host, it is optional and is localhost by default. Localhost refers to the computer that the program is currently running in. But, we can pass in the localhost explicitly as well (127.0.0.1 is the standard IP adderess for the local host).
The third parameter is a callback function that gets fired off, as soon as the server starts listening. It is also optional.
📝 Step 5 : Run the node application
Open the terminal, and run:
node index.js
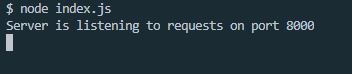
You may notice that the program keeps running, and does not exit right away. This is happening because of the event loop.
Now, open your browser and type:
http://127.0.0.1:8000/
in the URL tab. If you have followed the above steps, you will get the following screen.
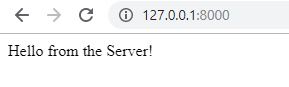
You have finally created your very own web server !🎉 It was easy, wasn't it ?
Now, let's add some more features to it.
📝 Step 6 : Adding HTTP Headers
A HTTP header lets us pass additional information with the request or the response.The basic syntax to specify a HTTP header is
{name:value} . Let's add a Content-type header to our HTTP response. The Content-type header is used to specify the media type of the resource. It basically tells the client what the content type of the returned content actually is.
This time, instead of sending a text response, let's send HTML as the response. Make the following changes to your createServer() method -
const server = http.createServer((req, res) => {
  res.writeHead(200, { "Content-Type": "text/html" });
  res.write("<h1><i>    Hello from the Server!   </i></h1>");
  res.end();
});
The first argument of the res.writeHead() method is the status code. The code 200 means that all is OK. And the second argument is an object containing the response headers, which is Content-type in our case.
Now, open the browser and you'll see the following response.

To view the headers, in the browser :
- Open dev tools.
- Click on Networks tab.
- Look at the headers part.
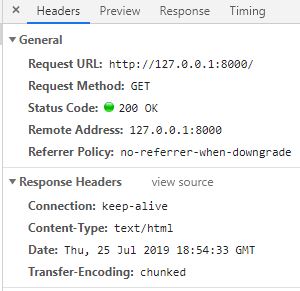
That's how you can see the header part and other related information such as status code, request URL, remote address and the content type.
Yay ! We are finally done .🎉
In case you missed something, here's the code for the web server - (link goes here ).