
Open-Source Internship opportunity by OpenGenus for programmers. Apply now.
In this article, we will know how to build a simple tool that can test the typing speed of the users. We will develop this using JavaScript along with HTML and CSS.

Tech stack to be used:
HTML, CSS, JavaScript
Setting up the structure using HTML:
Let's create the skeleton structure of the project.
<html lang="en">
<head>
  <title>Typing Speed Tester!</title>
  <link rel="stylesheet" href="public/style.css">
 </head>
 <script src="public/index.js"></script>
First, we need to inlcude our CSS and JS file link, as shown above.
Now, let's make the boxes where we will show the number of words typed, timer, number of mistypes and the accuracy of the typing.
<body>
 <div class="container">
   <div class="title">Typing Speed Tester!</div><hr>
   <div class="border">
   <div class="header">

     <div class="wpm">
       <div class="head">Words/min</div>
       <div class="init_wpm">100</div>
     </div>

     <div class="errors">
       <div class="head">Errors</div>
       <div class="init_errors">0</div>
     </div>

     <div class="timer">
       <div class="head">Time(s)</div>
       <div class="init_time">60s</div>
     </div>

     <div class="accuracy">
       <div class="head">Accuracy(%)</div>
       <div class="init_accuracy">100</div>
     </div>
   </div>
   </div>
As shown above, we created a div tag for each box and and put two nested div tags for the heading and the initialized data. Eg: For showing the tpying speed, we created a div tag with class 'wpm' and the nested div tags are 'head' (where the heading 'words/min' will be shown) and 'init_wpm' where the the initial value of the words/min, i.e 0 will be shown.
Now, we'll work on the text box and start button.
  <div class="content" style="display: none;"></div>
     <textarea class="input_box" placeholder="Start typing..." oninput="textInput()"
      onfocus="startGame()"></textarea>
      <br>
      <button class="start" onclick="startGame()">Start</button><br>
   </div>
We created the text input box using the 'textarea' tag with class 'input_box' where user will type the given text that will be shown after user press the start button. The placeholder is put as 'Start typing...'. When user types, the input text is processed by the textInput() method, that will be disccussed later.
A buttons are created using 'button' tags, when user clicks the button the timer starts.
Here's the complete HTML code.
Complete HTML code:
<html lang="en">
<head>
  <title>Typing Speed Tester!</title>
  <link rel="stylesheet" href="public/style.css">
  <script src="public/index.js"></script>
</head>
<body>
  <div class="container">
    <div class="title">Typing Speed Tester!</div><hr>
    <div class="border">
    <div class="header">

      <div class="wpm">
        <div class="head">Words/min</div>
        <div class="init_wpm">100</div>
      </div>

      <div class="errors">
        <div class="head">Errors</div>
        <div class="init_errors">0</div>
      </div>

      <div class="timer">
        <div class="head">Time(s)</div>
        <div class="init_time">60s</div>
      </div>

      <div class="accuracy">
        <div class="head">Accuracy(%)</div>
        <div class="init_accuracy">100</div>
      </div>
    </div>
    </div>

    <div class="content" style="display: none;"></div>
     <textarea class="input_box" placeholder="Start typing..." oninput="textInput()"
      onfocus="startGame()"></textarea>
      <br>
      <button class="start" onclick="startGame()">Start</button><br>
      <button class="restart" onclick="resetValues()">Restart</button>
   </div>

</body>
</html>
Styling using CSS:
For stlying of each class, we can provide values to different styling properties like this given syntax-
.class-name {
    property-name: value;
}
For styling the elements, fixed font 'sans-serif' and colour('whitesmoke' and 'skyblue') are maintaned throughout the file.
body {
  background-color: whitesmoke;
  text-align: center;
  font-family: sans-serif;
}

.container {
  display: flex;
  flex-direction: column;
  align-items: center;
}
'text-align: center' and 'align-items: center' are used to keep the items and elements in the center.
Now, let's style the .title, .header and all the boxes.
.title {
  margin-bottom: 20px;
  font-size: 3rem;
  color: whitesmoke;
  width: 100%;
  height: auto;
  background-color: skyblue;
}

.header {
  display: flex;
  align-items: center;
}


.timer, .errors,
.accuracy, .cpm, .wpm {
  background-color:white;
  height: 60px;
  width: 70px;
  margin: 8px;
  padding: 12px;
  border-radius: 20%;
  box-shadow: grey 5px 8px 5px;
}
'border-radius: 20%' makes the the border little curvy, 'padding' property is used to shift the element to a certaint extent and 'box-shadow' is used to provide box shadow, here the colour given to the shadow is 'grey' and different widht of the shadow is given at different side of the box.
.errors{
  color: red;
}
.wpm{
  color: rgb(16, 197, 16);
}
.cpm, .wpm  {
  display: none;
}
Now, for the text content, background colour is given white, the font is made bold.
.content {
  background-color: white;
  font-weight: bolder;
  margin: 10px;
  padding: 25px;
  box-shadow: grey 5px 8px 5px;
  border-radius: 10px 10px 10px 10px;
}
Simiilarly, the input box is styled as shown below.
.input_box {
  background-color: white;
  font-weight: bolder;
  height: 80px;
  width: 40%;
  font-size: 1.5rem;
  font-weight: 600;
  margin: 10px;
  padding: 15px;
  border: 0px;
  box-shadow: grey 5px 8px 5px;
  border-radius: 10px 10px 10px 10px;
}
When user types the correct character, it should indicate that the user correctly typed. What we can do is turning the character into green when typed correctly with a the help of JavaScript. But first let's create a class for that.
.correct{
  color: rgb(82, 200, 82);
}
Now, let's style the start button.
.start {
  background-color: skyblue;
  font-size: 1.5rem;
  padding: 10px;
  border: 0px;
  color: whitesmoke;
  border-radius: 10px 10px 10px 10px;
  width: 30%;
  font-weight: bold;
  box-shadow: grey 5px 8px 5px;
}
Here's complete code for CSS.
Complete CSS code:
body {
  background-color: whitesmoke;
  color: black;
  text-align: center;
  font-family: sans-serif;
}

.container {
  display: flex;
  flex-direction: column;
  align-items: center;
}


.title {
  margin-bottom: 20px;
  font-size: 3rem;
  color: whitesmoke;
  width: 100%;
  height: auto;
  background-color: skyblue;
}

.header {
  display: flex;
  align-items: center;
}

.timer, .errors,
.accuracy, .cpm, .wpm {
  background-color:white;
  height: 60px;
  width: 70px;
  margin: 8px;
  padding: 12px;
  border-radius: 20%;
  box-shadow: grey 5px 8px 5px;
}

.errors{
  color: red;
}
.wpm{
  color: rgb(16, 197, 16);
}
.cpm, .wpm  {
  display: none;
}

.head {
  text-transform: uppercase;
  font-size: 10px;
  font-weight: 600;
  color: skyblue;
  font-weight: bolder;
}

.init_time, .init_errors,
.init_accuracy, .init_cpm,
.init_wpm {
  font-size: 35px;
}

.content {
  background-color: white;
  font-weight: bolder;
  margin: 10px;
  padding: 25px;
  box-shadow: grey 5px 8px 5px;
  border-radius: 10px 10px 10px 10px;
}

.input_box {
  background-color: white;
  font-weight: bolder;
  height: 80px;
  width: 40%;
  font-size: 1.5rem;
  font-weight: 600;
  margin: 10px;
  padding: 15px;
  border: 0px;
  box-shadow: grey 5px 8px 5px;
  border-radius: 10px 10px 10px 10px;
}


.correct{
  color: rgb(82, 200, 82);
}

.restart {
  display: none;
  background-color: skyblue;
  font-size: 1.5rem;
  padding: 10px;
  border: 0px;
  color: whitesmoke;
  border-radius: 10px 10px 10px 10px;
  width: 30%;
  font-weight: bold;
  box-shadow: grey 5px 8px 5px;
}

.start {
  background-color: skyblue;
  font-size: 1.5rem;
  padding: 10px;
  border: 0px;
  color: whitesmoke;
  border-radius: 10px 10px 10px 10px;
  width: 30%;
  font-weight: bold;
  box-shadow: grey 5px 8px 5px;
}
Applying JavaScript:
Now the main functionality of our typing speed testing tool depends on the JavaScript part. Let's see how-
let timer_text = document.querySelector(".init_time");
let accuracy_text = document.querySelector(".init_accuracy");
let error_text = document.querySelector(".init_errors");
let words_text = document.querySelector(".init_wpm");
let content_text = document.querySelector(".content");
let input_box = document.querySelector(".input_box");
let start_btn = document.querySelector(".start");
let restart_btn = document.querySelector(".restart");
let wpm_group = document.querySelector(".wpm");
let error_group = document.querySelector(".errors");
let accuracy_group = document.querySelector(".accuracy");
All the classes are selected and initialized in different variables for later use as shown as above. Classes in DOM are selected using **querySelector** method.
let time_left = 60;
let time_passed = 0;
let total_errors = 0;
let errors = 0;
let accuracy = 0;
let typed = 0;
let current_content = "";
let timer = null;
Variables like time-left, time-passed, total_errors, errors, accuracy, typed, current_content and timer are defined and initialized as shown as above.
Now let's define the function for showing text content that will be shown to user.
function ChangeContent() {
  content_text.textContent = null;
  current_content = "Lorem ipsum, or lipsum as it is sometimes known, is dummy text used in laying out print, graphic or web designs. The passage is attributed to an unknown typesetter in the 15th century."

  current_content.split('').forEach(char => {
    const charSpan = document.createElement('span');
    charSpan.innerText = char;
    content_text.appendChild(charSpan);
  })
}
A sample text is initiallized in the current_content varibale. Then iterating for each character (including whitespace), the constant varible charSpan is initialized by crearting new element 'span' and innerText is set as the current character. Now, that is pushed to the content_text by using appendChild method.
Now, let's see how the input text typed by the user is processed.
function textInput() {
  input = input_box.value;
  input_array = input.split('');
  typed++;
  errors = 0;
  quoteSpanArray = content_text.querySelectorAll('span');
  quoteSpanArray.forEach((char, index) => {
  let typed = input_array[index]
  if (typed == null) {
      char.classList.remove('correct');
  }
  else if (typed === char.innerText) {
      char.classList.add('correct');
  }
  else {
    errors++;
  }
});

error_text.textContent = total_errors + errors;
let correctCharacters = (typed - (total_errors + errors));
let accuracyData = ((correctCharacters / typed) * 100);
accuracy_text.textContent = Math.round(accuracyData);

if (input.length == current_content.length) {
    ChangeContent();
    total_errors += errors;
    input_box.value = "";
}
As shown above, the value of the input box, i.e 'text-area' tag is stored in the input variable. For the input text the characters are split and stored in input_array. After that the typed variable which was initialized as 0, gets incremented by one.
Now, the logic is, for each character typed if that character is matched with the character to be typed, 'correct' class is added in the element stored in char variable. Otherwise, the value of errors variable is incremented by one.
Then, the temporary value of errors variable is added to the value of total_errors variable. Number of correcty typed characters and the accuracy are calculated and the data is added to the concerned class as shown above in the second last block of code.
In the last block of code, if the user typed all the characters in the sample text we change the content (In this case the text will be repeated, you can add new sample texts too).
Now, lets's see how to start the game.
function startGame() {
  content_text.style.display="block";
  resetGame();
  ChangeContent();
  clearInterval(timer);
  timer = setInterval(updateTimer, 1000);
}
As shown above, everytime the start button is pressed, this block of code is executed. The sample text area is shown by changing the value of display property from none to block. Then, we reset the values of the variables as the initial values by resertGame() function as dicussed later. Then the sample text is shown by ChangeContent() function. Then we set the timer by setInterval method and update the timer.
function resetGame() {
  time_left = 60;
  time_passed = 0;
  errors = 0;
  total_errors = 0;
  accuracy = 0;
  typed = 0;
  c = 0;
  input_box.disabled = false;
  input_box.value = "";
  content_text.textContent = "";
  accuracy_text.textContent = 100;
  timer_text.textContent = time_left;
  error_text.textContent = 0;
  restart_btn.style.display = "none";
  wpm_group.style.display = "none";
}
Now, let's see how to update the timer.
function updateTimer() {
  if (time_left > 0) {
    time_left--;
    time_passed++;
    timer_text.textContent = time_left ;
  }
  else {
    finishGame();
  }
}
If time duration left is not 0, the timer value keeps decrementing and more time gets passed, i.e. time_left-- and time_passed++. Current value of timer is added to the textContent of timer_text variable. Else, if the timer value as reached 0 then finishGame() function is revoked.
function finishGame() {
  clearInterval(timer)
  input_box.disabled = true;
  content_text.style.display="none";
  wpm = Math.round((((typed / 5) / time_passed) * 60));
  words_text.textContent = wpm;
  wpm_group.style.display = "block";
}
First, the timer value is reset by clearInterval() method. Then, input box is disabled and content text area is hidden by changing display style property value to 'none'. Then the typing speed is calculated and shown as shown in the code above
Here's the full JavaScript code-
Complete JavaScript code:
let timer_text = document.querySelector(".init_time");
let accuracy_text = document.querySelector(".init_accuracy");
let error_text = document.querySelector(".init_errors");
let words_text = document.querySelector(".init_wpm");
let content_text = document.querySelector(".content");
let input_box = document.querySelector(".input_box");
let start_btn = document.querySelector(".start");
let restart_btn = document.querySelector(".restart");
let wpm_group = document.querySelector(".wpm");
let error_group = document.querySelector(".errors");
let accuracy_group = document.querySelector(".accuracy");


let time_left = 60;
let time_passed = 0;
let total_errors = 0;
let errors = 0;
let accuracy = 0;
let typed = 0;
let current_content = "";
let c = 0;
let timer = null;


function ChangeContent() {
  content_text.textContent = null;
  current_content = "Lorem ipsum, or lipsum as it is sometimes known, is dummy text used in laying out print, graphic or web designs. The passage is attributed to an unknown typesetter in the 15th century."

  current_content.split('').forEach(char => {
    const charSpan = document.createElement('span');
    charSpan.innerText = char;
    content_text.appendChild(charSpan);
  })

}

function textInput() {
  input = input_box.value;
  input_array = input.split('');
  typed++;
  errors = 0;
  quoteSpanArray = content_text.querySelectorAll('span');
  quoteSpanArray.forEach((char, index) => {
  let typed = input_array[index]
  if (typed == null) {
      char.classList.remove('correct');
  }
  else if (typed === char.innerText) {
      char.classList.add('correct');
  }
  else {
    errors++;
  }
});

  error_text.textContent = total_errors + errors;
  let correctCharacters = (typed - (total_errors + errors));
  let accuracyData = ((correctCharacters / typed) * 100);
  accuracy_text.textContent = Math.round(accuracyData);

  if (input.length == current_content.length) {
    ChangeContent();
    total_errors += errors;
    input_box.value = "";
  }
}

function updateTimer() {
  if (time_left > 0) {
    time_left--;
    time_passed++;
    timer_text.textContent = time_left ;
  }
  else {
    finishGame();
  }
}

function finishGame() {
  clearInterval(timer)
  input_box.disabled = true;
  content_text.style.display="none";
  wpm = Math.round((((typed / 5) / time_passed) * 60));
  words_text.textContent = wpm;
  wpm_group.style.display = "block";
}

function startGame() {
  content_text.style.display="block";
  resetGame();
  ChangeContent();
  clearInterval(timer);
  timer = setInterval(updateTimer, 1000);
}

function resetGame() {
  time_left = 60;
  time_passed = 0;
  errors = 0;
  total_errors = 0;
  accuracy = 0;
  typed = 0;
  c = 0;
  input_box.disabled = false;
  input_box.value = "";
  content_text.textContent = "";
  accuracy_text.textContent = 100;
  timer_text.textContent = time_left;
  error_text.textContent = 0;
  restart_btn.style.display = "none";
  wpm_group.style.display = "none";
}
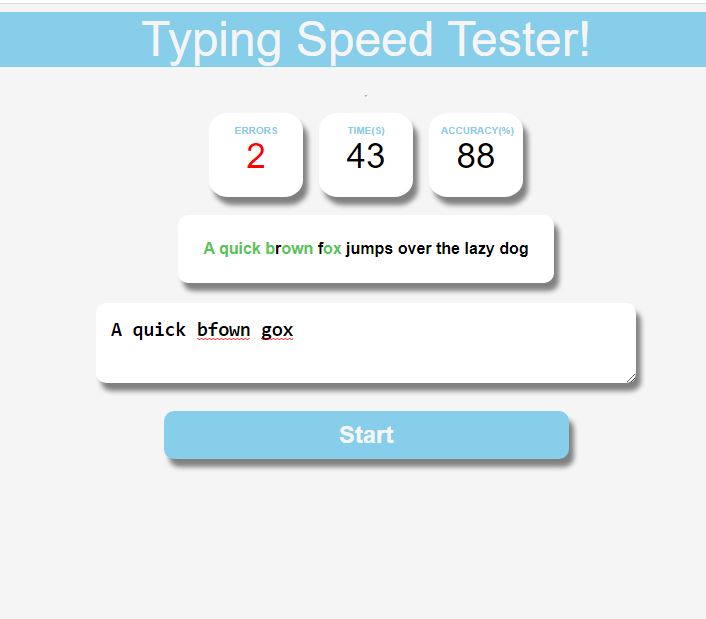
Output:
You can find the source code here: https://github.com/arghac14/Typing-speed-tester.
You can try the live demo: Link.
With this article at OpenGenus, you must have the complete idea of developing this Typing speed game in JavaScript. Enjoy.