
In this article, I will explain the steps on how I created a calculator with JavaScript with User Interface using HTML and CSS.
Table of contents:
-
Features/Requirements
-
Screenshot
-
HTML code
-
Styles with CSS
-
JavaScript:
- Generate the buttons
- ON/OFF functionality
- Set the numbers
- The calculate functionality
- The main logic
- Get the final result
- Clear All/Clear Last functionality
1. Features/Requirements:
-
create a UI for the calculator
-
have ON/OFF functionality
-
perform basic calculations:
- addition
- subtraction
- multiplication
- division
-
able to clear all/clear last digit
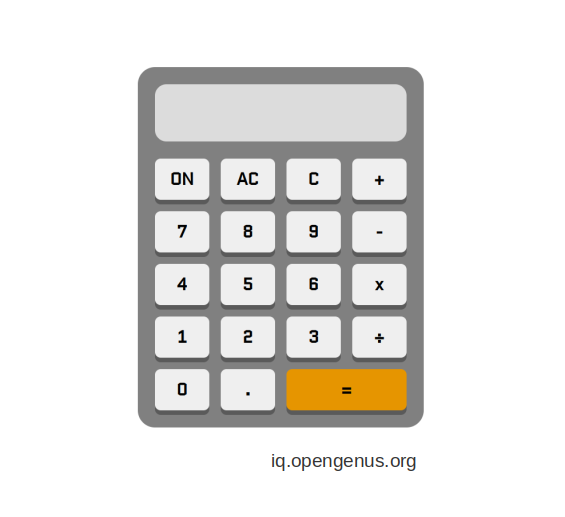
2. Screenshot
3. HTML code
<!DOCTYPE html>
<html lang="en">
  <head>
    <meta charset="UTF-8" />
    <meta http-equiv="X-UA-Compatible" content="IE=edge" />
    <meta name="viewport" content="width=device-width, initial-scale=1.0" />
    <title>Calculator</title>
    <link rel="preconnect" href="https://fonts.googleapis.com" />
    <link rel="preconnect" href="https://fonts.gstatic.com" crossorigin />
    <link
      href="https://fonts.googleapis.com/css2?family=Quantico&display=swap"
      rel="stylesheet"
    />
    <link rel="stylesheet" href="./style.css" type="text/css" />
  </head>
  <body>
    <div id="container">
      <div id="display">
        <span id="previous-number"></span>
        <span id="current-number"></span>
      </div>
      <div id="buttons-container"></div>
    </div>
    <script src="./index.js" type="module"></script>
  </body>
</html>
Above is the HTML structure of the calculator, it's short and simple.
In the head element, I added a few link tags, the first two means that we will need resources from that origin, and preconnecting speeds up future loads. The third link tag is getting the font from Google fonts. The order matters here because if we would put the link tag with the CSS file in the front, then the font won't load in our CSS file. So that's why the link tags with the external resource need to come before we attach the CSS file to our HTML file.
In the body element, I have a container div which is the calculator itself. Inside, I have a display div that contains two additional span elements (previous, current), here I will be tracking the previous numbers, the operator, and the current number. Below the display, I have a buttons container div that will hold all the buttons.
I purposely didn't hard code all the buttons here because it would be a long list of button elements, instead, I'm generating them with JavaScript.
4. Styles with CSS
/* Reset CSS */
*,
*::before,
*::after {
  margin: 0;
  padding: 0;
  box-sizing: border-box;
}

body {
  height: 100vh;
  display: flex;
  align-items: center;
  justify-content: center;
}

#container {
  width: 90%;
  max-width: 500px;
  background: grey;
  border-radius: 30px;
  padding: 30px;
}

#display {
  background: gainsboro;
  border-radius: 20px;
  width: 100%;
  height: 100px;
  margin-bottom: 30px;
}

#current-number,
#previous-number {
  width: 100%;
  height: 50%;
  border-radius: 20px;
  display: block;
  font-family: 'Quantico', sans-serif;
  display: flex;
  justify-content: flex-end;
  align-items: center;
  padding: 0 15px;
}

#current-number {
  font-size: 2.6rem;
}

#previous-number {
  font-size: 1.5rem;
}

#buttons-container {
  display: grid;
  grid-template-columns: repeat(4, 1fr);
  gap: 20px;
}

#buttons-container > button:last-of-type {
  grid-column: 3 / -1;
  background: rgb(230, 149, 0);
}

button {
  padding: 15px 0;
  font-family: 'Quantico', sans-serif;
  font-size: 1.8rem;
  font-weight: 700;
  cursor: pointer;
  border-radius: 10px;
  border: none;
  box-shadow: 0 8px rgb(90, 90, 90);
}

button:hover {
  box-shadow: none;
  position: relative;
  top: 10%;
}

@media (max-width: 600px) {
  body {
    overflow-y: auto;
  }

  #container {
    width: 95%;
    padding: 15px;
  }

  #buttons-container {
    column-gap: 10px;
    row-gap: 15px;
  }

  #current-number {
    font-size: 2rem;
  }

  #previous-number {
    font-size: 1.1rem;
  }

  button {
    padding: 10px 0;
  }
}
In the beginning, I'm resetting the CSS, because the default applied styles for the elements are different across the browsers, so with this, I'm styling the elements from 0 and the outcome will be pretty similar in all of the browsers.
I centered the calculator on the page using flexbox.
I gave the container a width of 90% but I also set the max-width to 500px so it will never be bigger than that.
You can see that I'm using the imported font called Quantico in the display and on the buttons, and I gave a fallback font sans-serif as well if for some reason the imported font won't load or work.
The buttons container has a display of a grid, with this it is quite easy to layout the buttons evenly. I set the grid to have 4 columns and the very last button (=) takes two column spaces.
#buttons-container > button:last-of-type {
  grid-column: 3 / -1;
  background: rgb(230, 149, 0);
}
In this example, I reference the last button in the buttons container and the grid-column property with the value 3 / -1 indicates that the button should take the column space from the 3rd column until the last one.
I gave a hover effect for the buttons, so when we hover over them they look as if we press the buttons. I achieve this by removing the box-shadow property from them, setting their position to be relative, and moving them down a little bit by adding the top property with a value of 10%.
button:hover {
  box-shadow: none;
  position: relative;
  top: 10%;
}
After that, I added a media query for screen sizes up to 600px, so the calculator fits nicely on most mobile phones.
5. JavaScript
This is the code in the index.js file:
import buttonsTextContent from './modules/buttons.js';
import { switchOffCalculator, switchOnCalculator } from './modules/onOff.js';

const currentNum = document.getElementById('current-number');
const previousNum = document.getElementById('previous-number');
const buttonsContainer = document.getElementById('buttons-container');
let num1;
let num2;
let currentOperation;
let previousOperation;
let result;
let current;

buttonsTextContent.forEach((button) => {
  const btn = document.createElement('button');
  btn.textContent = button;
  btn.setAttribute('id', `${button}`);
  const numberRegex = /[0-9]/;
  const operationRegex = /[.+\-x÷]/;
  // Add a class attribute called 'number' only to the number buttons
  if (button.match(numberRegex)) {
    btn.setAttribute('class', 'number');

    // Add a class attribute called 'operation' only to the operation buttons
  } else if (button.match(operationRegex)) {
    btn.setAttribute('class', 'operation');
  }
  buttonsContainer.appendChild(btn);
});

const numbers = [...document.querySelectorAll('.number')];
const operations = [...document.querySelectorAll('.operation')];
const equalBtn = document.getElementById('=');
const clearAllBtn = document.getElementById('AC');
const clearLastBtn = document.getElementById('C');

const switchBtn = document.getElementById('ON');
switchBtn.addEventListener('click', () => {
  if (switchBtn.textContent === 'ON') {
    switchBtn.textContent = 'OFF';
    switchOnCalculator(numbers, operations, setOperation, setNumbers);
    equalBtn.addEventListener('click', getResult);
    clearAllBtn.addEventListener('click', clearAll);
    clearLastBtn.addEventListener('click', clearLast);
    currentNum.textContent = '0';
    current = 0;
    num1 = null;
    num2 = null;
    currentOperation = null;
    previousOperation = null;
    result = null;
  } else {
    switchBtn.textContent = 'ON';
    switchOffCalculator(numbers, operations, setOperation, setNumbers);
    equalBtn.removeEventListener('click', getResult);
    clearAllBtn.removeEventListener('click', clearAll);
    clearLastBtn.removeEventListener('click', clearLast);
    currentNum.textContent = '';
    previousNum.textContent = '';
  }
});

const setNumbers = (e) => {
  if (currentNum.textContent.length < 13) {
    currentNum.textContent += e.target.textContent;
    current = Number(currentNum.textContent);
  }
};

const calculate = (num1, num2, operation) => {
  if (operation === '+') {
    return num1 + num2;
  } else if (operation === '-') {
    return num1 - num2;
  } else if (operation === 'x') {
    return num1 * num2;
  } else {
    return num1 / num2;
  }
};

const getResult = () => {
  if (currentNum.textContent !== '' && previousNum.textContent === '') {
    return;
  } else if (currentNum.textContent !== '' && previousNum.textContent !== '') {
    num2 = current;
    result = calculate(num1, num2, previousOperation);
    currentNum.textContent = result.toString();
    previousNum.textContent = '';
    current = result;
    num1 = null;
    num2 = null;
    previousOperation = null;
    currentOperation = null;
    if (currentNum.textContent.length > 12) {
      currentNum.textContent = currentNum.textContent
        .split('')
        .splice(0, 12)
        .join('');
    }
  } else {
    currentNum.textContent = num1.toString();
    previousNum.textContent = '';
    current = num1;
    num1 = null;
    previousOperation = null;
    currentOperation = null;
  }
};

const setOperation = (e) => {
  // Check if the dot is being clicked
  if (e.target.textContent === '.') {
    if (
      !currentNum.textContent.includes('.') &&
      currentNum.textContent !== ''
    ) {
      currentNum.textContent += '.';
    } else {
      return;
    }
  } else {
    if (!num1 && !num2) {
      previousOperation = e.target.textContent;
      num1 = current;
      previousNum.textContent = `${num1} ${previousOperation}`;
      currentNum.textContent = '';
      current = null;
    } else {
      currentOperation = e.target.textContent;
      num2 = current;
      result = calculate(num1, num2, previousOperation);
      previousNum.textContent = `${result} ${currentOperation}`;
      previousOperation = currentOperation;
      currentNum.textContent = '';
      num1 = result;
      current = null;
      num2 = null;
    }
  }
};

const clearAll = () => {
  num1 = null;
  num2 = null;
  currentOperation = null;
  previousOperation = null;
  result = null;
  current = 0;
  previousNum.textContent = '';
  currentNum.textContent = '0';
};

const clearLast = () => {
  if (currentNum.textContent !== '') {
    currentNum.textContent = currentNum.textContent
      .split('')
      .splice(0, currentNum.textContent.length - 1)
      .join('');
    current = Number(currentNum.textContent);
  }
Generate the buttons
const buttonsTextContent = [
  'ON',
  'AC',
  'C',
  '+',
  '7',
  '8',
  '9',
  '-',
  '4',
  '5',
  '6',
  'x',
  '1',
  '2',
  '3',
  '÷',
  '0',
  '.',
  '=',
];

export default buttonsTextContent;
I have a modules folder where I keep two files, one is for the button's text content and the other one belongs to the ON/OFF functionality. I tried not to put everything in the index.js file, it's better if we can extract functionalities into their own file whenever possible.
I created an array called buttonsTextContent because it only holds the text contents. I added the contents in order as they appear on the calculator.
At the end of the file, I export the array so I can import it into the index.js file.
Here, I import the array:
import buttonsTextContent from './modules/buttons.js';
And here, I create the buttons:
buttonsTextContent.forEach((button) => {
  const btn = document.createElement('button');
  btn.textContent = button;
  btn.setAttribute('id', `${button}`);
  const numberRegex = /[0-9]/;
  const operationRegex = /[.+\-x÷]/;
  // Add a class attribute called 'number' only to the number buttons
  if (button.match(numberRegex)) {
    btn.setAttribute('class', 'number');

    // Add a class attribute called 'operation' only to the operation buttons
  } else if (button.match(operationRegex)) {
    btn.setAttribute('class', 'operation');
  }
  buttonsContainer.appendChild(btn);
});

const numbers = [...document.querySelectorAll('.number')];
const operations = [...document.querySelectorAll('.operation')];
const equalBtn = document.getElementById('=');
const clearAllBtn = document.getElementById('AC');
const clearLastBtn = document.getElementById('C');
For each content in the array, I create a button element and save it in the btn variable.
I set the text content of the buttons and I gave each an id attribute which is going to be their own text content. So for example, if I want to reference the button with the number 1, then I can get it by it's id like this: document.querySelector('#1).
After this, I created a regex for the numbers pattern /[0-9]/, which means that the pattern is from the number 0 to number 9. So if the buttons match this, then I add a class attribute called the number to these buttons. Now, all th number buttons have a class called number.
There is another regex pattern I created /[.+\-x÷]/, this pattern means that I'm looking for matches that will match these characters. You can see, I put an escape character before the - sign because if I don't then it will serve as a ranged character like in the first example /[0-9]/. So if any buttons match this pattern, then I add a class attribute called operation. In the end, I append all the buttons inside the buttons container div.
When the buttons are created, I reference them and save them in variables.
I reference the numbers and operations with the querySelectorAll which will be all the elements with that class name and this will be an array of elements:
const numbers = [...document.querySelectorAll('.number')];
I used the spread operator (...) which is basically spreads the array elements inside the array. So inthis array I will have all the number button elements from 0-9.
ON/OFF functionality
const switchOnCalculator = (numbers, operations, operate, setNumbers) => {
  numbers.forEach((number) => {
    number.addEventListener('click', setNumbers);
  });
  operations.forEach((operation) => {
    operation.addEventListener('click', operate);
  });
};

const switchOffCalculator = (numbers, operations, operate, setNumbers) => {
  numbers.forEach((number) => {
    number.removeEventListener('click', setNumbers);
  });
  operations.forEach((operation) => {
    operation.removeEventListener('click', operate);
  });
};

export { switchOffCalculator, switchOnCalculator };
This is the other file in the modules folder where I keep the switch functions of the calculator. When we turn on the calculator then I'm adding event listeners to all the buttons and when we turn it off I remove the event listeners so we no longer can do calculations.
Now, I'm exporting the functions differently than in the buttons file, this is called named exports. Since there is more than one function I want to export, it makes sense to export them together and then import them together as well.
const switchBtn = document.getElementById('ON');
switchBtn.addEventListener('click', () => {
  if (switchBtn.textContent === 'ON') {
    switchBtn.textContent = 'OFF';
    switchOnCalculator(numbers, operations, setOperation, setNumbers);
    equalBtn.addEventListener('click', getResult);
    clearAllBtn.addEventListener('click', clearAll);
    clearLastBtn.addEventListener('click', clearLast);
    currentNum.textContent = '0';
    current = 0;
    num1 = null;
    num2 = null;
    currentOperation = null;
    previousOperation = null;
    result = null;
  } else {
    switchBtn.textContent = 'ON';
    switchOffCalculator(numbers, operations, setOperation, setNumbers);
    equalBtn.removeEventListener('click', getResult);
    clearAllBtn.removeEventListener('click', clearAll);
    clearLastBtn.removeEventListener('click', clearLast);
    currentNum.textContent = '';
    previousNum.textContent = '';
  }
});
I attach an event listener to the ON button and the text toggles from ON to OFF whenever we click the button.
When it's turned on, all the variables get reset and the number 0 appears on the display.
current = 0;
num1 = null;
num2 = null;
currentOperation = null;
previousOperation = null;
result = null;
You can see at the beginning of the file, I declared the variables but I didn't set a value for them yet because that will change every time we perform a calculation.
When we turn it off, the display gets empty and all the event listeners are removed.
Set the numbers
const setNumbers = (e) => {
  if (currentNum.textContent.length < 13) {
    currentNum.textContent += e.target.textContent;
    current = Number(currentNum.textContent);
  }
};
This function gets called whenever we click a number button. I set a condition so the length is not going to get too big and overflow from the display. So we can type a number and set it as the current number while the length is less than 13.
The calculate functionality
const calculate = (num1, num2, operation) => {
  if (operation === '+') {
    return num1 + num2;
  } else if (operation === '-') {
    return num1 - num2;
  } else if (operation === 'x') {
    return num1 * num2;
  } else {
    return num1 / num2;
  }
};
This function is straightforward, we need two numbers to work with and an operation, and depending on the operation type we perform the correct calculation.
The main logic
const setOperation = (e) => {
  if (e.target.textContent === '.') {
    if (
      !currentNum.textContent.includes('.') &&
      currentNum.textContent !== ''
    ) {
      currentNum.textContent += '.';
    } else {
      return;
    }
  } else {
    if (!num1 && !num2) {
      previousOperation = e.target.textContent;
      num1 = current;
      previousNum.textContent = `${num1} ${previousOperation}`;
      currentNum.textContent = '';
      current = null;
    } else {
      currentOperation = e.target.textContent;
      num2 = current;
      result = calculate(num1, num2, previousOperation);
      previousNum.textContent = `${result} ${currentOperation}`;
      previousOperation = currentOperation;
      currentNum.textContent = '';
      num1 = result;
      current = null;
      num2 = null;
    }
  }
};
We can already set our current number but we also need to set the operation.
if (e.target.textContent === '.') {
    if (
      !currentNum.textContent.includes('.') &&
      currentNum.textContent !== ''
    ) {
      currentNum.textContent += '.';
    } else {
      return;
    }
First, we check if the dot button is being clicked, if yes, then we have to check if the display is already including a dot, if not, then we can add a dot. This condition makes sure that there's no more than one dot being added.
 } else {
    if (!num1 && !num2) {
      previousOperation = e.target.textContent;
      num1 = current;
      previousNum.textContent = `${num1} ${previousOperation}`;
      currentNum.textContent = '';
      current = null;
If it's not the dot that we are clicking then it's an operation.
The first condition checks if neither num1 nor num2 is set. We set the operation to the previousOperation variable and the current number is going to be our num1. Then in the display, I keep track of them by showing num1 and the operation. Now, in the next round, the current number is set to null, so we have to type in a number again to set it to the current.
} else {
      currentOperation = e.target.textContent;
      num2 = current;
      result = calculate(num1, num2, previousOperation);
      previousNum.textContent = `${result} ${currentOperation}`;
      previousOperation = currentOperation;
      currentNum.textContent = '';
      num1 = result;
      current = null;
      num2 = null;
    }
The last part of the condition gets executed when we already have our num1 set.
So we need to set our num2 which is the current number and perform the calculation and save it in the result variable.
Num1 becomes the result and the operation is going to be whatever we clicked the last time. After that, we set both the result and num2 back to null.
This block of code will be executed every time we click an operation and a number after that.
Let's see how we can get the final result.
Get the final result
const getResult = () => {
  if (currentNum.textContent !== '' && previousNum.textContent === '') {
    return;
  } else if (currentNum.textContent !== '' && previousNum.textContent !== '') {
    num2 = current;
    result = calculate(num1, num2, previousOperation);
    currentNum.textContent = result.toString();
    previousNum.textContent = '';
    current = result;
    num1 = null;
    num2 = null;
    previousOperation = null;
    currentOperation = null;
    if (currentNum.textContent.length > 12) {
      currentNum.textContent = currentNum.textContent
        .split('')
        .splice(0, 12)
        .join('');
    }
  } else {
    currentNum.textContent = num1.toString();
    previousNum.textContent = '';
    current = num1;
    num1 = null;
    previousOperation = null;
    currentOperation = null;
  }
};
When we click the equal button there are a few conditions we need to check.
If we only have the current number in the display then we just return and do nothing.
If we have a number in both previous and current displays then we need to perform a calculation and show only the final result. Then we have to set the variables back to null. Also, I check if the length is greater than 12, if yes, then I just return 12 characters so the text will not flow out of the screen.
 if (currentNum.textContent.length > 12) {
      currentNum.textContent = currentNum.textContent
        .split('')
        .splice(0, 12)
        .join('');
    }
And if we have a previous number but nothing in the current display then we just return the previous number in the current field.
Clear All/Clear Last functionality
const clearAll = () => {
  num1 = null;
  num2 = null;
  currentOperation = null;
  previousOperation = null;
  result = null;
  current = 0;
  previousNum.textContent = '';
  currentNum.textContent = '0';
};

const clearLast = () => {
  if (currentNum.textContent !== '') {
    currentNum.textContent = currentNum.textContent
      .split('')
      .splice(0, currentNum.textContent.length - 1)
      .join('');
    current = Number(currentNum.textContent);
  }
};
The last two functions are simple.
When we click the AC (clear all) button then we reset everything to the same state as when we turned on the calculator.
When clicking the C (clear last) button, we only delete the last digit of the current number.
Conclusion
There are many ways to build a calculator with JavaScript, even more complex ones, and I hope my approach is clear after explaining all the steps.
You can test it out here: Calculator with JavaScript
But don't forget to turn it on first!