In this article at OpenGenus, we will be building a wordle game using HTML, CSS and JS. Stay for the exciting implementation details.
Contents:
- Game and the rules.
- Design Overview and Approach.
- Folder structure.
- Implementation
- wordle.html
- wordle.css
- wordle.js
- GamePlay.
Game and the rules.
Wordle is a good game to keep learning new words and keeping the daily vocabulary in check. The game focuses on helping user guess. It's very beginner friendly.
- In wordle, the computer chooses a word everyday.
- The user has to guess the word in six attempts.
- Each word will be a five letter one.
- The question mark icon contains all the information related to the game.
- The giveup button reveals the answer and the user can't continue anymore.
Design overview and approach.
To make a wordle game we are going to use HTML, CSS and Js. The main advantage of using Js is the dynamic functionality it provided to add and remove elements from HTML document using the interface DOM. Every document which is rendered on the webpage follows DOM. The nesting of the nodes can be observed while writing HTML document. HTML is hypertext markup language and is the default language to make documents used to display on browser.
we will start with the folderstructure and later move to thinking in depth on how to approach this problem. The project contains 3 files wordle.html which is an HTML document. There is wordle.css which contains the styles which are taken by the HTML element. The wordle.js file contains the code which is used to manipulate the document model and also make dynamic changes through events.
Folder structure.
``` Wordle | |- wordle.html |- wordle.css |- wordle.js ```
Implementation.
The wordle.html contains the basic template which will assist browser to parse the page for the necessary information and present it. The contents of the file are as follows.
wordle.html
<!DOCTYPE html>
<html>

    <head>

        <title> Wordle </title>
        <meta charset="'utf-8">
        <meta name="author" content="Sathya">
        <meta name="viewport" content="width=device-width, initial-scale=0, user-scalable=no">

        <link rel="stylesheet" href='wordle.css'>
        <script src="wordle.js"></script>
    </head>


    <body>


    </body>
</html>
Every HTML document starts with the html tag and the doctype declaration. Our html document has two parts. One, the head tag and other the body. The head tag contains all the metadata which is enclosed in the opening and the closing tags. The metadata is the data about data, in our case it is the information about the html document. It describes the author, title, characterset, styles and scripts that we are using in association with this document. meta tag is used to describe the metadata. The meta tag contains name and content attributes.
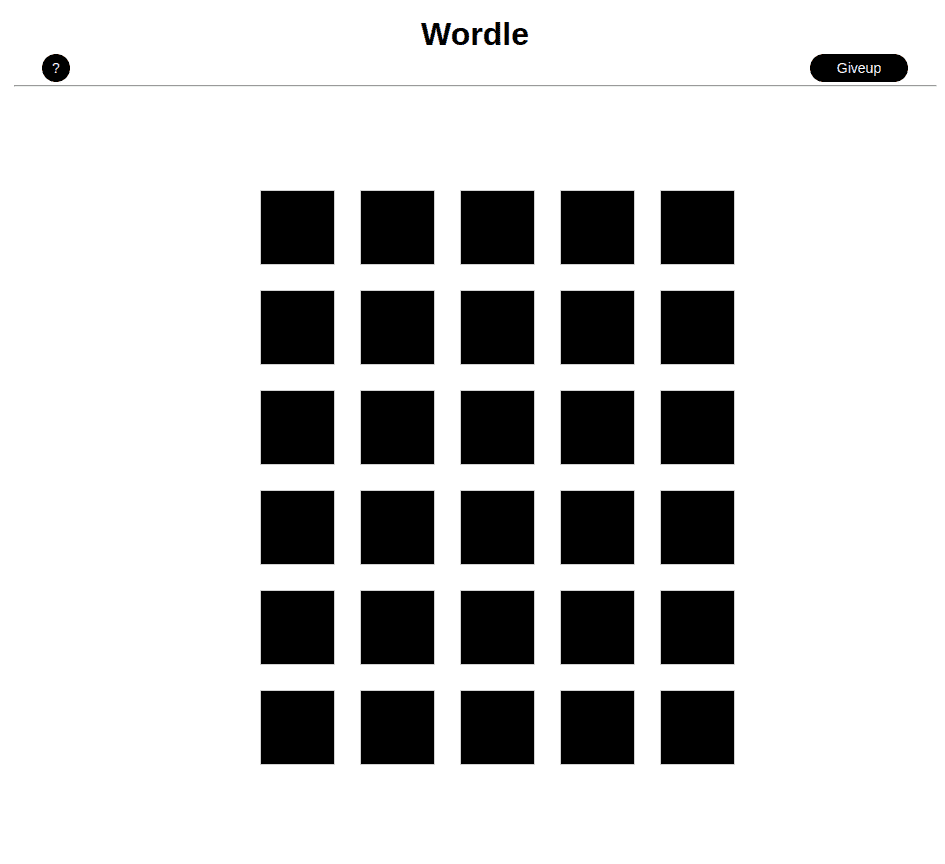
The body tag is the place where all the main contents of the page goes. Think of it as a canvas or a draw area. Its the part that we see on the screen. We are creating a heading tag and a div. The div is to hold all the tiles which are part of the game.
wordle.css
The style.css is the external css which beautifies the page which is displayed on the browser. To establish a connection between the html page and the css file we use link tag. The contents of css are as follows.
*{
    margin:0;

    padding:0;
    box-sizing:border-box;
}
We are setting the entire body margin and padding to 0 and maintaining a consistent box-sizing which is border-box. We are using box-sizing property because, in the olden days width of an element box was equal to the width of the element, padding of the element and the border. But when we are using responsive designs we need the element's box to stay consistent when we want to experiment. Default value of the box-sizing is content-box which doesn't include the padding and the border of the element into consideration and whenever they are added the element's size increases. Whereas using border-box we are simplifying things easily by also including the padding and border to the width and heights of the elements.
body{

    text-align: center;
    font-family: Arial, Helvetica, sans-serif;

}
#tiles{

    display:grid;
    margin:100px auto;
    grid-template-columns:repeat(5, 5em);
    grid-template-rows: repeat(6, 5em);
    gap:20px;
    /* background-color: green;  */
    justify-content: center;
    align-items:center;
    width:max-content;

}

.tile{

    border:1px solid lightgray;
    height:3em;
    width:3em;
    cursor:pointer;
    background-color: black;
    margin:1em;

    color:white;
    background-color: black;
    font-weight: bold;
    display: flex;
    justify-content: center;
    align-items:center;
    font-size:25px;

}

.correct{

    background-color: #6AAA64;


}

.present{

    background-color: #C9B458;

}

.absent{

    background-color: #787C7E;

}
We have created tile class which will be responsible for the style of the tiles where the user enters the alphabet. The tiles id acts as a container which will hold all the tiles. The container for holding tiles is created using a grid which has 5 columns and 6 rows. correct, present and absent classes are used to assign the tiles to green, yellow or gray based on if they if the position of the letter is matching , if the letter is present , if the letter is not present in the word.
#qmark:hover{

    background-color: white;
    color:black;
    transition: 0.7s;

    border:2px solid lightgray;
}


#qmark{

    height:2em;
    width:2em;
    left:35em;
    top:5em;
    position:absolute;
    border-radius: 20px;
    border:none;
    background-color: black;
    color:white;

    font-size: 14px;

}

#giveup
{
    height:2em;
    width:7em;
    right:35em;
    top:5em;
    position:absolute;
    background-color: black;
    color:white;
    border-radius: 30px;
    border:none;
    font-size:14px;

}

#giveup:hover {
    background-color: white;
    color:black;
    transition: 0.7s;
    border:2px solid lightgray;
}


.popup {
    position: fixed;
    top: 0;
    left: 0;
    width: 100%;
    height: 100%;
    background-color: rgba(0, 0, 0, 0.5);
    display: flex;
    justify-content: center;
    align-items: center;
    z-index: 9999;
  }

  .popup-content {
    background-color: #fff;
    padding: 20px;
    border-radius: 5px;
    width:max-content;
  }

  .popup-content>ol{

    text-align: left;
  }

  .popup-close {
    position: absolute;
    top: 39%;
    right: 33%;
    font-size: 3em;
    cursor: pointer;
    color:red;
  }
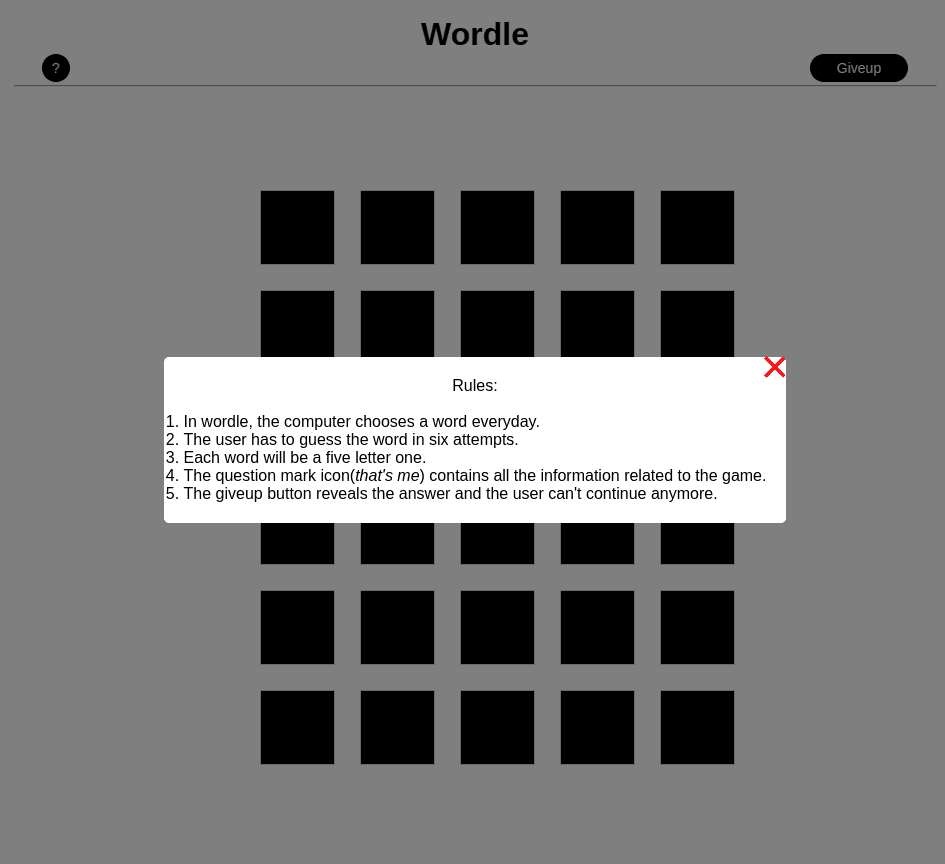
qmark and giveup id are created to beautify the question mark and the giveup buttons which we are going to add using DOM later. There is also a popup which opens up when we click on the question mark, to make it look good we are using popup, popup-content and popup-close classe.
wordle.js
// 0. basic essentials needed for the page


const heading=document.createElement('h1');

const linebreak=document.createElement('hr');

const tiles=document.createElement('div');

const answer=document.createElement('h2');

const giveup=document.createElement('button');

const qmark=document.createElement('button');

var gameover=false;
var rows=6;
var columns=5;

var rowsindex=0;
var columnsindex=0;

//actual data
let word1;

const url = 'https://wordle-game-api1.p.rapidapi.com/word';
const options = {
  method: 'GET',
  headers: {
  	'X-RapidAPI-Key': 'YOUR KEY',
  	'X-RapidAPI-Host': 'wordle-game-api1.p.rapidapi.com'
  }
};

fetch(url,options).then( data =>{
return data.json()
}). then( data =>{
  assignres(data)
})


function assignres(data)
{
word1= data.word;
word1=word1.toUpperCase();
console.log(word1);
}


window.onload=function(){

  initialization();

}
In the above we are actually planning everything that we have to insert into the HTML. DOM is the interface between scripting languages and the webpage structure. To get the word which should be different each day, we are using Wordle API provided on rapidAPI. The API has a free limit of 100 hits a day. If you want to convert this game into an actual application and want to publish it then you may want to consider subscribing to their other plans. We are going to use fetch function which is uses AJAX( Asynchronous Javascript and XML) to hit an API at a given endpoint and fetch data. For that we need to specify the type of method i.e 'get', 'post', 'put','delete'. In this case, it's the 'get' method. The API also needs a header. The header contains the API key which uniquely identifies the user. In the end we are converting it to uppercase and assigning it. On screen load, we want to execute some functionalities for that we are specifying window.onload.
function initialization()
{
    const body=document.body;
    console.log(body);


          // 1. making tiles and appending it to the tiles container

          for(let i=0;i<rows;i++)
              {
                for(let j=0;j<columns;j++)
                    {
                            const tile=buildtile(i,j);

                             tiles.appendChild(tile);
                    }
              }


          // 2. setting needed properties for the elements
          heading.innerText='Wordle';
          tiles.setAttribute('id','tiles');
          heading.style.margin='1em auto';
          linebreak.style.width='50%';
          linebreak.style.margin='1em auto';
          answer.innerText=""


          qmark.innerText='?';
          qmark.setAttribute('id','qmark');
          giveup.innerText='Giveup';
          giveup.setAttribute('id', 'giveup');

        body.appendChild(heading);
        body.appendChild(qmark);
        body.appendChild(giveup);
        body.appendChild(linebreak);
        body.appendChild(answer);
        body.appendChild(tiles);


        // 4. listening to a keyboard click, keyup->waits for user to pressup after pressing down; keydown-> press down

        document.addEventListener("keyup", (e)=>{

            // alert(e.code);


            if(gameover) return;

            if(e.code>="KeyA" && e.code<="KeyZ")
            {


                if(columnsindex<columns){

                    let currentTile=document.getElementById(rowsindex.toString()+columnsindex.toString());


                // console.log( rowsindex, columnsindex, e.code);

                    if(currentTile.innerText == '')
                    {
                        currentTile.innerText=e.code[3];
                    }
                    columnsindex+=1

                }
            }
                else if ( e.code == 'Backspace')
                {

                    if( columnsindex>0 && columnsindex<=columns)
                    {

                        columnsindex-=1
                        let currentTile=document.getElementById(rowsindex.toString()+columnsindex.toString());

                        // console.log(currentTile)
                        currentTile.innerText='';

                    }
                }

                if( columnsindex==columns && e.code== 'Enter')
                {

                    // 5. check if the word is correct
                    check_correctness();


                    rowsindex+=1;

                    columnsindex=0;
                }

                if(!gameover && rows==rowsindex)
                {
                    gameover=true;
                    answer.innerText=word1 + ", Try Again Tomorrow";

                }

            }
        )

}

// 3. buildtile function

function buildtile(i,j){


    const tile=document.createElement('div');
    tile.classList.add("tile");
    tile.setAttribute('id',i.toString()+j.toString());
    tile.innerText='';


    return tile;
}
This is the function that gets executed on the load, Initially we are trying to create tiles by using buildtile function and later appending it to the tiles container. Later we are styling, adding information to the constants which we already initialized earlier. We add them to the body of HTML which can be accessed using the DOM. The buildtile function add the tile class and also sets id as the row and column index. This will make things easier for us in the long run, for now just hold on. To change the tiles text dynamically we are going to add an eventlistener to the document. This listens for the 'keyup' which means when a key is pressed and released up again. If the columns index is within the range of the columns we take the key pressed and place it in the tile innnertext. If the key pressed is a backspace we will check to see if the column index is not zero and if it isn't then we are going to remove the letter which was placed and replace it with empty string.
If the columnsindex is equal to the columns and enter is pressed we will check if the word enter by the user is the word of the day as per the computer or not. If all the rows and columns are over the user has lost. Then the answer will be displayed at the top after the horizontal line.
function check_correctness(){


    let correct = 0;

    // using data
    let word=word1;
    let letterindex;

    for (let c=0; c< columns; c++)
    {


        let currentTile= document.getElementById(rowsindex.toString()+c.toString());
        let letter=currentTile.innerText;


         // 6. if letter is matching the letter in the word.

        if( letter == word1[c])
        {
            letterindex=word.indexOf(letter);
            word=word.slice(0,letterindex)+word.slice(letterindex+1,word1.length)
            currentTile.classList.add("correct");
            correct+=1;


        }
        // 7. if letter is present in the word.

        // 8. if the letter is absent in the word.
        else
        {

            currentTile.classList.add("absent");
        }


        if(correct==columns)
        {
            gameover=true;
            answer.innerText=word1 + ", You win";
        }
    }

    console.log(word);

    for (let c=0; c< columns; c++)
    {

        let currentTile= document.getElementById(rowsindex.toString()+c.toString());
             letter=currentTile.innerText;

       if ( word.includes(letter))
        {

            console.log(word)
            currentTile.classList.remove('absent');
            currentTile.classList.add("present");
            letterindex=word.indexOf(letter);
            word=word.slice(0,letterindex)+word.slice(letterindex+1,word1.length)
        }
    }

}
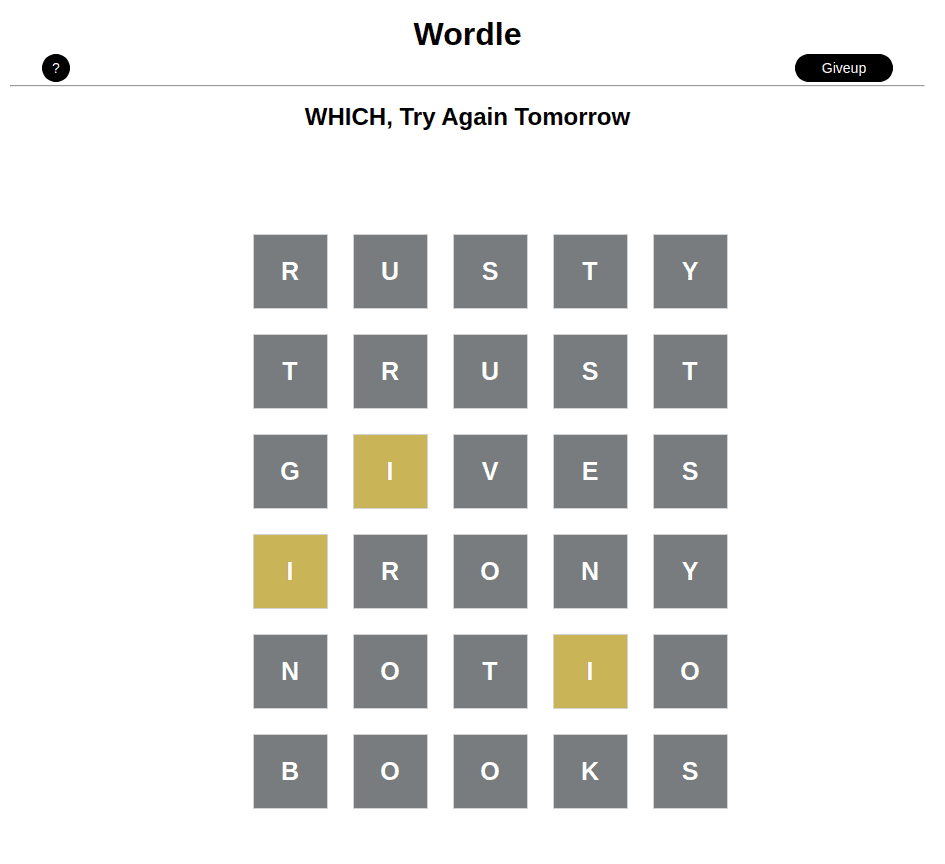
check_correctness is the most important function there is to this game. The logics in here are quite complex. We are taking each and every letter from the id we have given the tiles using DOM functions. If the letter matches the word at that column then we add the correct class and removes the letter from the word. Remember to not always play with data that you get, so use an extra variable to do operations and is the copy of the original data. If the letter is just present in the word we turn the tile to yellow by adding the present class to it and if it is not present we simply append the absent class. In doing so, we are checking the number of correctly matched tiles in a row. If all the tiles get matched then the user wins. In the second for loop we are checking for an edge case.
For example, the word of the day is 'squids' and I type 'sssss' then what do you think should happen? only 2 s should be highlighted and if the s are in the correct position then they turn green and the rest turn gray. But, we observe that except the one's in green all turn yellow, thereby confusing the user. We tackle the edge case because we removed the element if it's at the correct position.
giveup.addEventListener('click', ()=>{
answer.innerText= word1 + ", Try Again Tomorrow";
columnindex=columns;
rowsindex=rows;
})
qmark.addEventListener('click', ()=>{
const popup = document.createElement('div');
popup.className = 'popup';
const popupContent = document.createElement('div');
popupContent.className = 'popup-content';
popupContent.innerHTML=
`
<p> Rules: <p>
<br>
<ol>
<li> In wordle, the computer chooses a word everyday. </li>
<li> The user has to guess the word in six attempts. </li>
<li> Each word will be a five letter one. </li>
<li> The question mark icon(<em>that's me</em>) contains all the information related to the game.</li>
<li> The giveup button reveals the answer and the user can't continue anymore. </li>
</ol>
`;
const closeButton = document.createElement('span');
closeButton.className = 'popup-close';
closeButton.innerHTML = '×'
popupContent.appendChild(closeButton);
closeButton.addEventListener('click', () => {
document.body.removeChild(popup);
});
popup.appendChild(popupContent);
document.body.appendChild(popup);
})
The giveup button when clicked will displayed the correct answer on the screen and blocks the user from entering any text. The question mark button has rules which the user can refer to if they have any doubts. The popup has a close button which removes the popup and all this is added to the body of the HTML.
Game Pics
Gameplay