
Bomberman Game is an video game that originated in the 1980s. It has paylers with its explosive gameplay and strategic challenges. In this article, we will explain Bomberman Game and explore how to create this game using HTML and JavaSCript. By using the power of web technologies, we can bring Bomberman Game to modern browsers. Throughout this article at OpenGenus, we will explain the game mechanics, discuss the implementation of key features, and briefly discuss how we can build our own Bomberman Game.
-
Table of Contents:
- Understand the Gameplay
- Set up the HTML Canvas
- CSS Styling
- JavaScript Code
- Conclusion
-
Understad the Gameplay
To understand the Bomberman Game, we can first learn about the gameplay mechanics. Bomberman is a strategic maze-based game where the player controls a character known as Bomberman (or you can call the character whatever you wnat). The objective is to strategically place bombs to destroy obstacles, possible enemies, prevent dying from the explosion, and finally reach the exit.
The game is played on a grid-based maze, consisting of walls and destructible blocks. Bomberman can move horizontally and vertically, dropping bombs in the process. Bombs have their countdown timer before exploding, and the explosion and destroy the nearby blocks, enemies, or even the character themselves if they fail to escape the distance of the blast radius.
To make it more interesting, power-ups may appear when certain blocks are destroyed. These may provide temporary advantages, such as increased the radius of the explosion and additional bombs to enhance the player's abilities.
-
Set up the HTML
To start create the Bomberman Game, besides those tag like <html>, <head>, and <body> that is necessary for a html file, we can use the <canvas> element in HTML. This allows us to draw and animate graphics. First, we can define the canvas element in our HTML strucure and obtain the 2D rendering context using JavaScript. The canvas will serve as the game's development playground. We may draw the maze, characters, bombs, and other game elements.
-
CSS Styling
We will then use the <style> tag in the html file to styling the page. For example, this code uses CSS to style the body, and the whole canvas.
<style>
        html, body {
            height: 100%;
            margin: 0;
        }

        body {
            background: rgb(28, 26, 26);
            display: flex;
            align-items: center;
            justify-content: center;
        }

        canvas {
            background: white;
        }
    </style>
-
JavaScript Code
-Destructible Walls
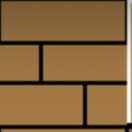
Destructible walls can be designed and built using a new canvas. Then, the destructible walls can be used on the main canvas. In this case, the destructible walls are the following shape.
   const destructibleWallCanvas = document.createElement('canvas');
   const destructibleWall = destructibleWallCanvas.getContext('2d');
   destructibleWallCanvas.width = destructibleWallCanvas.height = grid;

   destructibleWall.fillStyle = 'black';
   destructibleWall.fillRect(0, 0, grid, grid);
   destructibleWall.fillStyle = '#ab783a';

   destructibleWall.fillRect(1, 1, grid - 2, 20);

   destructibleWall.fillRect(0, 23, 20, 18);
   destructibleWall.fillRect(22, 23, 42, 18);

   destructibleWall.fillRect(0, 43, 42, 20);
   destructibleWall.fillRect(44, 43, 20, 20);
The code first create a HTML canvas element using the createElement method of the document object. Then, line obtains the 2D rendering context of the canvas. After that, the code sets the width and height of the canvas to the value of the grid variable. The fillStyle method sets the fill color of the rendering context to black. The fillRect method helps draw a filled rectangle on the canvas using the rendering context.
-Indestructible Walls
After these steps, a new canvas can be created to help design and develop the indestructible walls. For example, walls can be designed like the following.

The sample code can be:
    const indestructibleWallCanvas = document.createElement('canvas');
    const indestructibleWall = indestructibleWallCanvas.getContext('2d');
    indestructibleWallCanvas.width = indestructibleWallCanvas.height = grid;

    indestructibleWall.fillStyle = 'black';
    indestructibleWall.fillRect(0, 0, grid, grid);
    indestructibleWall.fillStyle = 'white';
    indestructibleWall.fillRect(0, 0, grid - 2, grid - 2);
    indestructibleWall.fillStyle = '#ab783a';
    indestructibleWall.fillRect(2, 2, grid - 4, grid - 4);
This piece of code's idea is similar to construct the destructible walls.
Then, the loop can be used to assign the destructible and indestructible walls to the canvas. For example, the following code is to help distribute the destructible and indestructible walls to the canvas. There are 85% of destructible walls in the canvas.
function generateLevel() {
        cells = [];

        for (let row = 0; row < numRows; row++) {
            cells[row] = [];

            for (let col = 0; col < numCols; col++) {

                if (!template[row][col] && Math.random() < 0.85) {
                    cells[row][col] = types.softWall;
                }
                else if (template[row][col] === types.wall) {
                    cells[row][col] = types.wall;
                }
             }
          }
     }
-Player
Then, the player can be built in the canvas. In the following code, the player is a circle, and start at the left corner position.

const player = {
    row: 1,
    col: 1,
    numBombs: 1,
    bombSize: 3,
    radius: grid * 0.35,
    render() {
        const x = (this.col + 0.5) * grid;
        const y = (this.row + 0.5) * grid;

        context.save();
        context.fillStyle = '#4d4fd6';
        context.beginPath();
        context.arc(x, y, this.radius, 0, 2 * Math.PI);
        context.fill();
    }
}
The code first sets up the property of the player. Then, it uses render to render the player in the canvas. The beginPath() method starts a new path in the rendering context. It marks the beginning of a shape to be drawn. The context.arc line creates a circular arc in the rendering context. It takes the x and y coordinates calculated earlier, the player's radius property, and defines the arc's starting angle as 0 and the ending angle as 2 * Math.PI, representing a full circle. The fill() method fills the current path in the rendering context with the previously set fill color.
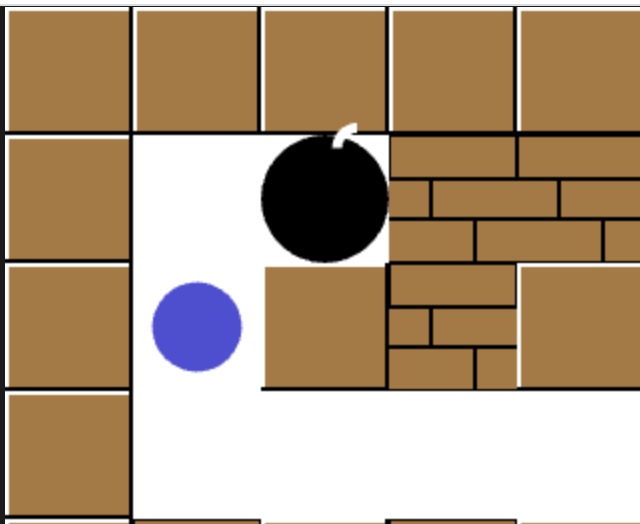
-Bomb and Explosion
After those set up, the next step would be design the bomb and explosion. The developer can set time for the explosion to take place after the player place the bomb. The developer can also determine the range of the explosion. In the following code, the bomb is designed to be a black circle, and it will explode after 3 seconds.
function Bomb(row, col, size, owner) {
        this.row = row;
        this.col = col;
        this.radius = grid * 0.4;
        this.size = size;
        this.owner = owner;
        this.alive = true;
        this.type = types.bomb;

        this.timer = 3000;

        this.update = function(dt) {
            this.timer -= dt;

            if (this.timer <= 0) {
                return blowUpBomb(this);
            }

            const interval = Math.ceil(this.timer / 500);
            if (interval % 2 === 0) {
                this.radius = grid * 0.4;
            }
            else {
                this.radius = grid * 0.5;
            }
        };

        this.render = function() {
            const x = (this.col + 0.5) * grid;
            const y = (this.row + 0.5) * grid;

            context.fillStyle = 'black';
            context.beginPath();
            context.arc(x, y, this.radius, 0, 2 * Math.PI);
            context.fill();

            const fuseY = (this.radius === grid * 0.5 ? grid * 0.15 : 0);
            context.strokeStyle = 'white';
            context.lineWidth = 5;
            context.beginPath();
            context.arc(
            (this.col + 0.75) * grid,
            (this.row + 0.25) * grid - fuseY,
            10, Math.PI, -Math.PI / 2
            );
            context.stroke();
        };
    }
The given code defines a constructor function called Bomb that represents a bomb in a game. When creating an instance of Bomb, the row, col, size, and owner parameters are used to initialize the bomb's properties. The bomb has a radius based on the grid value, and its alive property is initially set to true. The type property is assigned the value of types.bomb. The bomb has a countdown timer of 3000 milliseconds (3 seconds). The update() method updates the bomb's state based on the elapsed time (dt). If the timer reaches or falls below zero, the blowUpBomb() function is called, indicating that the bomb should explode. During the countdown, the bomb's radius changes between grid * 0.4 and grid * 0.5 based on the timer interval. The render() method is responsible for rendering the bomb on a canvas. It draws a filled circle representing the bomb and a fuse line using the context object, providing the visual representation of a bomb with an active timer.
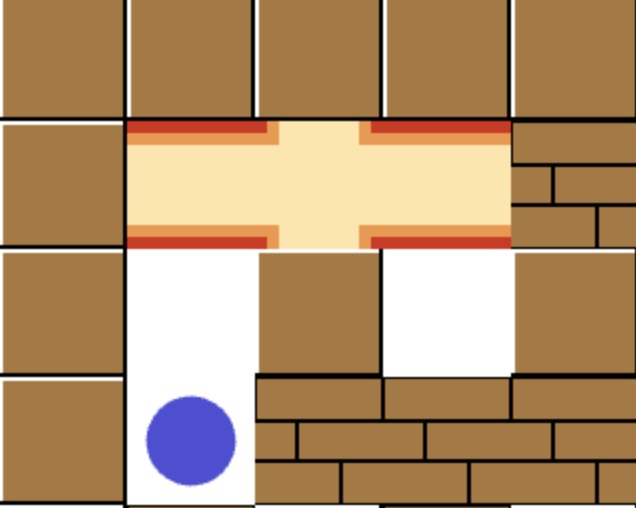
function Explosion(row, col, dir, center) {
       this.row = row;
       this.col = col;
       this.dir = dir;
       this.alive = true;

       this.timer = 300;

       this.update = function(dt) {
           this.timer -= dt;

           if (this.timer <=0) {
               this.alive = false;
           }
       };

       this.render = function() {
           const x = this.col * grid;
           const y = this.row * grid;
           const horizontal = this.dir.col;
           const vertical = this.dir.row;

           context.fillStyle = '#D72B16';
           context.fillRect(x, y, grid, grid);

           context.fillStyle = '#F39642';

           if (center || horizontal) {
               context.fillRect(x, y + 6, grid, grid - 12);
           }
           if (center || vertical) {
               context.fillRect(x + 6, y, grid - 12, grid);
           }

           context.fillStyle = '#FFE5A8';

           if (center || horizontal) {
               context.fillRect(x, y + 12, grid, grid - 24);
           }
           if (center || vertical) {
               context.fillRect(x + 12, y, grid - 24, grid);
           }
       };
   }
The provided code defines a constructor function called Explosion that represents an explosion effect in a game. When creating an instance of Explosion, the row, col, dir, and center parameters are used to initialize the explosion's properties. The explosion is initially set as "alive" with a timer value of 300. The update() method updates the timer, decrementing it by the time interval (dt). If the timer reaches or falls below zero, the alive property is set to false, indicating that the explosion is no longer active. The render() method is responsible for rendering the explosion on a canvas by drawing filled rectangles of different colors and positions, creating the visual effect of an explosion. The center, horizontal, and vertical variables control which parts of the explosion are drawn.
function blowUpBomb(bomb) {

    if (!bomb.alive) return;

    bomb.alive = false;

    cells[bomb.row][bomb.col] = null;

    const dirs = [{
        row: -1,
        col: 0
    }, {
        row: 1,
        col: 0
    }, {
        row: 0,
        col: -1
    }, {
        row: 0,
        col: 1
    }];
    dirs.forEach((dir) => {
        for (let i = 0; i < bomb.size; i++) {
        const row = bomb.row + dir.row * i;
        const col = bomb.col + dir.col * i;
        const cell = cells[row][col];

        if (cell === types.wall) {
            return;
        }

        entities.push(new Explosion(row, col, dir, i === 0 ? true : false));
        cells[row][col] = null;

        if (cell === types.bomb) {

            const nextBomb = entities.find((entity) => {
            return (
                entity.type === types.bomb &&
                entity.row === row && entity.col === col
            );
            });
            blowUpBomb(nextBomb);
        }

        if (cell) {
            return;
        }
        }
    });
}
The provided code defines a function called blowUpBomb that triggers the explosion of a bomb in a game. The function takes a bomb object as a parameter. If the bomb is not alive (!bomb.alive), the function immediately returns. Otherwise, it proceeds with the explosion process. The bomb's alive property is set to false, indicating that the bomb is no longer active. The corresponding cell in the game grid is set to null. The function iterates over predefined directions (up, down, left, and right) and for each direction, iterates bomb.size times. It calculates new row and column positions based on the direction and iteration count and retrieves the corresponding cell from the game grid. If the cell is a wall, the iteration is skipped. Otherwise, an explosion entity is created at the current position and added to the entities array. The cell in the game grid is set to null. If the cell contains another bomb, the blowUpBomb function is recursively called for that bomb. If the cell is occupied by any other entity, the iteration is skipped.
-Death of the Player and Reset
After the explosion, the player will die if they touch the explosion "fire". Therefore, there should be a function to check if the player hit the "fire" or not. If the player hit the "fire", what the consequence should be. In the following code, the player will return to the original position, and all the walls will be reset if they hit the "fire".
function resetGame() {
    generateLevel();
    player.row = 1;
    player.col = 1;
    entities = [];
}

function checkPlayerCollision() {
    for (let i = 0; i < entities.length; i++) {
        const entity = entities[i];
        if (entity.type === types.explosion && entity.row === player.row && entity.col === player.col) {
            resetGame();
            break;
        }
    }
}
The provided code defines a function called checkPlayerCollision that checks for collisions between the player and entities in a game. It iterates over the entities array, which likely holds various game entities. For each entity, it checks if the entity's type is an explosion and if its row and column positions match the player's row and column positions. If a collision is detected, the resetGame function is called, indicating that the game needs to be reset. The iteration stops after the collision is found, using the break statement.
-Restart the Game
If the player wants to start a new map from the beginning, they can click the 'restart' button on the right of the screen. Then, the player will return to the left top corner where they originally are and the map will be regenerated. The sample code is the following:
function resetGame() {
    generateLevel();
    player.row = 1;
    player.col = 1;
    entities = [];
}

function restartGame() {
    resetGame();
}
<button id="restartButton" onclick="restartGame()">Restart</button>

- Win State
The developer can design a win state for the game. In this sample, the if the player reach the right bottom corner of the map, they will win. There will be a green sign says "You win". The sample code is the following:
function showNotification(message) {
    const notification = document.createElement('div');
    notification.innerText = message;
    notification.className = 'notification';

    document.body.appendChild(notification);

    setTimeout(() => {
        notification.remove();
    }, 3000);
}
The provided code defines a function called showNotification that displays a notification message on a web page for a specific duration. When called with a message parameter, the function creates a new div element called notification and sets its inner text to the provided message. It assigns the CSS class name 'notification' to the notification element. The notification element is then appended to the document.body, making it a child element of the body. After a delay of 3000 milliseconds (3 seconds), a callback function triggers, which removes the notification element from the DOM using the remove() method. This effectively removes the notification from the page after the specified duration has elapsed.
Since there is a checkPlayerCollision function, there can be added a if statement to check if the player reach the right bottom corner.
if (player.row === numRows - 2 && player.col === numCols - 2) {
    showNotification('You win!');
}
CSS should also be used to style the notification.
.notification {
    position: fixed;
    bottom: 20px;
    right: 20px;
    padding: 10px 20px;
    background-color: #4CAF50;
    color: white;
    font-size: 18px;
    border-radius: 4px;
    z-index: 9999;
}
-User Input and Control the Character
After all these are set, the developer need to consider the buttom in the keyboard that the player can use to control the character in the game. Normally, the developer will use up, down, left, and right arrow to help control the direction of the character. They will also use the space buttom to place the bomb.
document.addEventListener('keydown', function(e) {
        let row = player.row;
        let col = player.col;

        if (e.which === 37) {
            col--;
        }

        else if (e.which === 38) {
            row--;
        }

        else if (e.which === 39) {
            col++;
        }

        else if (e.which === 40) {
            row++;
        }

        else if (
            e.which === 32 && !cells[row][col] &&
            entities.filter((entity) => {
            return entity.type === types.bomb && entity.owner === player
            }).length < player.numBombs
        ) {
            const bomb = new Bomb(row, col, player.bombSize, player);
            entities.push(bomb);
            cells[row][col] = types.bomb;
        }

        if (!cells[row][col]) {
            player.row = row;
            player.col = col;
        }
});
The provided code adds an event listener to the document for the 'keydown' event. When a key is pressed, the callback function is executed. Inside the function, it retrieves the current position of the player and assigns it to the row and col variables. Then, based on the value of e.which, it checks which arrow key or spacebar key was pressed. If an arrow key is pressed, it adjusts the row or col variables accordingly to move the player in the corresponding direction. If the spacebar key is pressed and certain conditions are met (the current cell is empty and the player hasn't exceeded the allowed number of bombs), it creates a new bomb object at the player's position and adds it to the game entities. The cell in the game grid is updated to indicate the presence of a bomb. Finally, if the new cell is empty, it updates the player's position to the new row and col values.
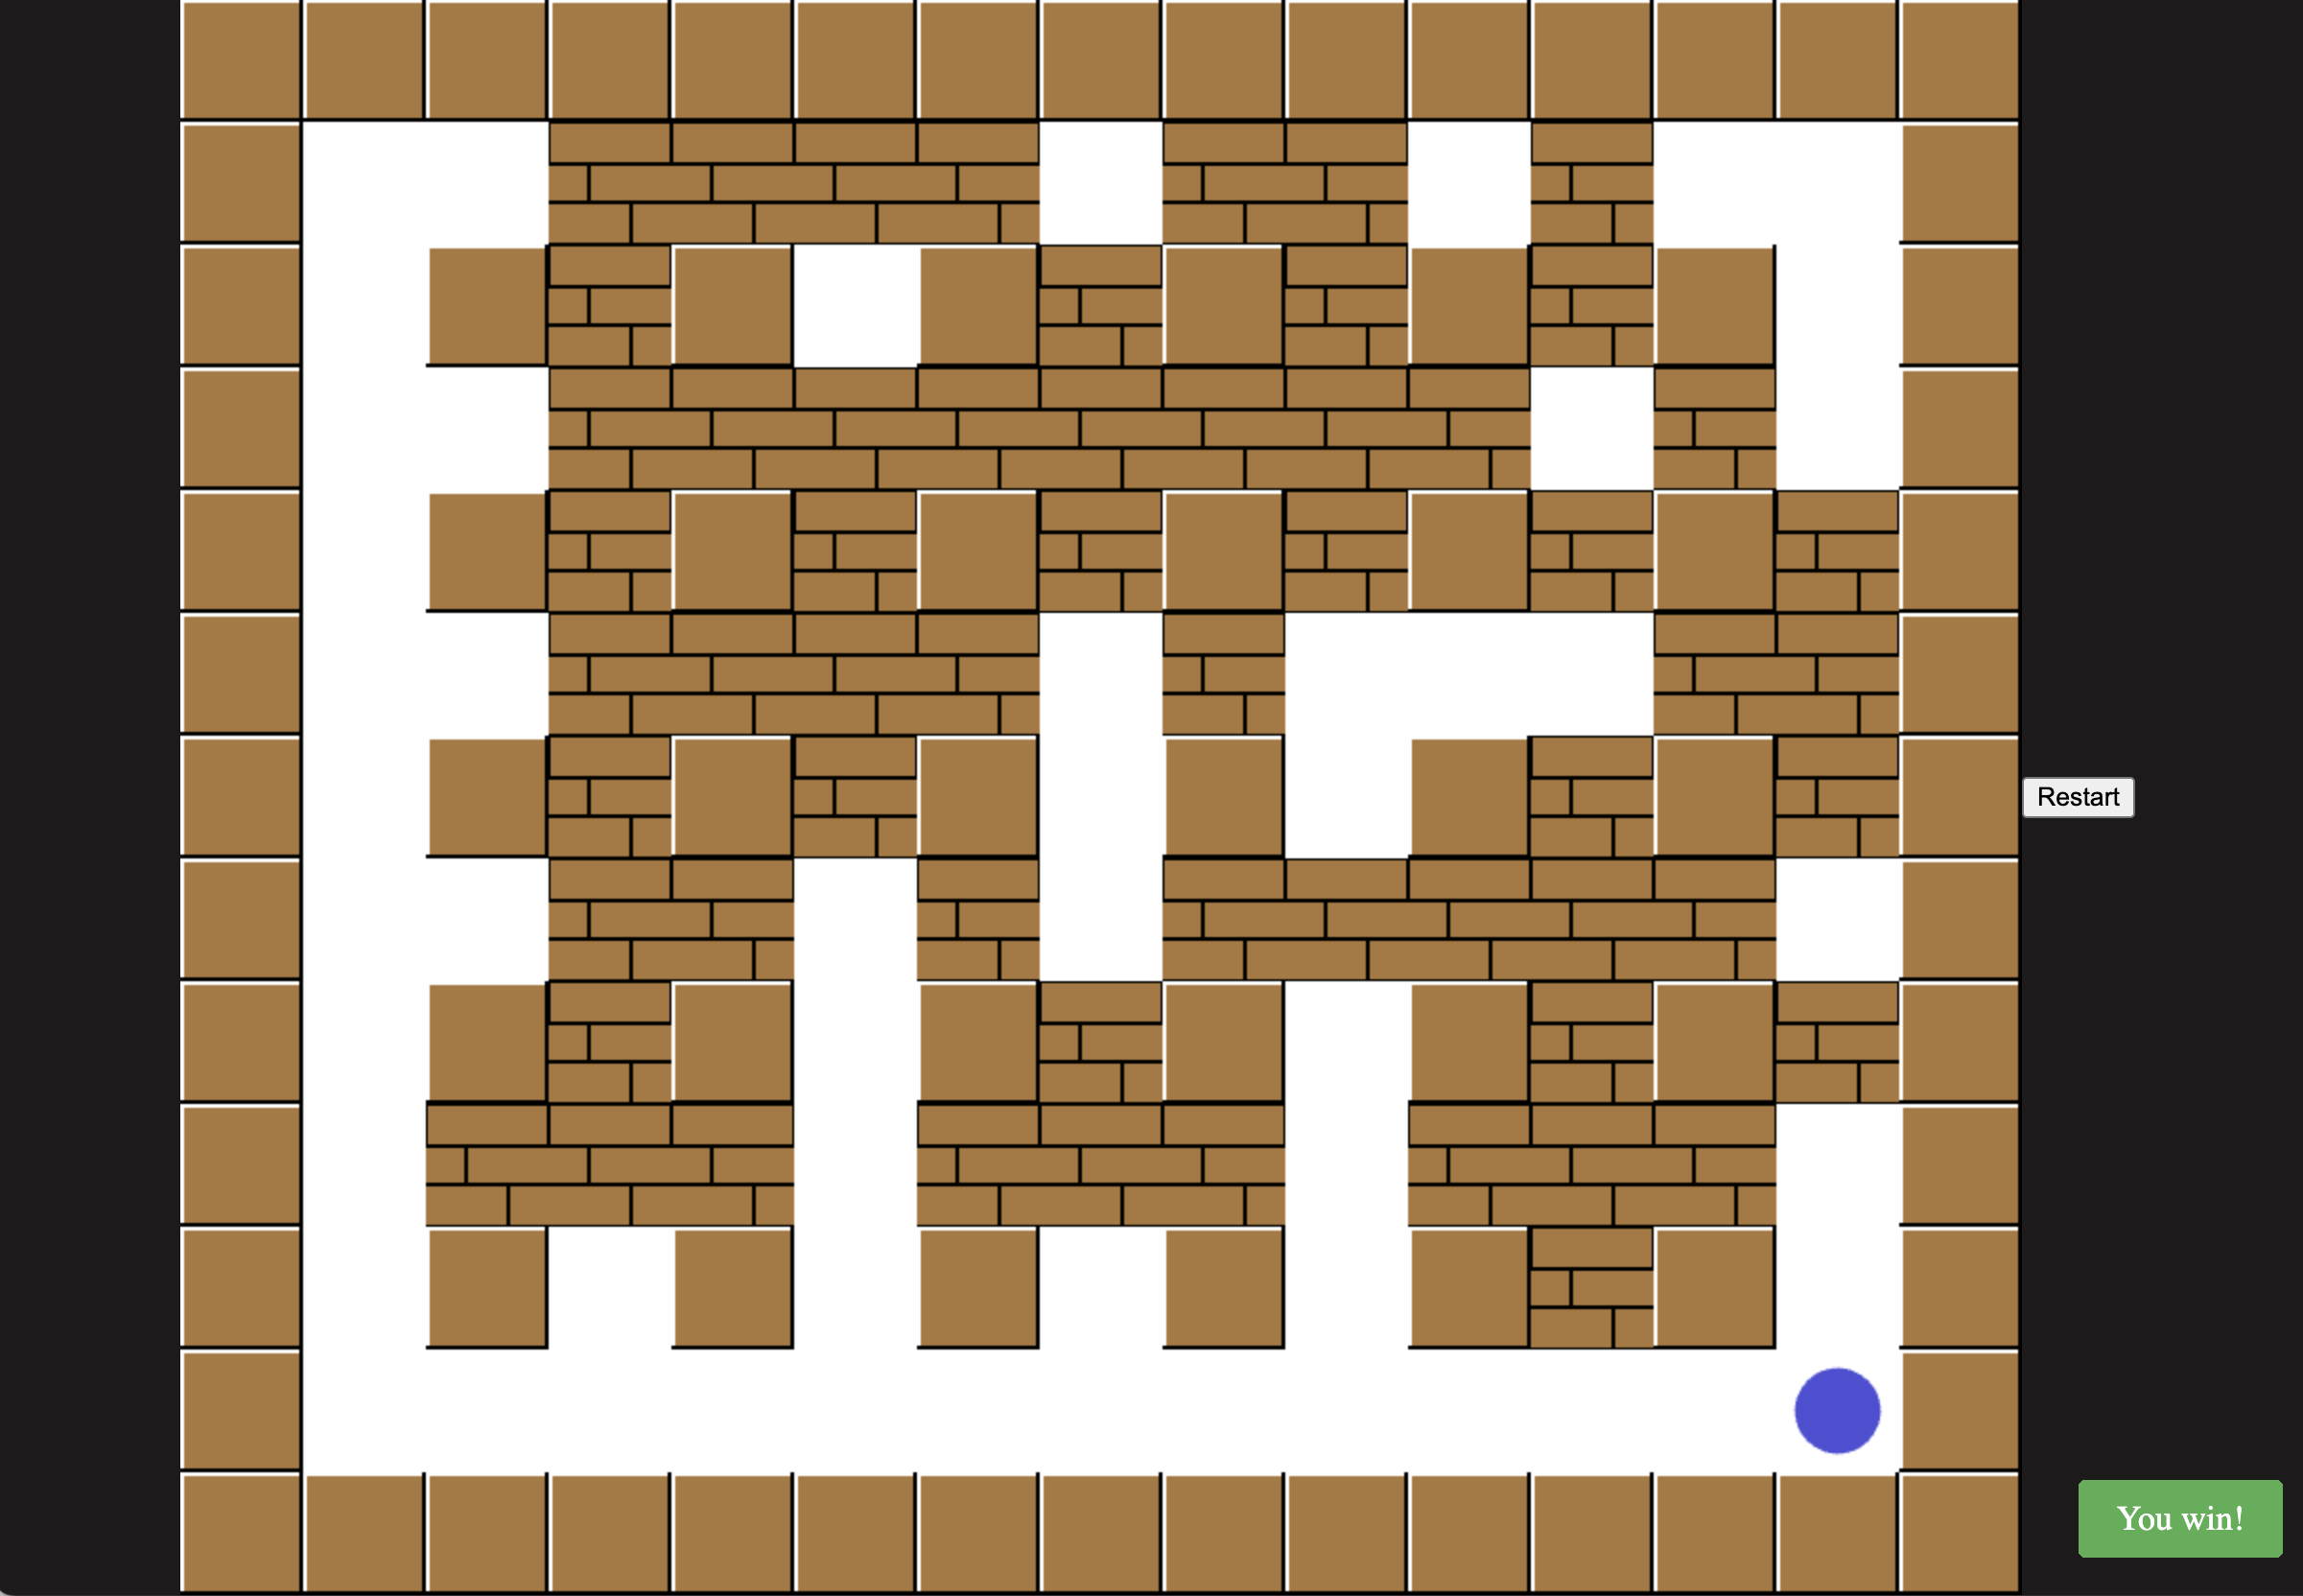
Then, this is a basic picture of what the game will look like:

Conclusion
Creating a Bomberman game using HTML and JavaScript is a challenging and rewarding endeavor. I personally do not have a lot of game development experience though I have experience with HTML and JavaScript when I started developing webs. It is a rewarding experience for me as I got to touch about games. By learning from the steps outlined in this article, you can embark on an exciting journey of game development, learning important concepts such as canvas rendering, game logic implementation, player input handling, and collision detection.
Through the combination of strategic gameplay, dynamic visuals, and immersive audio, your Bomberman game will capture the essence of the classic while offering a fresh and modern experience. So, gather your coding skills, unleash your creativity, and get ready to bring the explosive fun of Bomberman to life on the web.